
You have perhaps heard that JPEGS are 8-bit files, while RAW files are up to 16-bit files. That gets repeated a lot, and it one of the justifications for encouraging everyone to shoot Raw files. But you may wonder what impact this actually has on our pictures. What does bit-depth even mean?
If you’re like me, you don’t really care much. You glean that 16-bits must be better than 8-bits, so when possible work with 16-bit files. More = better. You may even understand how the number of available colors decreases as you start dealing with darker shades. But it may not seem like something to worry about much.
It turns out that understanding this issue will pay dividends to your photography. For example:
- Understanding bit-depth may help when you are choosing between cameras to purchase. Some cameras create files with more bits than others.
- It matters when we talk about color. In fact, bit-depth is what determines the number of colors available.
- Bit-depth determines the maximum dynamic range of your camera.
- Understanding bit-depth will also help demonstrate how to expose your photos. There is a technique called “Expose to the Right” that results directly from the concepts in this article.
This issue of 8-bit vs. 16-bit files will come up in other articles at Outdoor Photo Academy, so I want to have an article explaining the basics. I am sure the topic appears tedious, but I promise to make this topic as readable and simple as possible. In the end, you’ll have a valuable insight into the technology you are using that will improve your photography.
What is a Bit Anyway?
A file created by a camera is made up of pixels. But not all pixels are created equal. Each pixel is defined by how many bits it can carry within it. So what then is a “bit”?
Think of a bit as a switch. You can think of it as on/off switch, or a 1/0 binary switch, or a Canon vs. Nikon switch. It doesn’t matter what kind of switch. All that matters is that a bit is an either/or proposition, meaning that there are 2 possibilities in every bit. The more bits you have within each pixel, the more possibilities you have.
8-Bit Files
Next, you need to understand how bits are measured. The way you will measure bits is 2 to the power of however many bits you have. The 2 comes from the 2 possibilities in each bit. In the case of an 8-bit file, you have eight switches. The number of choices is 2x2x2x2x2x2x2x2 or 28. To save you from having to do the math, that comes to 256.
But we’re not done yet. Because there are 3 color channels, we have to account for that. We generally use the RGB colorspace, so there is a Red channel, a Green channel, and a Blue channel, which collectively creates our colors in digital photography. When we say a file is an 8-bit file, that means there are 8-bits per channel. That 256 figure means there are 256 possible shades of red. And 256 possible shades of green. And 256 possible shades of blue.
Therefore, to get the total number of colors in an 8-bit file, we have to multiply 256 x 256 x 256. That comes to 16,777,216 possible colors in an 8-bit file.
Your first reaction upon reading that might be, ” With all those colors, why do I even care about a higher bit-depth? Isn’t 16.7 million colors enough? How many could I possibly need?” Before jumping to any conclusions, read on.
16-Bit Files
Before we go into the differences in 8-bit files and 16-bit files, let’s quickly look at the number of colors in a 16-bit file. Again, to determine the number of colors, we measure the number of possibilities by 2 to the power of the number of bits, which in this case is 16. So here that will be 2x2x2x2x2x2x2x2x2x2x2x2x2x2x2x2 or 216. Again, to spare you the math, the total is 65,536. That means there are 65,536 shades each of Red, Green, and Blue. Because there are 3 color channels, our total available colors comes to a whopping 281 trillion and change.
Why Does 16-Bit Matter?
While a 16-bit file obviously has a lot more color combinations than an 8-bit file, it still may not be clear why this matters. After all, you still have 16.7 million colors available in 8-bit files.
The reason why 16-bit color matters has to do with the way colors are distributed across the spectrum. Here is the key: Of the available colors, a full half of them go to recording the top 50% of exposure values. That probably doesn’t sound so bad, but it is. The top 50% of exposure values in a photo is just one stop of light. Remember that a stop of light is a doubling or a halving of light.
And it get worse for 8-bit files. The number of available colors goes down by 50% for each stop thereafter. Each time you move one stop darker on the tone-scale, you get half as many tones to work with. Check out on the 8-bit chart what happens as you go down:
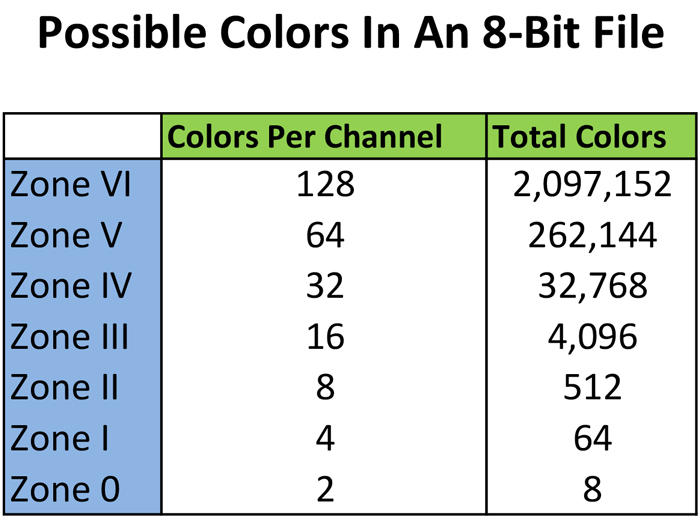
[box type=”info” style=”rounded”]If you are unfamiliar with the Zone system, it is a system for measuring tones and exposure values used primarily back in the film days. It was made famous by Ansel Adams and Minor White. The basic premise is simple: each stop of light is a Zone and you just have 11 Zones that move from black to white. The scale starts at Zone 0, which is pure black, and the numbers go up with each stop of light to Zone 10, which is pure white. Zone 5 is middle grey. For now, just think of each Zone as a stop of light.[/box]
In particular, check out the number of available colors for the bottom few stops of the chart above. At Zone 0, you only have 2 shades of each color, for a total available spectrum of 8 colors. That’s not good, is it? So the upshot is that in an 8-bit file you have plenty of colors at the lightest levels at your picture, but you have precious little to work with at the dark end. That is the downside of 8-bit files.
The primary enemy here is banding. If you have too few colors to work with, those colors will have harsh transitions. While that likely isn’t happening in Zone VII with over 2 million colors, it can definitely happen in Zone I with only 2 available shades per channel or 8 colors total. In addition, assuming you process your photos, you want to give yourself what is called “editing headroom.” This will avoid your histogram being pulled apart as you edit your pictures (particularly as you add contrast and pull the histogram in different directions).
The Benefit of 16-Bit Files
16-bit files fix this right up. Check out the chart reflecting available colors at 16-bits of data:

Even at the lower lightness levels, you have plenty of colors to work with. For example, in a 16-bit file even at Zone I you have 512 available shades within each color channel, for a total available spectrum of over 134,000 colors. That is a lot of different tones to work with. In fact, that is more shades than we get from an 8-bit file even at its brightest. Even at the darkest shades there are plenty of colors, which should lead to smoother transitions and less possibility of banding in our pictures.
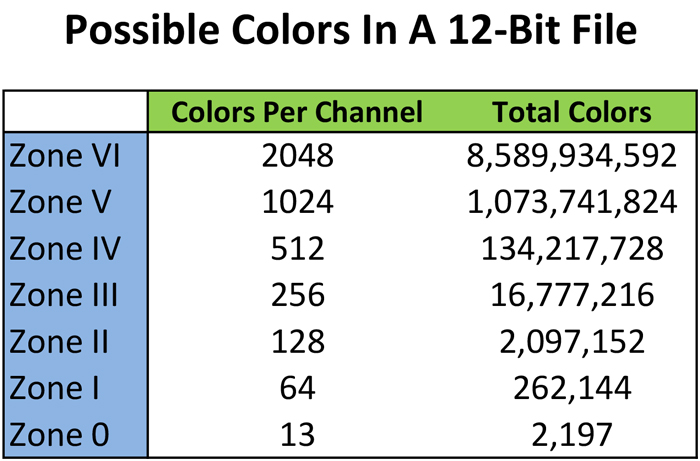
Additional Example: 12-Bit Files
I have a third chart below, and that is for files with a bit-depth of 12. I am providing this because many cameras are only capable of creating 12-bit files. Most cameras with full-frame or APS-C sensors create 14-bit files, and most cameras with Micro 4/3 and compacts create 12-bit files. I am just showing the 12-bit file because the point is to show that even at 12-bits, the number of tones is still exponentially better than an 8-bit file. It is even better for a camera that creates 14-bit files.
Applying Bit-Depth
Before reading this article, without knowing anything about technology, you might have surmised that a 16-bit file is better than an 8-bit file. The point of this article is not so much to make the point that 16-bit files are better, but to show how much they are better. 16-bit files have exponentially more color gradations.
How do you take advantage of this? First and foremost, by shooting Raw files. Setting your camera to a Raw file will cause it to use the highest bit-depth available to the camera. The camera might not be capable of creating 16-bit files (most cameras are either 12-bits or 14-bits) but it will get you the maximum number. If you shoot in Jpeg, you are starting off with an 8-bit file.
Second, you want to avoid darker tones when you can. As we saw above, lighter colors have exponentially more tones to choose from. Keeping things bright (but not blown out!) will give you the maximum room to work with your photos without banding becoming an issue. It will also help keep noise under control. When you hear photographers preach “expose to the right,” this is what they are talking about. They are saying to expose your photos so that the tones appear on the right (bright) side of the histogram. You can darken things up later to achieve the look you want.
When you are out shooting, you might also consider exposing normally, but bracketing your photos. This means that you set your camera to take 3 photos instead of 1, with one exposed normally, one underexposed, and one overexposed. In this way, you will get the benefit of having the normally exposed photo that looks the way you want it, but you will also have a brighter photo in case the darker tones of the normally-exposed photo are problematic.