
You need very few filters in modern digital photography. One you should get, however, is a polarizing filter. Why? They just make your photos look a lot better coming out of the camera in many situations. They are a simple way to:
- make the skies in your pictures a deeper, richer blue
- make certain colors in your pictures look more saturated
- eliminate glare and
- eliminate unwanted reflections
You will be surprised at how much better this little filter makes your pictures look. Let’s take a look at how they work and how you can get the most out of them to improve your photographs.

How Do Polarizing Filters Improve Your Photography?
First, without worrying about how polarizing filters work for the moment, let’s just take a closer look at their effects.
Primary Use
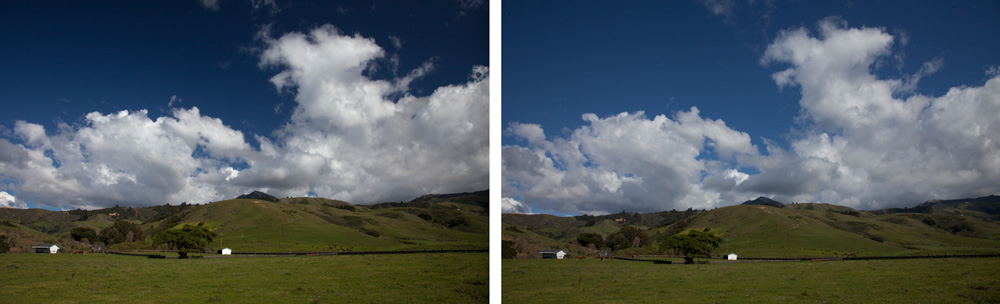
The primary use of polarizing filters is to make the color of the sky in your picture a deeper, richer blue. When you put the filter on your lens near the middle of the day, it will invariable have this effect on the sky.
To demonstrate this effect, take a look at the two photos above. The one of the left was taken with a polarizing filter, and the one of the right was taken moments later without a polarizing filter.
As you can see, the sky in the photo on the left taken with a polarizer is a much deeper blue than the picture taken on the right without a polarizer.
Secondary Uses
Although making the sky bluer is the most common use of a polarizing filter, they have other uses as well. Here are a few:
- Polarizing filters cut down on glare. If you are a fisherman, you have probably purchased polarized sunglasses to cut down on the glare from the water. The same effect occurs in photography. If there is an object in your frame that is causing glare, the polarizer filters out that light and thereby cuts down on the glare, if not removing it altogether.
- Polarizing filters add saturation to some colors. Actually, the filter may make your entire photo appear more saturated, but that is partially because colors appear more saturated when slightly underexposed. Highly reflective colors tend to appear more saturated if you have a polarizing filter on your lens because the filter reduces the reflective light and shows the underlying color.
- Polarizing filters will also cut down on reflections. If you have a photo with glass or water that you don’t want to reflect, use a polarizer to reduce or eliminate it. This works well when you face reflections in windows and puddles.
- A polarizer will also do double-duty as a mild neutral density filter. Neutral density filters cut down the amount of light coming into your camera. While that is not the intent of a polarizing filter, it is one of the consequences (see below). You can use that consequence to your advantage when you find you need a little less light coming into your camera.
Any one of these benefits will justify the purchase and use of a polarizing filter.
Downsides
Is there are downside to using a polarizing filter (besides the actual cost in dollars)? Well, yes. The main one is that it will cost you some light.
If you look at the face of the polarizing filter, you will notice that it is dark, so it might come as no surprise that is causes less light to get into your camera. Most polarizing filters will cost you between 1 and 2 stops of light.
What does that mean to your photography? It means if you are shooting with, say, a shutter speed of 1/120 of a second, if you increase the exposure by 2 stops to offset the use of a polarizing filter, it will put your shutter speed at 1/30 of a second (since a stop of light is a doubling of light, a 1-stop offsetting increase puts the shutter speed at 1/60 and the second stop/doubling puts it at 1/30). That slow of a shutter speed might introduce some camera shake into the picture and cause it to be blurry. Of course, you could also make changes by increasing the size of the aperture (but that would decrease your depth of field) or by increasing the ISO (but that could introduce digital noise into the picture).
Polarizing filters work best in the middle of the day. Therefore, there is usually a lot of light to work with when you use your polarizer and the reduction in light will usually not be a problem. The decrease in light does mean that you should not leave your polarizing filter on your lens all the time. If you are shooting in a low-light environment, not only will the filter have no effect, but the reduction in exposure will be significant and could detrimentally affect your pictures.
How to use Polarizing Filters
Most polarizing filters (and any polarizing filter that you will want) are circular polarizing filters. That means they screw on to the end of your lens.
The key to polarizers is to know that when you attach the filter to the end of your lens, you are not done. The filter is designed to twist around your lens. The effect of the filter increases or decreases depending upon how you have it turned.
Aim your camera at the sky and slowly turn the filter until the blue in the sky is at its darkest. You may have to turn it back and forth a few times to get it right. You do not need to be precise though – just twist it until the sky generally looks darkest. If you set the filter in this fashion, it will provide you with the maximum effect.
Some people find that the darkest setting is slightly too much for them. So there may be a bit of trial and error before settling on your particular preference. On your first use of the filter, it is a good idea to take a few pictures of the exact same scene with the exact same settings, while varying the strength of the polarizing filter. You can then compare them on your computer later and decide which one you like the best.
Another thing to watch out for when using polarizing filters is the orientation of your camera. If you set up your polarizing filter so that the sky is at its darkest while holding the camera to take a standard horizontal picture, it will all change when you tilt your camera to take a vertical picture. Your turning of the camera turns the filter as well. You will need to reset the filter by twising it whenever you turn the camera.
When Polarizing Filters Do Not Work
Polarizing filters work best when the sun is at a right angle to the camera. That means the effect is the most pronounced at midday, when the sun is directly overhead (or nearly overhead). We will discuss why in a moment. For now, it is important for you to know that polarizing filters will not have much, if any, effect when the sun is low in the sky. Do not use the polarizing filter early or late in the day. You will get the downside of the filter (restricting light into your camera) without any benefit.
In addition, do not use a polarizing filter on a super-wide angle lens. Polarizing filters work by filtering out light from certain directions. When you use a wide angle, some portions of the scene might be directly into the sun, while others might be as far as 90 degrees to the sun. Therefore, the polarizing filter will cause different parts of your scene to be exposed differently. The result is likely to be ugly dark splotches in your picture.
How Polarizing Filters Work
Now that you understand the effects and how to use a polarizing filter, it is time you understood how they work. This will help you better understand when to use them and when not to use them. Rather than get into the science, I want to offer an analogy that I think might help you more.
Think about polarizing filters like vertical blinds that you may have seen hanging over sliding glass doors. If you are not familiar with these blinds, they are vertical strips of material that hang in a line in front of the glass. When light from the sun comes in the glass door from an angle, the blinds catch the light. The blinds stop direct the focused light of the sun from entering your home, but rather reflect a certain amount of diffused light inside. The result is that you get the diffused rays of the sun to brighten your home without the harsh direct sunlight.
Those blinds work great when the sun is at an angle to the doorway. The do not work so well when the sun is directly facing the doorway. In that case, the light comes straight on through (unless you close the blinds, but let’s not worry about that, since it doesn’t apply to polarizers, which cannot open and close). The point is that direct sunlight comes through the blinds without being stopped and the blinds have little effect.
Polarizers work in pretty much the same way. They are basically pieces of glass constructed as strips, and each strip has edges (which you cannot see or feel, but they are there). When you put the filter on your lens, it restricts the light that is allowed to come into your camera. Specifically, the edges of the strips of the filter allow light in from certain directions. When you set the filter so that the strips run vertical across your lens and the sun is at an angle (high in the sky), the sunlight is reflected into your camera. The result is diffused rays of sunlight, as opposed to harsh direct sunlight. As we saw above, this can have great effects for your pictures.
But conversely, just like vertical blinds that don’t stop the sun directly facing them, a polarizer will not have any effect when the sun is low in the sky. They require having sunlight hit them at an angle to work properly.
Which One to Buy
Now that you know how polarizers work, you will probably want to buy one. Which polarizing filter should you buy? That is a difficult question.
I love a bargain as much as anyone, but when it comes to something that is going over your lens and direct affects the optics of your pictures, you should not gamble. Therefore, you should not buy a super-cheap polarizing filter. In the context of polarizing filters, I define super-cheap as anything under $100.
But that doesn’t mean you should run out and buy the most expensive polarizing filter you can find. You will see polarizing filters that cost in excess of $400. As you might expect, there are photographers who swear by these items, and I’m sure they work very well. But I have never seen any evidence of a significant increase in quality. As a result, I recommend you stick to filters in the range of $100-250. These seem to offer good quality without too high a price tag.
Within that range, you will find a number of polarizing filters. There are several made by B+W in that range and, in fact, the one I use is the B+W C-POL circular polarizer. I can tell you that it has always worked well for me. I have not, however, done side by side comparisons with other filters, so I cannot tell you whether another might be slightly better. I frankly don’t see how one would be significantly better.
Mimicking the effect in Photoshop and Lightroom
It used to be said (and sometimes still is) that a polarizing filter created the one effect that you could not replicate in Photoshop. As to the primary purpose of polarizing filters (making the sky a deeper, richer blue) that is no longer true, if it ever was.
In both Photoshop and Lightroom you can target the blue tones of your picture and make them deeper without making the white cloud or other parts of your picture darker. I walk you the process here. I will do so using Lightroom, although you can go through the same process in the Adobe Camera Raw screens in Photoshop or Photoshop Elements.
Open your picture in the Lightroom Develop module. Then scroll down to the HSL/Color/B&W group of controls. You will see a group of sliders for various colors. One of these sliders is Blue, and you will pull it to the left to make the blue tones in your picture darker.
But don’t do that yet! First, above the sliders for the various colors, you will see selections for hue, saturation, and luminance. Luminance refers to the brightness or darkness of colors. Make sure that luminance is selected.
Once that is selected go down to the Blue slider and pull it to the left. As you do so, watches the blues in your sky get darker and deeper blue.
Summary
Polarizing filters are one of the few filters you will want in your bag. Buy a good one, but don’t break the bank. Keep it in your bag – not on your lens – because it costs you 2 stops of light. But it really comes in handy when you want to capture a blue sky or reduce glare or reflections. And don’t forget to twist it to its darkest setting!
Great article, Jim. Brought out some things I didn’t know.
Great! When writing about something many people already know about, the worry is that you won’t be adding anything new. So I’m glad to hear that.
Hi Jim very new to taking pictures Love the pictures. There great. Don’t know anything about polarized filters. Is the one you used is it a color filter.
Love to find out. Thanks rick
Sorry I should have clarified that. They are dark, almost black filters with a bluish tinge. They will not change the colors of your image (except as mentioned in the article) though. Hope that helps. If you have any other questions, just let me know.
Thanks Jim that helps. I’m headed to punta cana april 6. Want to take some great pics. I bought a Nikon d7000 about a month ago any great suggestion or tips. Do you think I should use a polarize filter for the beach scenes. I’ve read all your articale. Great advice.