

When you have ugly bands of color in your picture, it is referred to as “banding.” It occurs where you have large portions of a single color in your picture, usually a dark color. For the outdoor photographer, that almost always means it occurs in the skies. Since we frequently have skies in our pictures, it is worth spending some time understanding how to avoid this problem.
What Is Banding?
Banding occurs where the transitions from one tone to another are uniform and harsh, such that the transition is visible. In explaining what it is, let me first explain what should happen (i.e.what happens when there is no banding).
Areas in your picture that appear to you as one color are usually the result of lots of slight deviations in color. Your camera picks up thousands and thousands of colors. The change in color from, say, a blue tone to a slightly darker blue is usually undetectable. The transitions are so slight from pixel to pixel that the effect is a nice smooth transition. You don’t see a harsh line, just a gradual transition.
However, in some situations, the change in colors is more abrupt. The abrupt change shows up as streaks in your picture. Those streaks are what is called banding. Why do these harsh transitions happen? Because sometimes there just aren’t enough colors available to your camera or computer to create those nice smooth transitions. When there aren’t enough colors, the steps between colors get wider. That’s the banding you see.
How to Avoid Banding
We’ll talk about how to fix banding in a minute. But first let’s see if we can avoid it in the first place. Since banding is partially a function of available colors, the first thing we should look at is maximizing the number of colors available in our pictures. Is it possible to increase the number of colors you have available to your camera in an effort to avoid banding? Sort of.
Does the Camera Matter?
It is possible – but, frankly, highly unlikely – that a different camera would help you avoid banding. Some cameras can recording more colors than others. Check the bit depth of your camera. Common bit depths are 8-bit, 12-bit, and 14-bit. I have described the differences in this article, but the short version is that the higher the bit depth the more colors the camera can show.
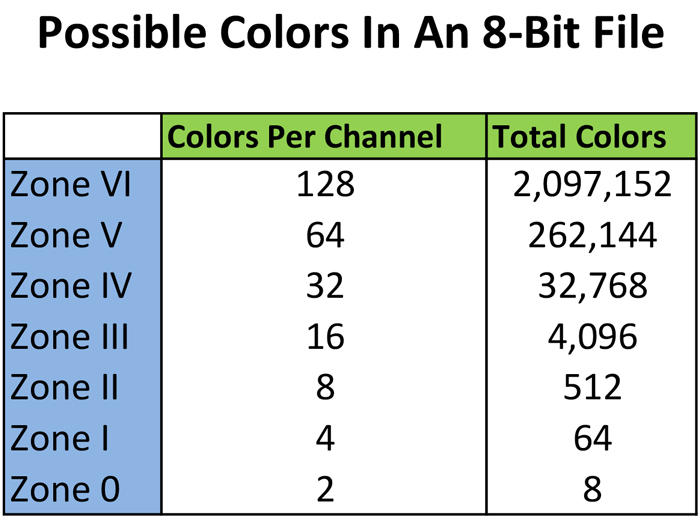
There are still a lot of colors in 8-bit files, it is still important to maximize the number of bits you use. This is especially true when you are talking about darker tones, because the number of colors available isn’t spread evenly across the spectrum (most of the colors available to the camera are at the bright end). There are actually very few colors available when you get toward the darkest tones. This is why banding occurs more often in darker portions of images – there are less colors available.
So the point here is to check the bit depth of your camera. But odds are there is no issue here. Most cameras these days are 14-bits. Some compact and mirrorless cameras will be 12-bit, but even that is still ok.
Maximizing Available Colors to Avoid Banding
Of course, you need to make sure you are getting the maximum number of colors your camera can obtain. You do that by shooting in your camera’s RAW format. You should be doing that anyway. RAW files will maximize the camera’s bit depth, thereby giving you the most colors available in your picture. On the other hand, if you shoot JPEGs, the number of colors will be limited. JPEGs are only 8-bit files, which means less colors available. So if your camera is creating JPEGs instead of RAW files then you are costing yourself some colors and increasing the odds that banding occurs in your pictures.
At the capture phase, there is one other thing you might want to try if you are worried about banding, and that is slightly overexposing your pictures if you think some banding might appear. This is referred to as “exposing to the right” because by overexposing the picture you are pushing the majority of the tones to the right side of the histogram. I confess that I have not tested this so I cannot swear this works to avoid banding. However in theory it should. If there are indeed more colors available in the brighter tones then it stands to reason that brightening the image would give you more colors to work with and reduce the cause of banding.
Avoiding Banding – The Real Culprit
Most of the time, banding is actually self inflicted. That is, the picture comes out of the camera looking ok but then we go to work on it in Photoshop or Lightroom and we manage to add some banding. We push and pull on the colors and then banding that would otherwise only be viable to a pixel peeper becomes obvious. So, when it comes to the cure, we should start by remembering to do no harm.
Be careful when you edit. If you see banding, back up and reduce the edits you have applied. That is the number one way to eliminate banding. But if you still have a problem that you want to fix, read on.
How to Fix Banding
Now we need to talk about how to fix banding. It would be nice if we could somehow cram more colors into the darker portions of our images, but we can’t. Therefor the fix is to disguise it.
Your eye picks up banding partially because of the uniformity of the change. The bright line is like a beacon to our eyes. So what we need to do is break up that uniformity. We do that by inserting some randomness into the offending area of the picture. This is accomplished either by inserting some noise or adding random spattering of your colors. You may under up using both techniques, depending on the situation. Both techniques require Photoshop, and below are the steps for doing them.
Adding Noise
As you may be aware, digital noise is random artifacts that appear in pictures. You generally don’t want it in your pictures, and many of us spend a lot of time and effort getting rid of it. So, while this may seem akin to inviting your sworn enemy to your home for dinner, you can take advantage of the randomness of digital noise to add it where there is banding. Here are the steps for doing so:
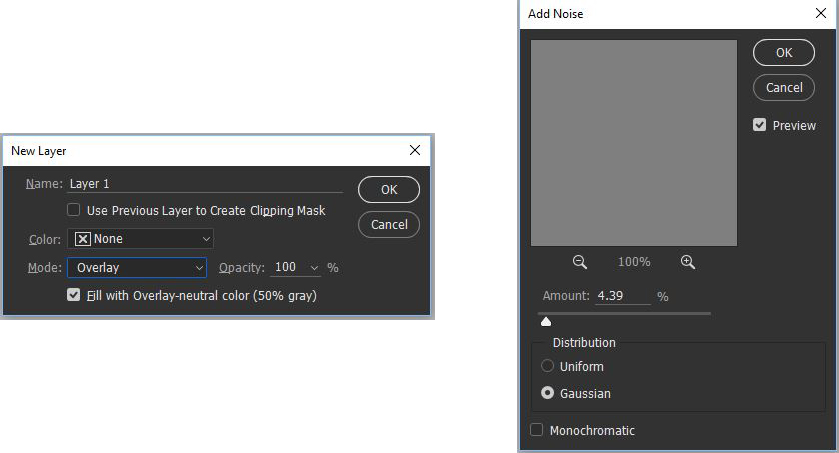
- Create a new layer. This will just be a grey overlay where you will ultimately add the noise. Press Ctrl+Shft+N, and in the resulting box that pops up, select Overlay as the Mode, then check the box at the bottom for Fill with Overlay-neutral color (50% gray). Click OK.
- Add the noise. Select the Add Noise filter by clicking on Filter > Noise > Add Noise. In the box that pops up, choose the amount of noise you want to add (start with a default in the range of 3-5%). In the Distribution choice at the bottom of the box, choose Gaussian.
- Mask it off. If you don’t do anything further, you will have added noise everywhere in your picture. That would be bad. So now you should add a layer mask to remove the noise everywhere that you don’t want it. If you aren’t familiar with masks, click on Layer > Layer Mask > Hide All, which will hide the effect everywhere (note the black box that was added to your layer). Next, select your Brush tool (press B), make sure the color is set to white (press D, which stands for default). Now just paint in the area with the banding where you want to add the noise.
This approach above involves adding noise to the image as a whole. One addition to this approach is to add the noise to just one color channel. If your banding occurs primarily in one color, you might check the color channel to see if you can limit where the noise is applied.
Applying the Spatter Filter
The next technique is to use something call the Spatter filter. This is an old filter that has essentially been discontinued by Photoshop. Because it is no longer supported, it hasn’t been updated to work on 16-bit files. It is actually the preferred method, but because the filter only works on 8-bit files, that’s the only time you can use it. So, if you have an 8-bit file, here are the steps for applying the spattering:
- Create a New Layer. Select the offending portion of the sky of your image and then create a new layer (Ctrl+J).
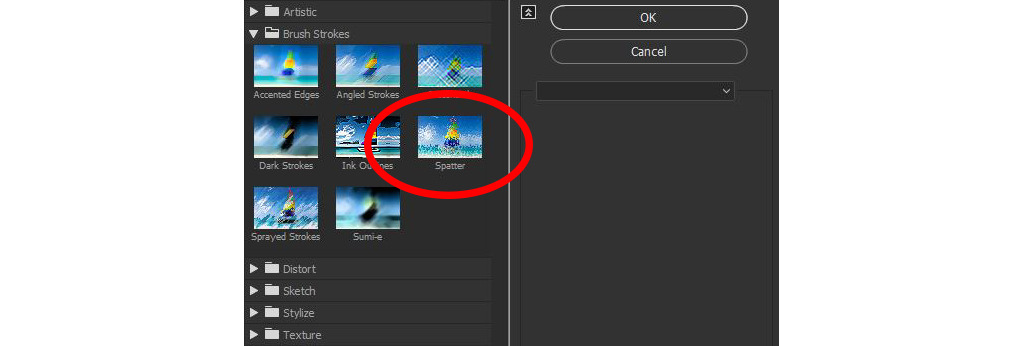
- Add the Spatter. Next go to the Filter Gallery (Filter > Filter Gallery) and find the Spatter filter (it us under the Brush Strokes options. Click on it and some options will appear to the right. Push the Spray Radius all the way to 25. Pull the Smoothness down to 1.
- Mask as needed. Make sure you are only applying the Spattering where you want it by adding a layer mask. Use the same steps as in the previous technique.
Avoiding and Fixing Banding
Now we’ve covered how to avoid banding and how to fix it when it occurs. But how should you go about dealing with this issue in your day to day workflow? That depends on a lot of things, including what you’ll be doing with your pictures. When if comes to avoiding and fixing banding in your photos, there are essentially three ways to go about it, which I’ll call the Light, Moderate, and Nuclear options. Let’s conclude by walking through these options:
- Light: The light option is to simply try to avoid banding. You just shoot in RAW and avoid overprocessing your photos. This is nothing new to you, and stuff you should be doing anyway. But from there, if you do that, you will find that you rarely need to do anything further. As mentioned previously, visible banding is usually self-inflicted. But not inflicting it on yourself, you don’t need to apply the fixes. If you are posting your images online (as opposed to printing), this is generally all you need to do.
- Moderate: The moderate option is to take some steps to fix banding. Of course, you’ll do the obvious stuff too (shoot in RAW, avoid overprocessing). But here you will take the steps mentioned in this article to fix the banding. If you post your photos online and make small to moderate sized prints, you’ll find that simple avoidance will be enough 90%+ of the time, and the fixes mentioned in this article will take care of the banding when you occasionally run across it.
- Nuclear: For makers of large prints or dedicated pixel-peepers, you’ll still do everything mentioned in this article, but you’ll also take steps to identify banding that isn’t visible in a standard monitor display. To identify the banding, you should apply high contrast to your sky. This is usually done with a Curves Adjustment Layer. In fact, I’ve seen some that apply several steep slopes in their Curves Adjustment layer. You might also look at the individual color channels. Once you have carefully evaluated your file, you still take the same steps for fixing it mentioned in this article. The only difference here is the steps taken to identify the banding in the first place.
Hopefully these strategies will allow you to avoid and fix any banding issues you face. If there are additional issues, just leave a comment or shoot me an email.