
You want to maximize the depth of field of your pictures. The obvious way to do that is to use the smallest sized aperture the lens will allow, right? You know that the smaller the aperture, the greater the depth of field. So why not just crank down the aperture all the way to f/22 (or whatever the smallest setting on your lens is) and be done with it?
You may have heard of something called diffraction. It is a phenomena that causes your pictures to become softer (less sharp) when you use the smallest aperture settings on your camera. As a result, most experts in the world of photography recommend that you avoid the smallest apertures (like f/22), and only use larger apertures. This has become accepted practice among most photographers.
Recently, however, a respected photographer/teacher/author named Bryan Peterson has challenged that view. In his book Bryan Peterson’s Exposure Solutions (a follow-up to his great (perhaps even classic) book Understanding Exposure) he recommends that you ignore the conventional wisdom and go ahead and shoot at f/22. He says the same thing in his lectures (I saw him at the Out of Chicago photography conference). I gather that he believes the effects of diffraction are overstated and, in any event, more than offset by the benefit of maximizing your depth of field.
So who is right? Bryan Peterson or the vast majority of photographers? Let’s take a look.
What is Diffraction?
But first, what is diffraction and where does it come from? The science really isn’t that important to most of us as photographers, but we should know in general what this phenomena is all about.
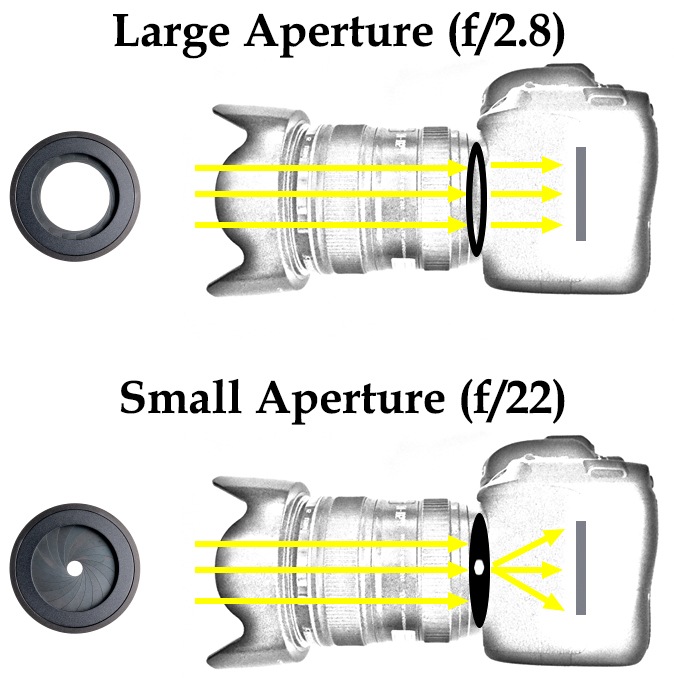
Diffraction is caused by the scattering of light that necessarily occurs when the light goes through a small aperture and then spreads out over your camera’s image sensor. Check out this graphic I created to show you how it happens:

When you use a wide aperture, as in the example on top, light is allowed to come into the camera and moves more or less straight on to the image sensor. Diffraction is not an issue.
When you use a small aperture, however, the light reaching the sides and corners of the image sensor can only get there after passing through a small aperture and then spreading out. That spreading of the light cause the light rays to hit adjacent photosites. Essentially, the spread causes the light to hit the wrong photosite and causes blur.
The effect is more pronounced in digital sensors with a high density of megapixels since they have smaller photosites. The smaller photosites mean that the same amount of spreading will have an even greater impact. That means that if you have a camera with a smaller sensor but a lot of megapixels on it, diffraction will be more of an issue for you that others. I will get into this issue a lot more below, but just keep it in the back of your mind for now.
Anyway, what does all this talk of diffraction mean to you? Softness. Diffraction will create a certain amount of blur in your image. How much? Let’s take a look.
A Test of Diffraction’s Effects
Is diffraction an interesting theory for pixel-peepers with little noticeable impact on your pictures, or something that really results in visible softness? I decided to test it on my camera and one of my lenses. The test is simple if you want to do it yourself: with the camera on a tripod simply take the exact same picture at different aperture settings (and offsetting shutter speed changes to keep the exposure the same) and then compare the pictures side by side.
Here are comparisons of pictures I took on my Canon 6D with my 24-105 mm f/4.0 lens:
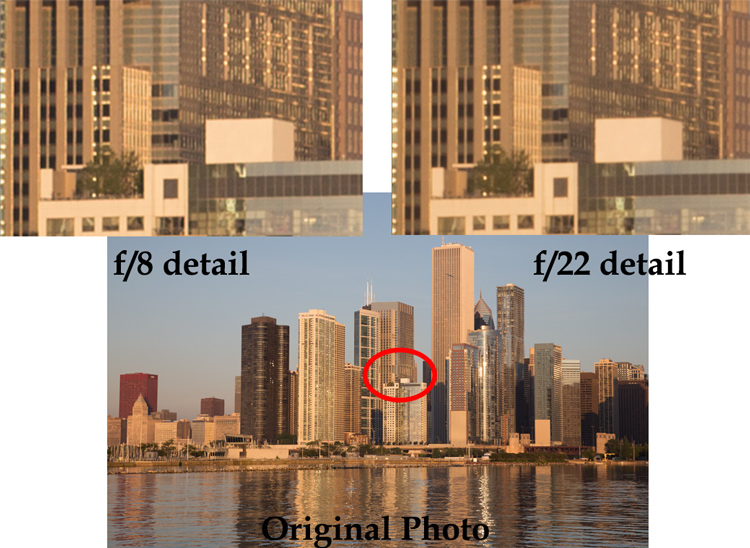
I shot the exact same picture at every aperture setting on my lens. At the bottom of the graphic is one of the originals with the detail area marked. Above that are two detail areas, one at f/8, which I deemed to be the sharpest aperture setting after looking at the pictures, and the other a f/22, which is the smallest aperture setting for the lens I was using.
Can you see softness in the shots taken with the smaller aperture? I can. There is definitely a certain amount of blur in the detail.
But, I should point out that these pictures are zoomed in at something like 400%. How do they compare at normal size? Let’s take a look:

Can you see a difference between the different versions of these pictures now? I cannot.
This test tells me that diffraction has a minor impact on my pictures, but will not be a big deal if I am just posting the pictures on the web. But is that the end of the issue? No. Keep in mind that results for you might be different depending on what kind of camera you use. As mentioned above, the density of megapixels on your sensor will have a lot to do with the impact of diffraction. How so? Let’s get into that now.
Enter Doug Kaye
I’m going to admit something now. I previously wrote something about diffraction , but I had the science behind diffraction wrong. None other than Doug Kaye, who you might know from TWIP and All About the Gear, sent me an email to (gently) correct me. He then helped me fix up what I had written. It was very helpful, but in addition to that. Doug shared the results of some of the testing he has done on diffraction.
I keep mentioning that the impact of diffraction will vary depending on the density of megapixels on your camera. Doug is the one that walked me through this concept and, in fact, he has done some testing of that. Most of us only have one camera to worry about, but Doug tests lots of cameras.
Here’s how Doug explains the concept:
With low-density sensors (larger photosites), a given amount of diffraction doesn’t make a difference because the light doesn’t spread to adjacent photosites. But with higher-density sensors (smaller photosites), the same amount of spread crosses more photosite boundaries and hence appears as a blurring of the image.
In other words, if you cram a lot of megapixels on a camera with a small image sensor, the photosites will be very small and the scattering of light caused by the small aperture will cross over into other photosites more easily. That will mean more softness due to diffraction. But in a camera where megapixels are more spread out, the same amount of spread will have less of an impact. In that case, the result is less of an impact on your pictures due to diffraction.
How does this work on given cameras? Doug has come up with certain guidelines to explain when you can first notice the effects of diffraction:
- On a 24 megapixel full-frame camera, diffraction will first be visible at f/11
- On a 36 megapixel full-frame camera, diffraction will first be visible at f/8
- On a 16 megapixel APS-C camera, diffraction will first be visible at f/8
- On a 24 megapixel APS-C camera, diffraction will first be visible at f/5.6
- On a 16 megapixel Micro 4/3 camera, diffraction will first be visible at f/5.6
In other words, the smaller the image sensor and the more megapixels you put on the sensor, the sooner diffraction becomes visible.
So What Do We Do With This?
So what does all this tell us? And, more importantly, what does this mean for our photography?
Well, the first thing it tells us is that there is, in fact, such a thing as diffraction. It isn’t a made-up thing. It has a visible impact on your pictures, at least when you zoom in on the details. If you are on a quest for maximum sharpness, then diffraction is something you should worry about.
But the biggest thing I learned here is that the impact of diffraction will vary depending on your situation. Someone with a camera with a large image sensor and low megapixel density (for example, the Sony A7S, with only 12 megapixels spread out over a full frame sensor) has less to worry about when it comes to diffraction. On the other hand, if you have a camera with a Micro 4/3 or even APS-C sensor, then you might want to take diffraction into account a little bit more when setting your aperture.
It also depends on your output. If you are making a 20 x 30 print, you might want to worry about it. If you are just posting to Facebook, probably not. Of course, a lot of times we don’t know what we are going to do with the image when we are taking it.
So what should you actually do to make sure diffraction is not an issue for you? Here are the key takeaways as I see them:
Before Shooting
Do Your Own Test. Take a look at Doug Kaye’s guidelines above and start from there, but then check the extent to which diffraction affects your pictures. It is easy to do: just take the same picture using different aperture settings and compare them. Diffraction might have a more dramatic effect for you, in which case you should make adjustments when shooting (more on this below). But you might find that there is very little impact of diffraction, in which case you can not worry about it.
When Shooting
When you are out shooting, there are different things you can do to maximize depth of field without suffering from softness due to diffraction. Here are some of those things, in order from where you have the least problem with diffraction to the greatest.
- Shoot at f/22 when you need maximum depth of field. If you want to maximize depth of field for your shot, go ahead and shoot at f/22! This obviously applies if your camera is one that is not as affected by diffraction. But even if you do have a camera that might be affected by diffraction, as mentioned above, consider what you are going to do with the picture. Most of us just end up posting our photos to the web, where you usually won’t be able to see the effects of diffraction.
- Use Hyperfocal Distance to Allow You to Use Larger Apertures. Where you do have a diffraction problem or you need maximum sharpness and cannot risk any softness in your image (like for large prints), go ahead and shoot with a larger aperture to avoid any effect of diffraction. As a threshold matter to that, you should understand the concept of hyperfocal distance and see if you can get away with having everything sharp in the image with the smaller depth of field. Frankly, if you are comfortable with hyperfocal distance, you will often find that you do not need to use the lens’s smallest aperture to have everything in your picture sharp.
- Focus Stacking. Finally, for those occasions that you need everything in the frame absolutely tack sharp – from something right in front of you all the way to infinity – and you do not want any softness due to diffraction, you can use a technique called focus stacking. Using this technique, you take multiple photos of the same shot using a wider aperture, but changing the point of focus for each shot. You work your way from focusing on something right in front of you to setting the focus at infinity. Then you combine the pictures in Photoshop to use the sharpest points of each. Consider this a sort of heavy artillery for this situation.
After the Shot
After you take your shot, there are some things you can do in post-processing to negate or at least minimize the effects of diffraction. Those things are:
- local contrast adjustments,
- increases in clarity, and
- sharpening.
You can make your photos much sharper that way. In fact, much of the time, you can completely negate the effects of diffraction using these tools/techniques (of course, you then have to consider how sharp your photo could have been if you used these tools on a photo with no softness due to diffraction to begin with).
Conclusion
I hate it when I cannot come to a clear conclusion about something. I especially hate the answer “it depends.” But that’s where I think we find ourselves on the issue of diffraction.
Is Bryan Peterson right, that we should shoot at f/22? It depends. It depends on how much diffraction effects our camera. It depends on our output. It depends on what are trying to achieve. But in certain circumstances, I’d say yes, he’s right – go ahead and shoot f/22.
Hey Jim,
That’s an Excellent article. learned a lot from this.