
In digital photography, the concept of dynamic range refers to the difference in light intensities in the scene you are photographing. Think of a scale with something super-bright (like the sun) on one side and something very dark (like a closet with the lights off) on the other. Dynamic range refers to how much of this scale your camera can cover. The reason it is important is that the portion of the scale that can be seen at any single moment is limited. It is limited for human eyesight and it is even more limited for digital cameras.
If you set your exposure so that portions of your picture fall outside the dynamic range of your camera, you will have problems. The pixels will be totally white if you are overexposed or completely black if you are underexposed. You will see a spike on one side of your histogram letting you know that the pixels are outside the dynamic range of your camera. So it is important to understand this concept and how to deal with it in your photography. This article will show you how to do that.

Your Eyes and Dynamic Range
The best way to understand dynamic range is to first consider it without a camera. Your eyeballs have a limited dynamic range, so let’s start there.
How does it work? Well, imagine you are in a movie theater in the middle of the day. Having sat through a movie in a dark theater, your eyes are accustomed to the darkness. You can see everything around you in the dark theater pretty well. But when the movie is over and you walk outside, the light is blinding. It actually hurts to open your eyes all the way. Bright areas just seem white.
If you stand outside for 10 or 15 minutes, your eyes adjust fully to the brightness. You can now see everything around you in detail just fine.
If you walked back into the dark theater, everything would seem pitch black. You could not see where you are going and you certainly could not make out any details. Your eyes are not accustomed to the darkness.
The examples above show that our eyeballs have a limited dynamic range at any particular point in time:
- You can see in the dark just fine (once your eyes adjust). When you are in a dark theater, your eyes have no trouble making out detail.
- Your eyes are capable of seeing in the bright light just fine as well. When you are outside on a bright sunny day, you can see everything in detail.
- But your eyes cannot do both at the same time. When your eyes are accustomed to darkness, you cannot make out tones in bright light. And when your eyes are accustomed to a bright scene, you cannot make out tones in a dark room.
Thus, your eyeballs have a limited dynamic range.
The Camera and Dynamic Range
Essentially, it works the same way for your camera as it does for your eyes.
If your camera is set to capture tones that are on the darker end of the spectrum, it has trouble handling very bright tones. Those bright tones may appear as pure white, which is referred to as “blown out.” This is the equivalent for your camera of eyes that have been adjusted to darkness, which now cannot handle brightness.
Conversely, when the camera is set to capture a bright scene, it has a hard time distinguishing darker tones. The darker areas may show up in your picture as pure black without any detail. This is the equivalent for your camera of eyes that are adjusted to brightness walking into a dark room.
Your camera can only make out a limited number of tones at the same time. The range your camera can handle is actually much narrower range than what your eyes see.
Application to Photography
You will often face a dynamic range problem in your outdoor photography. Let me walk you through an example using a few different versions of the same picture.
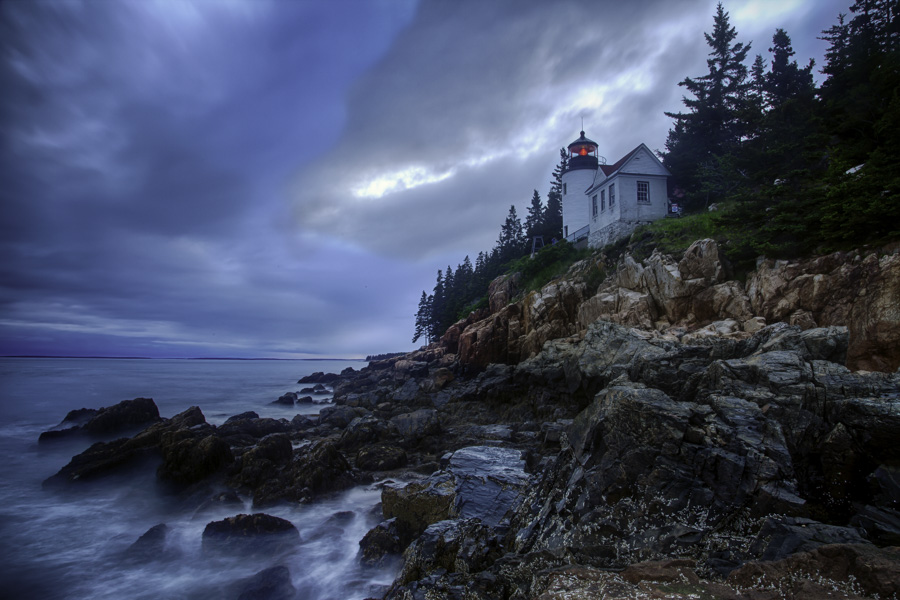
Let’s say you have a scene before you with a sky that it brighter than the foreground. To say that this scene is common is an understatement, as it is the case in the vast majority of outdoor scenes. You have to find a way to deal with the difference in brightness values between the sky and the ground.
First, you can set your camera to expose the foreground properly, so at least that will appear correct. If you do so, your picture might look something like this:
That obviously looks terrible. Although the foreground is nice and bright, the sky is pure white or “blown out.” If we looked at the histogram, we would see a spike on the right side of it. There is not detail in much of the sky, particularly on the right. You don’t want that.
So, conversely, you could expose the picture so that the sky will not be too bright. You can meter off the sky and set your exposure so that the sky is properly exposed. Here is an example of what might happen if you do that (it is the same picture as above, but with reduced exposure to keep from blowing out the sky):
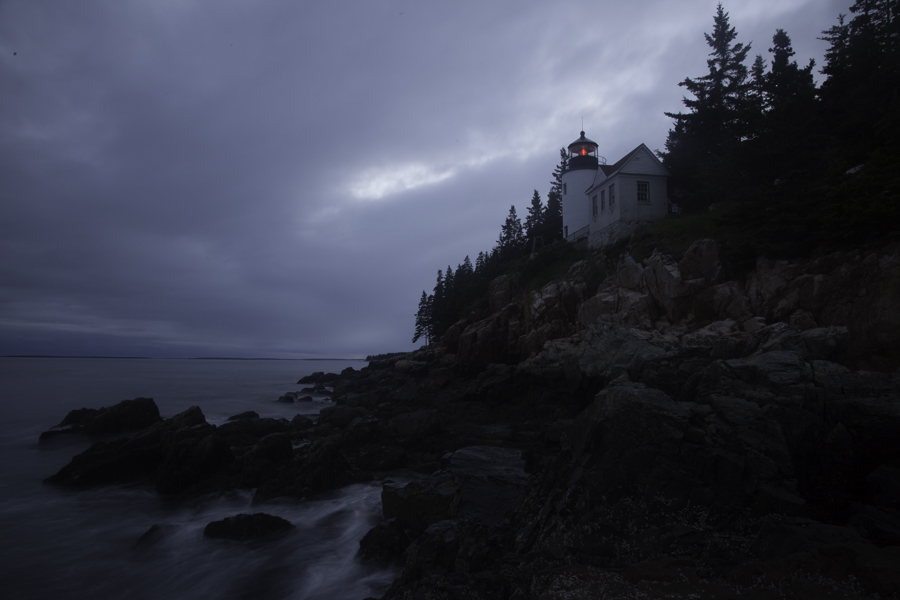
That looks terrible too. The foreground is too dark and much of it is black. If we looked at the histogram, we would see a spike on the left side of it.
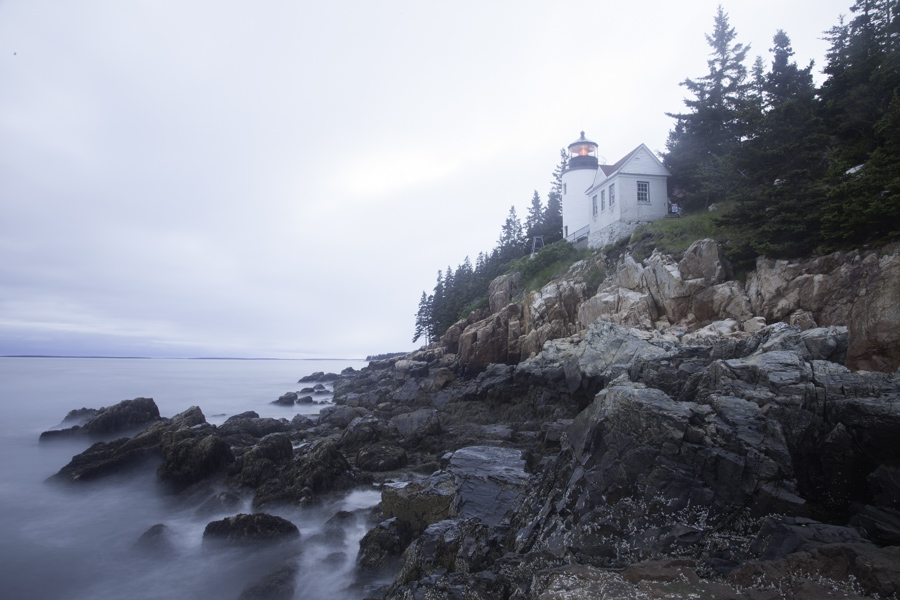
To fix this, you might try exposing in the middle. In my first picture (the one that is too bright), the shutter speed was 15 seconds. In the second picture (the one that was too dark), the shutter speed was 2.5 seconds. So in this final picture, the shutter speed will be 6 seconds, which is right in the middle. Here is how the picture looks now:
The third picture looks better, and most of it is technically within the dynamic range of the camera, but it is still not quite right. The sky is too bright and the foreground is a little too dark.
We will talk about how to fix this in a minute. First, let’s talk about how you tell whether the picture is all within the dynamic range of your camera.
Measuring Dynamic Range In Your Camera
So how do you tell if the various parts of your picture are within the dynamic range of your camera? The best way is the histogram. You can use the histogram in your camera when you are out shooting, or the histogram available in your post-processing software when you are back at your computer.
To start with, there is a histogram in your camera. You should use it when you are out shooting. That way, you can tell at the time of capture if you are keeping everything within the dynamic range of your camera. To do this, you will need to go into your camera’s menu to tell it to display the histogram after you take a picture. While you are at it, many cameras can also be set to blink or flash on the LCD in any portions of your picture that are outside the dynamic range of your camera (i.e., pure white or pure black). You may or may not want to set the camera to blink at you, but you should definitely set it up to show the histogram after you take the picture.
The actual dynamic range of cameras varies from model to model, but most DSLRs have a dynamic range of 10 – 12 stops (recall that a stop of light is a doubling of light). However, when your are out shooting, you should probably think of your camera as having a dynamic range of only about 6 stops of light. The reason for that is that this will correspond with the exposure scale you see when composing a picture. Very often that scale will look like this:
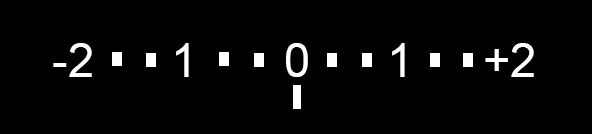
The numbers measure stops of light. So, for example, the 1 to the right of the 0 means you are 1-stop overexposed. Once you get above the 2, the camera will start flashing at you as a warning that you are nearing the limits of its dynamic range. If you assume that you have another stop to work with on either side of the 2s on the scale, that would get your 6 stops of light. Therefore, again, I recommend you think of your camera as having a dynamic range of about 6 stops, even though it is actually higher than that.
Fixing Dynamic Range Problems
So now that we understand dynamic range and know how to measure it, we can set about trying to address it in our photography. Unfortunately, there is no single answer for addressing a wide dynamic range. There are, however, a variety of workarounds and things you can do to stay within the camera’s dynamic range. So the remainder of this article will take a look at those.
Method 1: Work With Your Exposure Settings
The first and best way to deal with the limited dynamic range of your camera is to simply set your exposure so it keeps everything within the dynamic range, even if it means exposing your picture differently than you otherwise would.
As an example, when you face a scene with a lot of contrast where you know you are likely to have a dynamic range problem, you might meter the brightest part of the picture and set your exposure value on the high side of the scale. That will keep the bright portion from being blown out. Hopefully, since you set the camera to overexpose slightly, the exposure value will also be high enough to keep the darker part of your image from turning black. Thus, everything will be in the dynamic range of your camera.
You will face this situation all the time in outdoor photography. You constantly face scenes with a bright sky and a not-so-bright foreground. In this situation, meter on the sky and set the exposure value at +1. That will keep your sky within the camera’s dynamic range. Hopefully, that will be enough light to keep the foreground from being black as well. If not, make adjustments and try again.
If that won’t work, you will have to get creative. I previously wrote an article for Digital Photography School with several methods you might use to deal with dynamic range limitations. Check it out here.
Method 2: Add a Filter
To deal with a dynamic range problem in camera, you can also use a graduated neutral density filter. These are often called “Grad ND” filters for short.
A Grad ND is a glass plate in a rectangle shape that attaches to the front of your lens using a special holder. The glass is dark at one end and clear at the other. You set the filter so that the darker portion covers the sky, while the clear portion of the filter covers the foreground. The upshot is that your sky is darkened by the filter while the foreground is left alone. Hopefully it evens out your exposure enough to keep everything within the dynamic range of your camera.
A Grad ND is not a cure-all though. The line between the dark and clear portions of the filter is a straight line, so if your scene does not offer a straight horizon line, you may not be able to use the filter. The filters and attachments can be a little cumbersome as well. But sometimes these filters are life-savers, and I recommend you keep one in your camera bag.
Method 3: A Lightroom Quick-Fix
You can also fix a dynamic range problem to a certain extent in post processing.
As a threshold matter, you should set your camera to shoot in Raw format. Raw files have a wider dynamic range than JPEGs. Once your are at your computer, the easiest way is to make some quick adjustments in Lightroom. Here is a three-stop process for dealing with a dynamic range problem in Lightroom that will take you just a few seconds:
- In the Develop module, pull down (left) on the Highlights slider. That will tone down your highlights.
- Next, just pull up (right) on the Shadows slider. That will increase the exposure of the darker areas of your picture.
- If the picture looks washed out pull the Blacks slider down (left). That will add contrast.
That’s it. Very often this is all that is needed to make your pictures look 100% better. In fact, I went ahead and made some quick Lightroom adjustments to the picture we have been using as an example above. Here is the before and after:

If you do not have Lightroom, but you have Photoshop or Photoshop Elements, you can use the Adobe Camera Raw screen to do the same process.
Method 4: Bracketing and Blending
If none of the previous techniques work, you will need to break out the heavy artillery. That means you will need to bracket your photos and then blend them in some fashion.
To bracket your photos, set your camera to take three pictures (or five pictures if your camera allows it) at least one stop apart. The camera will take three photos, one at normal exposure, one underexposed, and one overexposed.
Once you are in Photoshop, you can blend these exposures. I wrote a quick primer on blending photos toward the end of this article.
Method 5: HDR
You can also use High Dynamic Range (HDR) software such as Photomatix and HDR Efex Pro to blend the photos.
To use an HDR technique, first bracket your photos as mentioned in Method 4 above. Then you will load those photos into either Photomatix and HDR Efex Pro, which are the two best HDR programs. You will go through the tonemapping process in those programs (using whichever one your choose) to blend the photos. If you are unfamiliar with this process, here is probably the most popular HDR tutorial by one of the most famous HDR photographers to get your started.
HDR has a little bit of a bad reputation in many photography circles, but it is a very powerful tool. There is an “HDR look” that offends some people. As with many other techniques, beginners can sometimes overuse it. Just keep it under control and perhaps even blend your HDR file with your original images, and it can really help solve your dynamic range problem.
Conclusion and Recommendations
Hopefully you now understand the nature of the challenge that outdoor photographers face with respect to dynamic range. And hopefully this gives you some ideas of how to tackle the problem in your photography. I will talk a lot more about each of these methods of dealing with dynamic range problems in future articles. The point for now is to introduce you to the problem and the ways of dealing with it.
To help your apply the content of this article to your photography, I want to leave you with a checklist of a few things you can do to avoid dynamic range problems. These simple steps will solve most dynamic range problems:
- Shoot in Raw. This will increase the dynamic range of your camera.
- Set Your Exposure Based On the Highlights. Find the brightest portion of your scene and set your camera’s exposure scale to overexpose (start with +1).
- Use a Grad ND when possible.
- Bracket Your Photos. Even if you don’t think you will ever blend your photos or or use HDR, bracket anyway. You might start using more post-processing later, and this way you’ll have the data around to use. In any case, sometimes the bracketed photos will surprise you and you’ll find that the overexposed or underexposed picture just looks better.
Doing these things will make sure that you are maximizing the dynamic range and that you are well-poised to try to fix it later if you want.
Next Steps
Ready to dig a little deeper into dynamic range?
- To see what is involved with bracketing your photos, check out The Quick Guide to Bracketing Your Photos.
- To see how to use spot metering to maximize the dynamic range within a particular picture, read Nail the Exposure with Spot Metering.
- To learn how to use post-processing to maximize dynamic range, watch my video on the Basic Lightroom Edit or read this DPS article on Using Lightroom to Enhance Your Landscape Photos.
- For an introduction to High Dynamic Range Photography, start with An Introduction to HDR.
- To see which cameras have the best dynamic range, check out this article on Comparing the Dynamic Range of Digital Cameras.
I’m a new subscriber. So far, I’ve studied about half a dozen of the topics on your site. I’m no beginner but repeatedly, I’ve been blown away but your ability to cast fresh light on subjects which I thought I had sufficiently grasped. Your talent for breaking down and simplifying just about any topic is unique – truly amazing.
I’m almost embarrassed to get this tutoring for without having to pay you. You’ve taught me far more about processing my shots (and far more efficiently too) than just about any of the authors who I’ve paid for their expertise.
Thank you.
Thank you very much.
Wow. Thanks so much! I’m glad you’re enjoying the content. Comments like this make it worthwhile. I’m 100% focused on simplifying this stuff, so I’m glad that is coming through. Thanks again!
Hi Jim really enjoying the artticals as a beginner your pics and videos really help. It really help us biginners under stand the triangle settings. Thanks rick
I’m glad this is helping. Yeah, those triangle settings are the key. Master them, and everything else is easy after that. Or at least easier.
Great advise Jim. As a new beginner of just two weeks. Your advise and pics are amazing
Thanks so much!
HDR explained is surely the best advise I received from you so far. Thank you. Ron
I appreciate it Ron. Glad you found it helpful.