
What if I told you there was only one tool you needed to affect the lightness and darkness values of your picture? And what if I told you that the same tool was the only thing you would need for all color correction in your picture? Would you be interested in learning that tool?
No doubt we all would. And such a tool exists. Odds are you’ve heard of it. You may have even tried it out. It is the Curves Adjustment Layer, and it is all you need to:
- enhance colors,
- remove color casts,
- lighten your picture,
- darken your picture,
- add contrast.
What? Then why don’t we all use this tool all the time? Why isn’t this the first thing you learn when they teach Photoshop?
Probably because whenever you see this tool in action the result look something like this:
It looks too complicated. If you are like me, you don’t even know where to start with that. It seems beyond the capacity of even experienced Photoshop users. As a result, I avoided getting involved with Curves Adjustment Layers for years. I thought it was beyond me.
But I’m here to tell you that using Curves doesn’t need to be overly complicated. There are very simple moves you can make with Curves that allow you to ease your way into it. In fact, if you know how to use the Levels tool in Photoshop, then you already know a lot of what you need to use Curves.
And I’m also here to tell you that this is how the serious Photoshop users use Photoshop. If you master Curves, you are well on your way to mastering Photoshop. The various sliders and adjustments will seem clumsy and amateurish to you compared to Curves.
In this article I am going to introduce you to the Curves Adjustment Layer and show you three simple things you can do to start getting comfortable with it. The tips and techniques in this article won’t allow you to master Curves right away, but they will get you started with it. From there, if you can add additional steps and processes as you gain experience.
The Curves Adjustment Layer
It is actually simpler for me to show you how to use Curves than it is to explain it. Nevertheless, here is how it works:
A Curves Adjustment Layer is just a histogram with a diagonal line through it. You are probably already familiar with the histogram, which is really just a bar graph showing the brightness values of the pixels in your picture, with the darker pixels stacked in the columns to the left, and the lighter pixels stacked in the columns to the right.
But then there is that diagonal line running through it. That diagonal line represents the way things are presently. If you don’t change the diagonal line, nothing changes in your picture. But once you start making changes to that line, things will change in your picture. Specifically, by pulling the line up, you increase exposure values, and by pulling the line down you decrease exposure values.
To change the line, just click on it at any point and drag it. When you release the mouse button, the line is changed according to the point you just set. If you drag it up, things get brighter. If you drag the line down, things get darker. You can drag part of the line up and part of the line down if you want too. In fact, you can set as many points as you want. Go ahead and create a Curves Adjustment Layer, and make some changes to the line just to get a feel for it. When you are done, you can just delete the layer and no harm will have befallen your picture.
Even if this doesn’t make sense to you, keep going. Like I said, it is easier to show this to you than explain it.
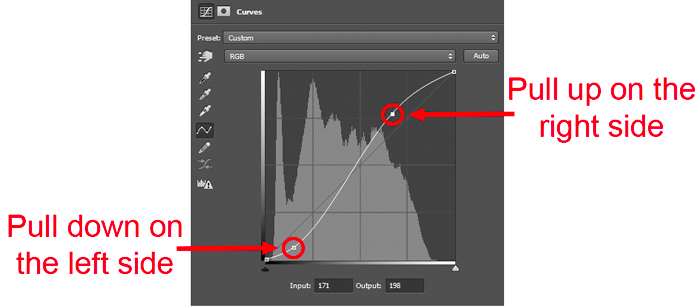
Setting Your Endpoints
We already mentioned Levels, so let’s start by doing something similar to that. Curves can do everything Levels can do and more. If you do nothing more then use a Curves Adjustment Layer like a Levels Adjustment Layer, that will get you started and feeling comfortable with Curves. You can worry about other aspects of Curves later.
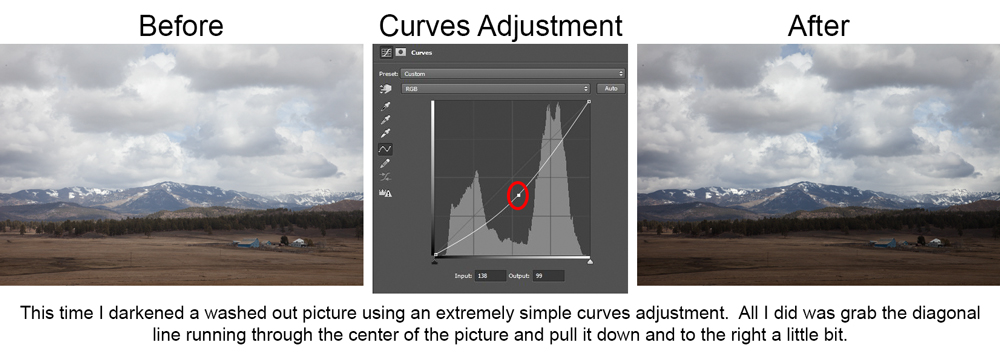
Both Curves and Levels allow you to set the white point and black point of your picture or selection. The adjustment is made in exactly the same way for each. Below is an example of a change made to a picture by using a Curves Adjustment Layer in the same way as you might use a Levels command. That is, the example just scoots the white point and the black point in toward the center of the picture. This simple move can have a profound effect on your pictures.
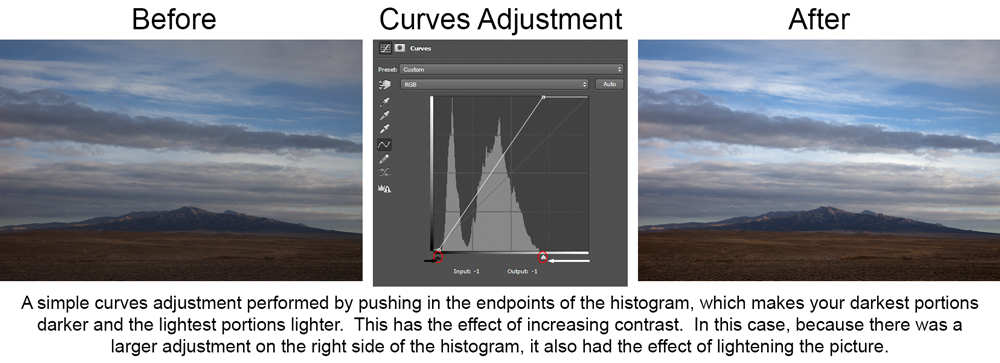
Of course, the Levels Adjustment Layer also has the gamma slider in the center. There are better ways to I just lightness and contrast in curves though, which we will talk about later. But now you are already using Curves to set your endpoints and increase the contrast of your picture.
Lighten and Darken
Don’t try to do too much with one Curves Adjustment Layer. You can create a bunch of Curves Adjustment Layers that each do small discrete tasks. Working in that manner will probably work better for you. Adding more layers costs you nothing. Creating several layers is ultimately much simpler than trying to create a monstrosity with a complicated curve to it.
If you want to brighten the whole picture or your selection, just pull the curve up in the center. Pull it a little bit diagonally to the top left, like so:
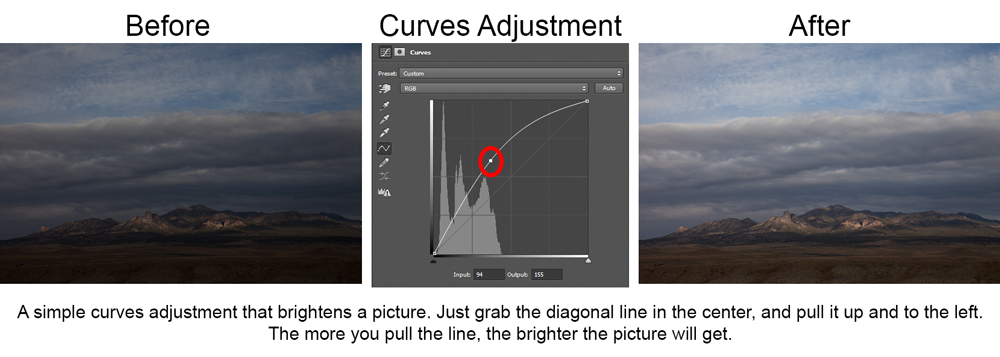
Now you have brightened the whole picture. But what if you wanted to brighten the lighter portions of the picture, while having less of an effect on the darker portions of the picture? In that case, just pull up on the diagonal line more on the right of the histogram. Remember that the brighter pixels live on the right side of your histogram. By pulling up the diagonal line on that side, you are changing the curve more for those pixels. The diagonal line will naturally return to its center position as it moves to the left.
We have already lightened the picture, but now let’s do the opposite and darken it. To darken the picture, just pull the center of the curve towards the bottom right:
If you want to darken the darker portions of your picture more than the lighter portions, just pull the diagonal line down more on the left side. The dark pixels are on the left side of the histogram. By pulling the line down more on that side, you are affecting those pixels more. Again, the diagonal line will naturally tend to go back to where it was as the pixel values increase.
In this way, not only can you lighten or darken your image as a whole, but you can target portions of your image for adjustment.
Steepen the Curve
The thing that the curves adjustment layer does really well is increase contrast. This is where the real power of the Curves Adjustment Layer comes into play. You have probably heard of the “S “curve, and it is true that you can create such a curve to increase contrast. It will look something like this:

All you are doing with an “S” curve is making two simple moves in one curve: you are darkening the dark portions of the picture, and you are lightening the bright portions of your picture.
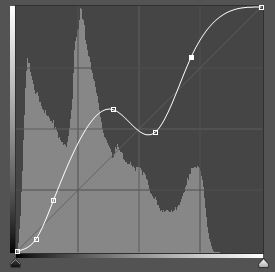
Simple as that is, it doesn’t even need to be that complicated. I have one simple thought for you to keep in mind whenever you are thinking about increasing contrast and it is this: Steepen the curve.
Find the meat of your picture or make a selection using one of Photoshop selection tools. Then to increase contrast all you do is steepen the curve in the portion of the histogram where there are the most pixels. If you’re starting with the histogram to the left, steepen the slope to make it look like the one on the right:
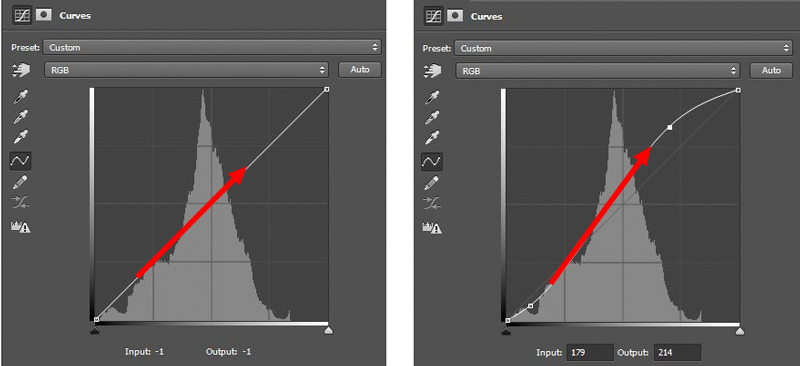
Notice that doing so created the famous “S” curve. But you don’t have to create a curve at all. You can also just scoot in the white point and black point to create the same steepened slope. Either way works.
Add Masks to Make Targeted Adjustments
So far we have made changes to the overall picture. But if you add “masking” to the equation, you can selectively add these effects to just portions of your picture.
The Curves Adjustment Layer already has a mask attached to it. Just look at the right side of the layer and you will see a white rectangle:
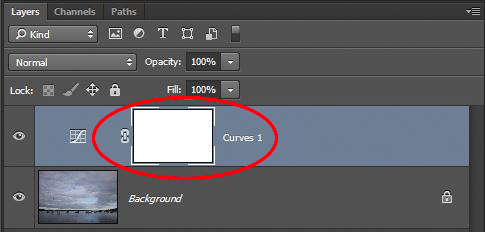
The white color means that, while there is a make, you will see the effect on your pictures. If you don’t want to see the effect everywhere, you need to change that white to black where you don’t want the changes to affect your picture. To do that, all you have to do is use your brush tool, set the color to black, and paint the mask wherever you don’t want to see the changes you are making with your Curves Adjustment Layer.
You can do the opposite by inverting the mask, which sounds complicated but is simply done by pressing Ctrl+i. Now your mask is black, meaning that the effects of the Curves Adjustment Layer will show nowhere in your picture. Your picture will appear the same as it was without the Curves. You can now use your brush tool and paint with a white color to add in the effect just where you want it.
You can also work in shades of grey to blend in the effect. To do that, change the “opacity” of your brush. The higher the percentage, the more effect the brush will have on your mask.
When might you use these masks? Quite frequently. In fact, as most people gain experience and confidence with curves and masking, they start using them all the time. You can selectively lighten/darken and increase contrast for all the separate parts of your pictures and it will add enormous depth and interest to them.
An Example of Curves and Masking
As a quick example of what I have been talking about, and hopefully to tie it all together, let’s make some changes you might want to make to a standard outdoor photo. We start with this photo taken in Monument Valley, Utah:
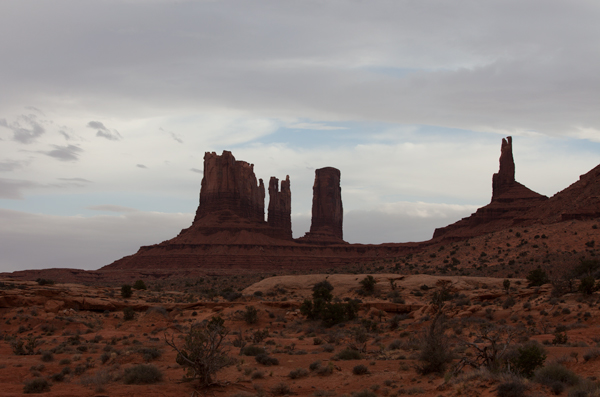
This photo has the standard stuff wrong with it that you will face time and time again in outdoor photography: the sky is too bright and the foreground element is too dark. Plus we want our subject to stand out a little bit more.
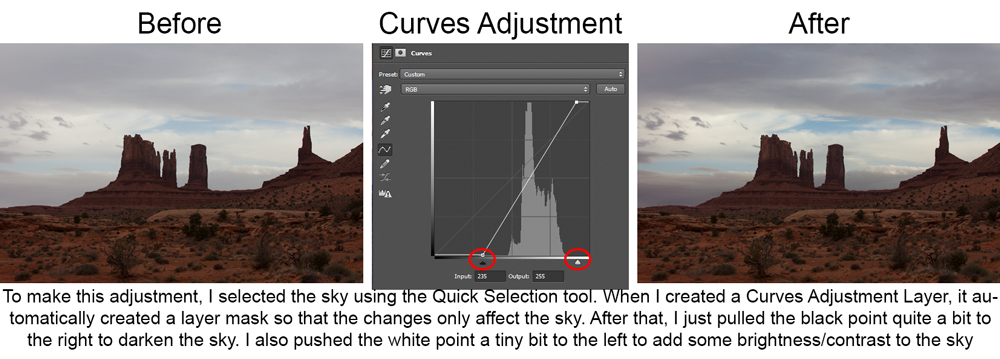
So let’s start with the sky. The sky has plenty of brightness (perhaps too much), but I want to darken portions of it and add contrast to it. So I would select the sky, which I did using the Quick Selection Tool, and create a Curves Adjustment Layer to darken the dark portions of the sky. I would also pull in my white point to make sure the whites are very bright. The adjustment I made to the sky looks like this:
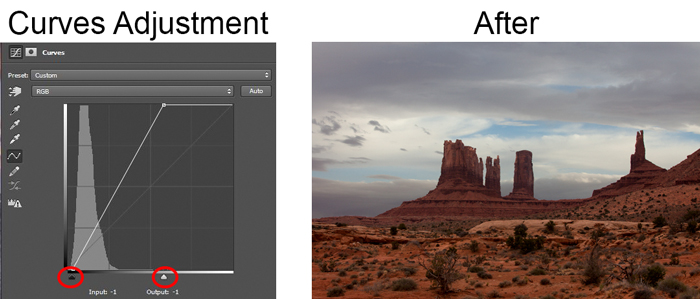
I like that, but the foreground is too dark. So I will lighten it up while adding some contrast to it. I do that by selecting the foreground (or I could just re-select the sky and hit “inverse”) and creating a Curves Adjustment Layer. Once I have created it, I drag the white point to the left to brighten the foreground. I will also pull the black point a little to the left to keep the foreground from appearing washed-out. The change I made looks like this:
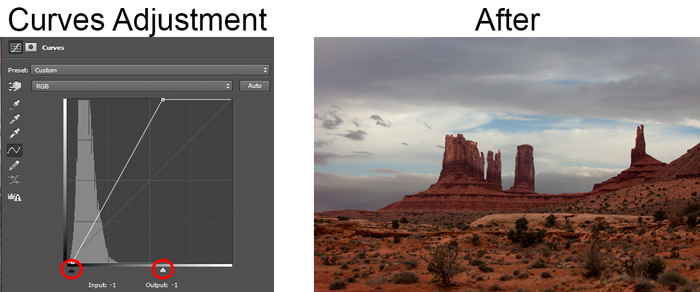
That looks pretty good. But finally, for my subject, I want to just add some contrast. In this case I will select the monuments and create one more Curves Adjustment Layer. I will draw both the black point and the white point toward the center of the histogram, but since the monuments are dark I will end up pulling in the white point by a larger amount. The change looks like this:
When I’m done, I have gone from the picture on the left to the one on the right with just 3 simple Curves Adjustment Layers:

So there you have it. And this is just scratching the surface of curves. Notice we haven’t used any complicated curves. We haven’t gone into the individual channels. We haven’t even affected color yet at all. Yet I think you’ll agree that the picture on the right looks much better.
Conclusion
These are three simple steps that will set you on your way to mastering the curves adjustment later. With just these, you can lighten and darken your picture, as well as affect contrast. But the most important aspect of this, of course, is adding contrast. Just remember to always steepen the slope.
From here, the sky is the limit. You can create a lot more layers to affect different areas of your picture. You can make changes within the various color channels of your layer. And, of course, you can make complicated curves.
We will cover a lot more about Curves in future articles of Outdoor Photo Academy. But I wanted this intro to get you started using them.