


Almost everyone’s first attempt at photographing the moon results in disappointment. When you look at your pictures after that first try, the moon inevitably appears like a small white blob in the sky. The question quickly becomes how to avoid that and get a really sharp picture of the moon. Is there a trick to it? Can it only be done on certain nights? Do you need special gear?
Not really. Photographing the moon is actually pretty simple and it can be done most nights. Most night photography comes down to proper stabilization and avoiding blown highlights, and photographing the moon is no exception.
There are a few additional wrinkles though. Precise focus and exposure are crucial, and if you just rely on your camera’s autofocus or light meter, you will end up with the dreaded white blob. There are additional steps you’ll need to take (but don’t worry there is no additional gear needed) which I will walk you through here. So follow along and learn exactly how to photograph the moon.
What You’ll Need to Photograph the Moon
First, you’ll need the right gear – but don’t worry, you probably already have what you need.
For this project, what you’ll really need besides your camera is your longest lens. If you are a wildlife or sports shooter, then you will probably have a really long lens, and you will be in good shape. The rest of us will just have to make do.
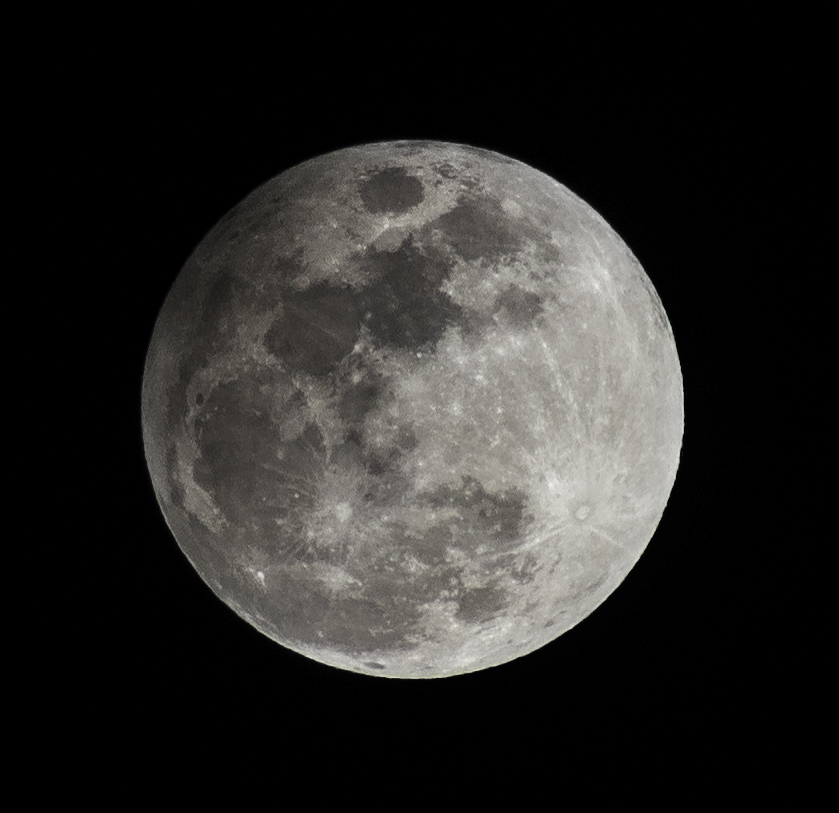
My longest lens is only 200 mm. After adding my teleconverter (more about that in a second), I took my shot at 400 mm and the moon was still tiny in the picture. I had to do a lot of cropping to make the moon a significant part of the picture. Here is the uncropped image, so you can see the extent of it:
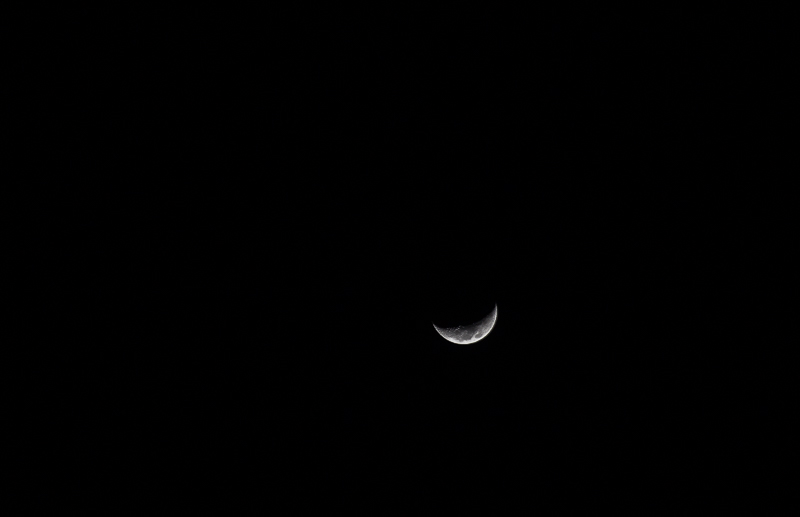
I was using a 70 – 200 mm f/2.8 lens. I added a 2x teleconverter to it, so I was shooting at 400 mm. As you can see, I could have used a longer lens. If you have one, use it. But you don’t need to rush out and spend a lot of money on a super-long lens.
But I Don’t Have a Long Lens!
What to do if you don’t have a long lens? Does that mean you are out of luck? Not necessarily. Here are two thoughts for you:
- Teleconverters: First, check out teleconverters. These are relatively inexpensive devices (at least, compared to lenses) that attach to your camera between it and the lens and add focal length. Typical strengths are 1.4x and 2x. That means, if your longest lens is a 200 mm (which is the case for me) then you can put on a 2x teleconverter and now your lens is a 400 mm. There is a cost though, and that cost is light. Using the teleconverter will result in a smaller aperture. The aperture will be one stop smaller for a 1.4x teleconverter and 2 stops smaller for a 2x teleconverter. Therefore, you will need a relatively fast lens to make these work.
- Rentals: If that won’t work, consider renting a lens. If you don’t already have a go-to rental place, check out LensRentals and BorrowLenses. Lenses with super-long focal lengths are outrageously expensive. Unless you are shooting wildlife or sports, they are just not worth the money. Further, for most of us they are specialty items you will only use now and again. In that case, you might as well rent it only when you need it. It will save you a small fortune.
Tripod and Remote
Other than a long lens, all you need is a tripod and remote shutter release. Actually, I suppose you could hand-hold the camera for this shot because you’ll be using a shutter speed that complies with the Reciprocal Rule. However, using a tripod and remote are much preferred. As mentioned above, precise focus is crucial, and you probably can only achieve that by taking your time with the camera set up on a tripod. So if you have a tripod and remote, use them.
Setting Up to Photograph the Moon
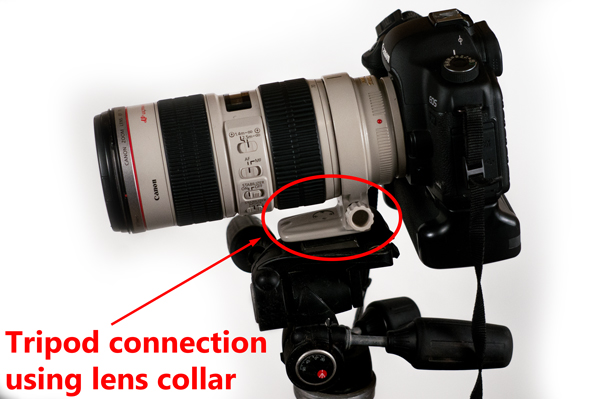
Now let’s get set up for the shot. First just put your camera on a tripod and aim it at the moon. If you are using a long lens, you might want to attach the tripod to the lens instead of the camera. That will distribute the weight of the camera and lens a little more equally and put less pressure on your tripod controls. After that, zoom in with your zens all the way on the moon. Don’t worry about focus or exposure yet. Just get everything aimed at the moon.
One you have your camera in place, the main thing to do is this: use the Live View feature on your camera so you are looking at the picture through the LCD. Once you have zeroed in on the moon, zoom in on the LCD as much as possible. Most cameras will have a feature that allows you to do so. From there, you will be able to see the moon close up. That will allow you to set your exposure and focus precisely.
These pictures live and die by the precision of the focus and exposure. Zooming in on the LCD will let you control these settings with as much precision as possible. This is a really important step, so don’t overlook it.
Exposing Your Photo of the Moon
The main danger when photographing the moon is that you overexpose it so that the moon must looks like a white blob in the sky. It is very easy to do. If you rely on your camera’s meter for your exposure values, you are almost certain to have this happen. Therefore, what you need to do is set the exposure values based on what you are seeing through your LCD.
Switch your camera to Manual mode. Now you will be in complete control of the exposure settings. Don’t worry about what the camera’s meter says. The meter is likely to be hopelessly confused and will just lead you astray. All that blackness in the sky makes the camera think the scene is underexposed so the camera’s meter will be screaming at you to get more light into the camera. Ignore it. Ignore the histogram as well. Instead, expose your picture by how it appears in the LCD of your camera. There are two ways this might do, depending on whether your camera gives you a preview of the exposure through the LCD:
- If your camera gives you a preview of the exposure through the LCD, use that to set the exposure. Reduce the exposure until you can see lots of detail in the moon and there are no blown out highlights.
- If your camera does not have this feature, you can just take test shots. Then zoom in on those to see the detail in the moon. Keep doing so until you have lots of detail in the moon and no blown highlights.
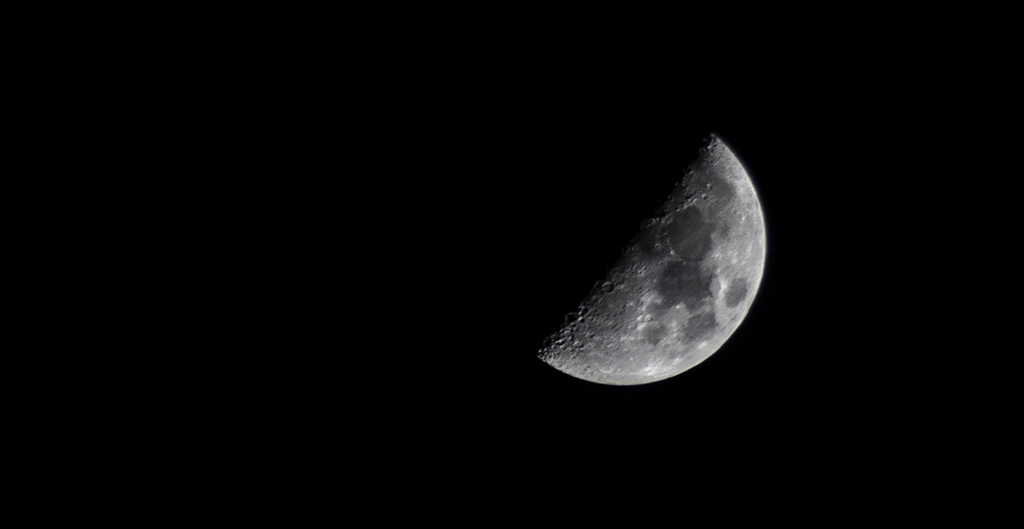
For the photo at the top of this page, I used exposure values of 1/400th of a second, with the aperture at f/5.6 and the ISO at 800. Why these exposure values? Here’s what I was thinking:
- Shutter Speed: I wanted a fast shutter speed. That may seem weird to you since my camera was on a tripod with a basically unmoving subject (I know it is moving slightly, but you’ll be using fast enough shutter speeds to negate that movement). In theory, I could have used a much longer shutter speed and captured a sharp image, which would have allowed me to use a smaller aperture or, perhaps more importantly, a lower ISO. But I wanted that very fast shutter speed for a particular reason. When I was zoomed in on my LCD at 10x, I could see tiny vibrations in the view whenever there was even the slightest breeze. I was worried about them causing tiny bits of blur in the picture, so I thought I would use a fast enough shutter speed to negate these.
- Aperture: There is absolutely no need for a deep depth of field in this picture. Everything is on the same plane of focus. I set the aperture on its widest setting. In this case I was using a 70-200 mm f/2.8 lens, but I was also using a 2x teleconverter, which cost me 2 stops of light. That means my widest aperture was f/5.6. So that is what I used. In your case, just use the widest aperture on your lens, whatever that is.
- ISO: Although I’m talking about it last, I actually set the ISO first. I knew I wanted a relatively fast shutter speed, so I set the ISO high. For this shot, the ISO was set at 800. I should note, however, that I took other shots with the ISO at ranges between 400 and 1600. This particular shot just happened to be at 800, and frankly most of the shots I took were at this level.
With the benefit of hindsight, I am comfortable that these exposure settings were reasonably correct. I think I could have reduced the overall exposure level a touch, but they are ok. I would recommend to you that you use a fast shutter speed even though you are on a tripod. You are shooting something very far away, so the tiniest movements of your camera and lens will have a dramatic impact at that distance. Further, you will likely be cropping your image significantly, so any softness will be magnified.
Nailing the Focus
You will need to use manual focus for this shot. Odds are, autofocus just won’t be precise enough.
As mentioned earlier, be sure you are viewing the moon through the LCD and be sure you have zoomed in as much as your camera allows. Most cameras have a button that allows you to zoom in on the LCD. Don’t confuse this with the actual zooming of your lens. Zooming on your LCD has no impact on the actual picture – it just allows you to see the detail of the picture you are about to take.
Once you are zoomed in on the LCD, you can set the focus precisely. This is the key to ensuring success, as, again, these photos come down to making the details sharp. To set the focus, just twist the focus ring back and forth until the focus is perfect. Do it slowly and carefully. You may have to do it several times to get it just right.
Taking the Shot
Now you are ready to take the shot. First, there are a couple of other settings that you might want to address:
- Mirror Lock Up: Assuming you are in Live View (or using a mirrorless camera) then you don’t need to use mirror lock up. Otherwise, be sure you enable that.
- Image Stabilization: You may want to turn off the Image Stabilization on your lens. Many say that having image stabilization turned on while your camera is on a tripod creates a little bit of softness.
With those checked, go ahead and take the picture. In fact, take several shots. You never know what forces might be acting on your camera and lens to create a tiny amount of movement, which will result in a lack of sharpness, at any particular moment. Taking several shots increases your odds of success. In my case, I rattled off several shots in a row every time I set up. Some were demonstrably sharper than others. Why? I don’t know. But I just always take several to insure success.
Editing Your Photograph of the Moon
Once you have your shot, it is time to edit it. The first thing you will need to do is crop the image. If you are like me, you are generally not comfortable cropping away large chunks of your image, but that is exactly what you’ll have to do here. Don’t be surprised if you need to cut away over half of the image to make the moon take up a lot of space in the picture.
After that, the two most important things are to make sure that your exposure level is right and that the picture is as sharp as possible. The sharpness is probably where you will help the picture the most in post processing, but first let’s make sure the exposure level looks good.
Brightness/Exposure
If you have a problem with the exposure of your photo of the moon, it is likely to be that there are parts that are too bright. In that case, you should just reduce the highlights a bit. Whether you are in Lightroom or the Adobe Camera Raw (ACR) screens in Photoshop or Elements, just pull the Highlights slider to the left. There is no set amount – just pull it until you have detail in all areas of the moon and none of it is blown out.
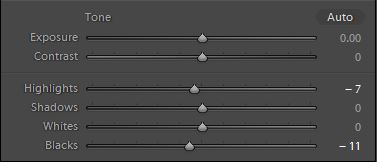
There is one other move you will likely want to make, and that is to make the darkest tones in the image even darker. To do that, find the Blacks slider and pull it to the left (again, whether you are in Lightroom or ACR). What does this do for you? Two things. First it maintains contrast in the image. By reducing the highlights in the prior step, you reduced contrast a little bit. Reducing the blacks will help maintain – and perhaps even increase – contrast in the image. Second, it will pull parts of the image to pure black. Normally this is not something you want. However, there is no sense having any detail in the sky. It just takes away from the subject (the moon). Further, any detail will likely just be noise. Just get rid of it by pulling it all to black.
Sharpness
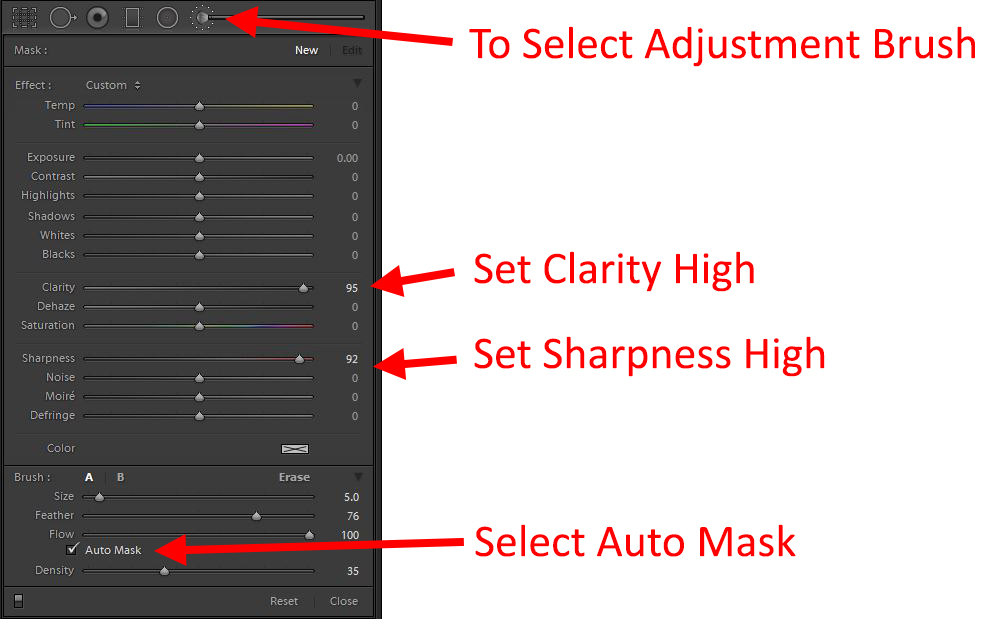
Now we get on to the fun part. You should enhance the sharpness of the moon to a pretty significant degree. The best way is to use the Clarity and Sharpness sliders in Lightroom or ACR.
In particular, the best way to apply these changes is not to make global adjustments to the entire image – in which case you are just sharpening the noise and any artifacts in the sky – but rather to use the Adjustment Brush and dial in a high amount of both Clarity and Sharpness in those sliders. In my image, I pushed the sliders almost all the way to the right.
The Clarity control in particular will have a pretty dramatic effect on your picture. Normally you might be concerned about overdoing this control, but in this case it just shows up as additional detail to the moon. You can really crank this up. Be sure “Auto Mask” is selected so that if you paint outside the moon it will limit the effect to the moon itself.
Noise
The only other significant concern you might have is any noise in your photo. I would avoid any global noise reduction adjustments because you will be undoing some of the detail you just added in the previous step. Noise reduction always means some reduction in detail. Therefore, apply your noise reduction to the black sky, but not the moon itself. You can use the Adjustment Brush to add in noise everywhere except the moon. You can also take the photo into Photoshop and use a noise reduction plug-in such as Noiseware. Apply the adjustment on a new layer (Ctrl+J), so then you can mask off the moon.
Photographing the Moon versus Including the Moon in Your Photograph
In this article, I’ve talked about how to photograph the moon. By that I mean taking a picture of the moon – and only the moon. It is sort of like taking a portrait of the moon.
But, you may think, I want to take a picture of the landscape and include the moon in it. How do I do that? The answer is, for the most part, for you not to do that. I’ve seen more pictures ruined by people trying very hard to include the moon in their photos than almost any other cause at night. Trying to include the moon in the scene almost inevitably leads to a large amount of black space in the middle of the photo. In that way, including the moon in your photo makes it worse, not better.
Of course, on occasion, including the moon in your photo is a positive. Who would say that Ansel Adams made a mistake by including the moon in Moonrise, Hernandez? Nobody. If you do, try to capture it when the moon is close to the horizon line. That way you will limit the amount of dead space in your picture.
In addition, when you do attempt to include the moon in your photo, because of its brightness, you face a quandary. You can either expose the picture correctly overall and then have a blown out moon, or you can expose the moon correctly with the result that the rest of the picture is woefully underexposed. Neither of those options is great.
There is a third way if you are determined to include the moon in your picture. That is to take two pictures of the exact same scene with one exposed for the scene as a whole and one exposed for the moon. Then you can blend them in Photoshop later.
Now – Go Photograph the Moon
A great thing about capturing the moon is that you can do it on any clear night where there is a moon, which is most of the time. You don’t have to wait for special night. You don’t have to drive into the countryside to avoid light pollution. You can set up just outside your home and have the whole thing done in less than half an hour. So give it a try. Hopefully using these tips will help you come away with a great result.