
We photographers spend a lot of time worrying about exposure settings. Virtually anything you read will stress shooting in a manual mode so that you can control the exposure. But underpinning this is an assumption that we know, or that our camera knows, the proper exposure level in the first place. In other words, we have to know the amount of light coming into our camera so that we know what exposure settings to use. So just how do we know that?
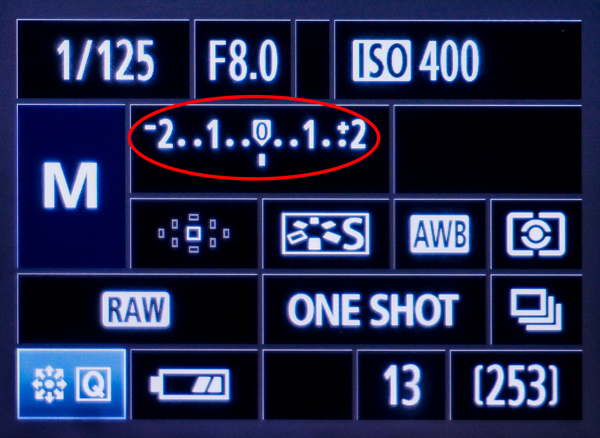
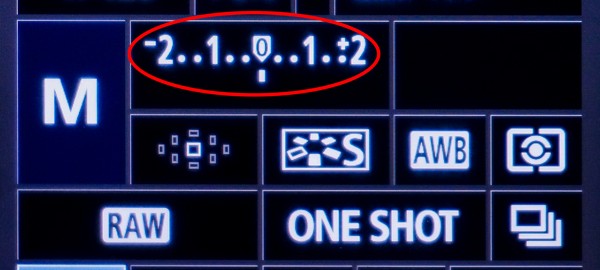
The initial answer, of course, is that the level is determined by your camera’s internal light meter. The camera meters the light levels of the scene and then tells us what is a proper exposure. There is often a scale in the middle of your viewfinder, and sometimes a number (which may be positive or negative), or both, and the “right” exposure is set in the middle of the scale as a “0.” If your camera is set to overexpose, the meter will read something on the “plus” side of the scale. For underexposure, the meter will be on the “minus” side of the scale, meaning we need to add light to achieve the proper exposure.
But the real question is how the camera knows the “proper” light level in the first place. Is there a proper light level for all situations? And what if you’re aimed at a dark part of an otherwise bright scene (or vice versa)? How does the camera make sense of all of this?
That is what we’ll cover in this article. First, you will see how the camera determines the right level of light for your scene. Then, you will learn how the camera goes about measuring the available light to compare it to that level. That is important because then, and only then, will you understand how to meter and, consequently, how to properly expose your picture.
The Automatic Route
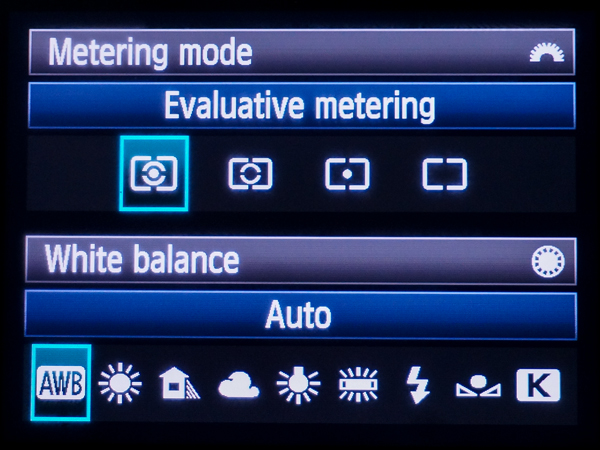
Before we get into that, I should mention that there is an easy, albeit imperfect, way to go about this. Like so many things in photography, you can just go with the automatic settings. On your camera this will be called something like “evaluative metering,” “matrix metering,” or “multi-segment metering.” They are all different brands’ way of saying “automatic.”
I bring it up here because, frankly, the automatic way really isn’t that bad. Just put the camera in the most automatic metering mode your camera offers, then set the meter on the “0” in the center of the scale, and I would hazard a guess that the camera will get it right (or pretty close) about 75 – 80% of the time.
To make it work right in that other 20 – 25% of the time, however, will take some knowledge about what is going on. Plus if you ever want to add mood or effects to your photos by affecting the exposure, you need to control this process. If you understand a little bit how the camera measures light and how you can control it, then it allows you to take control and make it work for you in every situation.
So that’s what we’ll do in the remainder of this article. But don’t worry, its not really complicated.
Determining the “proper” light level
So let’s dig in. First, let’s consider how the camera determines the “right” amount of light for your picture.
The Camera Compares the Values to 18% Grey
When you look through the viewfinder and get it all set up so your exposure meter is lined up right down the middle at “0,” how does that camera actually know that is the right level?
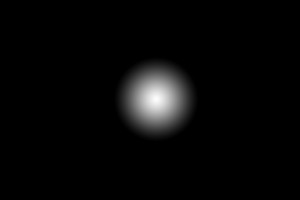
The answer is that it really doesn’t. It is just a machine and just knows what it has been programmed. But it has been programmed to measure the lightness values of the scene and average them out. The value is then compared to a preset standard of 18% grey. This is basically a middle shade of grey.

Why 18% grey? That is just what the camera engineers have collectively determined is the average light value of most scenes in the world. In other words, if you take the brightness levels of a bunch of scenes in the world, measured them all, and averaged out all the pixels, then the value you would end up with is 18% grey. So the camera engineers use that tone as the proper exposure level.
I should note that the manufacturers all do it essentially the same way and nobody complains about it, so they appear to be right about that level for most scenes. If you meter a scene through your camera and the meter is right in the middle, that is 18% grey.
Problems with the “One Size Fits All” Approach
Like I just said, lining up the exposure so it is right down the middle will usually work for you. But if you are in a particularly light or dark scene, it won’t. Again, the camera will attempt to reduce any scene to middle grey. Let’s take a look at a few examples.
You’ll Need to Overexpose Bright Scenes
First, let’s say that you are taking pictures of an outdoor, daylight scene blanketed in snow (in other words, it is a very bright scene). You look at the meter and set it to “0.” If you take the picture, it will likely come out looking very grey and dingy.
Why? What’s going on here? The answer is the while you know that your scene is mostly white from all that snow, the camera doesn’t know that. The camera thinks everything is 18% grey. By setting the meter to “0” you essentially said to the camera: “make this scene average out to 18% grey.” So the camera does what it is told and makes the scene appear, overall, 18% grey.
So the picture you took is underexposed and all that white in the frame has been made grey by the camera. That’s not what you want. To get it where you want you need to overexpose (per the meter). Set your exposure so the meter lines up to the right on your screen. You want the camera to expose the scene at something brighter than 18% grey.
In a scene like this, or any bright outdoor scene such a beach, try setting the meter at +1, which is one stop overexposed per the camera. You are now telling your camera “make this scene brighter than 18% grey.” If you take the picture, the camera will do what it is told and make a brighter scene that you see. That should be more in line with what you intended.
You’ll Need to Underexpose Dark Scenes
It works the same way in reverse for dark scenes. For dark scenes, you will need to underexpose your shot (per the meter) to keep your camera from turning that darkness into a middle grey.
Let’s say, for example, you are taking a picture of your black cat laying on a dark sofa. The overall scene will be dark. If you set the exposure to “0” the camera will make this scene average out to 18% grey, not the darker tones you want.
To address this, line your meter up to the left side for these shots. For a dark scene like the one described above, try setting your exposure at -1. Now you are telling your camera “make this scene darker than 18% grey.” That should get you the darker tones you are looking for.
Setting the Proper Light Level
So now you know how the camera sets the proper exposure level at “0” by converting everything to middle gray. Use this level as a “default” level, or if the scene is not particularly light or dark. You also know how to adjust if your scene is very bright (tell the camera to overexpose per its meter). You also know how to adjust if your scene is dark (tell the camera to underexpose per its meter).
But this all presupposes that the camera is measuring all the pixels in your frame and averaging them out, giving equal weight to each. That’s not how cameras work, and in any event it is probably not going to be what you want. So now let’s look at how the camera actually evaluates lightness values of the various portions of your frame, which ones it measures, which ones it ignores, and how it weights them. That will allow you to fine-tune your metering.
How the camera measures light
In this section, we need to consider what part of the screen the camera uses to measure light. And what if part of the scene is really dark and part of the scene is really light?
Lest you think I’m creating needless complication here, this will be a problem you will face in outdoor photos more often than not. Your scene will frequently contain a bright sky, a medium-toned foreground or subject, and will also have a dark shaded area or two in it. So what part of this view does your camera look at to determine the proper exposure?
The answer is “whichever one you tell it to look at.” You can tell the camera to look at most everything, or you can tell the camera to weight some part more than others, or you can also tell the camera to just use one particular point to determine the light level. How the camera responds depends on the “metering mode” you use.
The Metering Modes
Every brand of camera will have the options stated above, by the may go by a few different names, depending on your brand. Here are the options contained in most cameras, from the broadest to the narrowest:
Evaluative, Matrix, or Multi-Segment: This is essentially “Auto Mode” for metering. In this mode, much of the frame is used to evaluate light levels. The camera will evaluate the scene, using middle grey as its target, and use algorithms designed by the manufacturers to determine the proper exposure. An important feature of this mode is that it is typically tied to the camera’s auto-focus, so that the camera will weight the subject higher than other parts of the frame.
 Partial Metering: The camera restricts the portion of the frame that it uses to meter light to about the middle 8-10% of the view. Often there is a circle in the middle of your viewfinder that will show you this zone. This allows you to meter more accurately on your subject, but the camera will still take a little bit of the surrounding area into consideration. There is also a related mode called “center-weighted metering” that essentially does the same thing, but it will take the entire frame into consideration.
 Spot Metering: The camera meters based on a single spot that is right in the middle of your frame. The camera uses only about 1-5% of the frame to measure the amount of light. This gives you precise metering, but only of one particular element of your frame. To overcome this downside, however, you can take multiple readings throughout your frame (more on this below).
As you can see, you can tell the camera how specific to get with the metering. Any one of these methods is fine, as long as you are comfortable with it and understand what is going on. But at the same time, none of these is a perfect system. For example:
- If you spot meter the scene mentioned above, and you meter off the sky, a “correct” exposure per your camera will result in a black foreground.
- If you spot meter off the foreground, a “correct” exposure per your camera will result in a completely blown out (white) sky.
- Or if you choose evaluative metering the camera may end up trying to go down the middle and getting absolutely nothing right.
Choosing the Right Metering Mode
Which one should you use? There is no right or wrong answer here, and you can use whichever mode your are most comfortable with. They all have their plusses and minuses.
That said, I do want to leave you with a recommendation. Which metering mode you should use will depend on where you are with photography. In my view, there is a best way to go about metering, and it is to take multiple spot meterings (discussed below). At the same time, I do not want to bog down beginners with taking multiple spot meterings when you have so much else to learn and worry about while shooting. So here is what I recommend:
Beginnners: Go with the “automatic” mode of your camera for now, whether that is called “evaluative,” “matrix,” or “multi-segment” metering. Get comfortable with your camera, with exposure, with photography in general. You have a lot to learn, and letting the camera handle this task for now will let you focus on other things until you are ready to tackle this head-on.
This will actually work pretty well for you. As I mentioned earlier, the camera’s meter will “get it right” if you set it right in the middle at “0” about 75 – 80% of the time. In addition, since the metering interfaces with the camera’s autofocs, the camera will usually prioritize your subject. The camera will attempt to keep all elements within its dynamic range. Oftentimes the camera’s computer will do a better job than a human (and it will certainly work quicker).
The downside is that you lack control over the process. But remember that you can still set the overall scene a little brighter or a little darker as described above.
In terms of the actual shooting process, wherever possible I recommend you take the picture using this metering mode with the meter set on “0,” check out your histogram, and adjust it up or down if necessary.
Once you have gotten more comfortable with your camera, you can worry about the spot metering strategy I recommend for those that have been at this a while.
Intermediate – Advanced: I recommend using spot metering when you are shooting. Spot metering gives you precise readings of what you are aimed at. The way you get around the fact that it only meters a small portion of the frame is that you take multiple readings in light and dark portions of your frame.
There are a lot of aspects to this approach to consider as you are shooting. Obviously, you will want to make sure your subject is at the proper level, so you will typically meter off of that. In addition, meter on the brightest and darkest portions of the frame and make sure they are where you want them (that the bright portions are on the “plus” side of the meter and the dark portions are on the “minus” side of the meter. I will describe the process for doing this that I use in the very next article.
This method gives you precise control over the camera’s metering and the exposure process in general. The downside is that you cannot work as fast as the camera’s computer, but you will find that, with experience, you can move very quickly.
Final Takeaway
Hopefully now you understand how the camera is metering light and how it is determining the “proper” exposure level. Understanding that process leaves us with three simple steps for exposure:
1. Set up your camera with the metering style you want (spot-metering or your camera’s version of auto).
2. Understand that your camera is converting everything to middle grey and act accordingly. That is, if you have a very light scene, set the camera to overexpose; and if you have a darker scene set the camera to underexpose.
I recommend you practice with this a little bit so that the adjustments you make on a picture by picture basis get to be second nature.
If and when you are ready to tackle spot metering, head to the next article where we cover that subject.
Thanks for the explanation. Very helpful! Could you suggest what metering mode to use when the subject is not centered, or does it not matter if there’s an average of the whole frame?
Good question. You are right about it not mattering if you are metering based on average (or using an automatic mode). On the other hand, it would matter if you are using spot metering. Even in that case, however, I would just meter without worrying about your composition, and then when you have the exposure the way you want it, move the camera into final position. So I think the answer to your question would be either automatic metering, where centering would not matter, or spot metering, where it would matter, but you could just deal with it. Hopefully this answers the question, but if not just let me know.