

The idea of high dynamic range (HDR) photography is that you will take your set of bracketed photos and process them in a dedicated HDR program on your computer. When it comes time to do that processing, there is perhaps no more widely used program than Photomatix Pro. It costs $99 and operates as a stand-alone program, or works within Photoshop and Lightroom. If you don’t already own it, I recommend buying it.
Using Photomatix is fairly simple, once you know how to use it. When you first see the different dialogue boxes and multiple sets of controls, however, it can appear overly complicated. In this article, you will learn how to set up Photomatix so that these dialogue boxes can be clicked through quickly. After that you will learn how to use the Tone Mapping and Exposure Fusion modules to create your HDR photos. In doing so, you will learn about some of the key sliders and controls.
You will notice as we go though this process that some of the sliders and controls get glossed over. That is because, for the most part, these are controls for things that can be done better in Photoshop or Lightroom. You should let Photomatix do what it does best (Tone Mapping and Exposure Fusion) and let Photoshop and Lightroom do what they do best (affecting brightness, contrast, and color). That will make your Photomatix experience much simpler, and will also result in better pictures.
The Photomatix Process
Using Photomatix boils down to just four steps:
- Importing the photos you want into Photomatix
- Making your preprocessing selections
- Setting the style of processing you want to perform
- Using the sliders to set the effects.
Each of these steps is super simple. The remainder of this article will go through those steps in order.
Step 1: Import Your Photos into Photomatix
Obviously the first step in using Photomatix is getting your photos into the program. So let’s do that first.
Importing your photos into Photomatix is simple. Just open the program and then, at the top left of the screen, click on the button that says “Load Bracketed Photos.” When you do so, the following dialog box will appear:
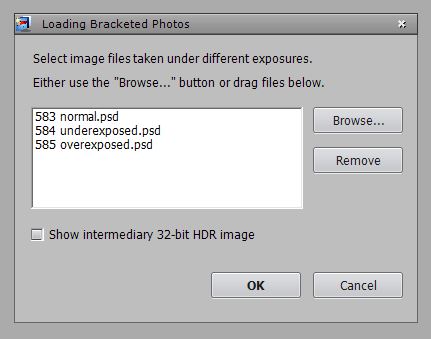
Click on the Browse button, select the photos you want from your hard drive, and click OK. I have selected 3 photos, but if you have bracketed 5 or even 7 photos, you can select all of them.
If you have Lightroom, the process is even simpler, as Photomatix interfaces really well with Lightroom. Just select the photos you want to use in Lightroom, then right-click your mouse. One of the options that appears will be Export. Select Export, and then select Photomatix Pro. Your photos will open up in Photomatix and you will be ready to go.
Step 2: Set Your Preprocessing Selections
When import your photos into Photomatix, you will immediately be faced with a dialog box giving you some preprocessing options. Here is the dialog box that will appear:
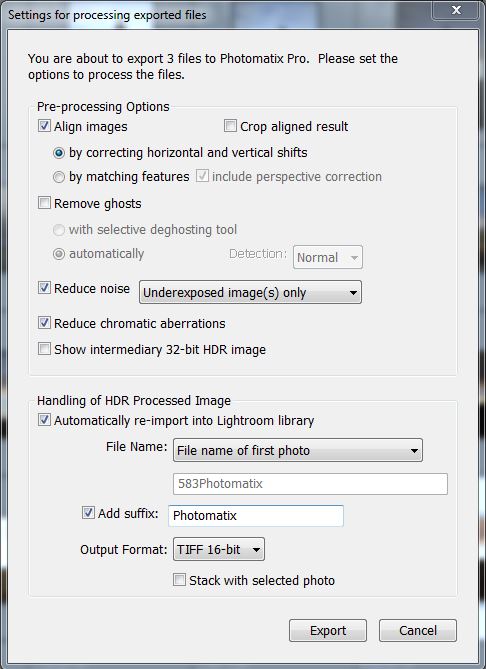
The settings in the box above are the settings you should generally use, and the ones that will be used for the examples in this article. Here is how to approach these settings:
- Aligning Images: Photomatix will do its best to align your images, and will generally do a good job of it, even where you hand held your shots and moved a little bit between shots. I find that having Photomatix align images by correcting horizonal and vertical shifts tends to do a slightly better job. Both options (by correcting shifts and by matching features) generally work fine, so just try them both and use whichever one you feel does the best job for you.
- Remove Ghosts: If there are objects that moved during your shots, it tends to create what are called “ghosts” and Photomatix can help you remove them. In this case, my photos have no such ghosts, so I left the box unchecked. In fact, you should leave it unchecked whether you think you have an issue with ghosting or not. If you do, just deal with it in Photoshop using the Clone Stamp Tool or by masking it out using different layers.
- Reduce Noise: Photomatix will help you keep digital noise under control, and provides a few options for doing so. You can have Photomatix reduce noise on underexposed images, or on normal and underexposed images, or leave it off entirely. Leave this option on, but just reduce noise on the underexposed images, since that is where noise is generally the most prevalent.
- Reduce Chromatic Aberrations: The HDR process tends to sometimes create chromatic aberrations in your photos, so leave this option checked. Photoshop has a tool for removing chromatic aberrations as well, so you could leave this unchecked and deal with any problems later, but there is no downside to leaving it checked here.
- Handling of HDR Processed Image: This portion of the dialogue box will only appear if you use Lightroom to get your photos into Photomatix. These options just relate to how your photo is identified and stored by Lightroom, and as such there are no right or wrong settings here. Keep the output at 16-bit TIFF files to preserve the highest quality though.
Once you have these options set, just click OK or Export. It will take a while for Photomatix for process your photos, but after that, you will see the result. Don’t worry if the result you see is nowhere near what you want (and it probably won’t be). This is just the default setting of Photomatix, and now the fun begins.
Step 3: Select Your Starting Point in Photomatix
Now your photos are in Photomatix, and you are ready to go. At this point, you are probably itching to start moving the sliders around and make the picture look its best. Before we get on to that though, we need to consider the starting point and how we go about processing your photos.
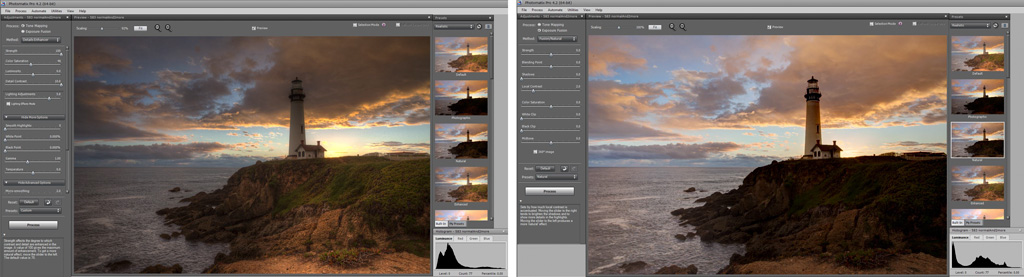
Photomatix offers two modules for processing your photos, which are called: Tone Mapping or Exposure Fusion. They work differently, and the sliders available to you to do the final processing of your picture will be different depending on which you select, so we need to take a second and make sure you understand the difference.
Here is the difference between Tone Mapping and Exposure Fusion:
- Tone mapping is the process by which Photomatix sets the tone of all the pixels in the image. It is not a rote blending (like Exposure Fusion) but a complete reworking of all the tones in the picture. It works great where the dynamic range is really high, and it gives you a lot of control over the image. The only downside is that it can result in that “HDR look” that many hate.
- Exposure Fusion is the process whereby Photomatix blends together the pictures without going through a whole tone mapping process. The result is less control over the image by you, and usually the picture still has a very wide dynamic range, but the benefit is that you get a more realistic HDR.
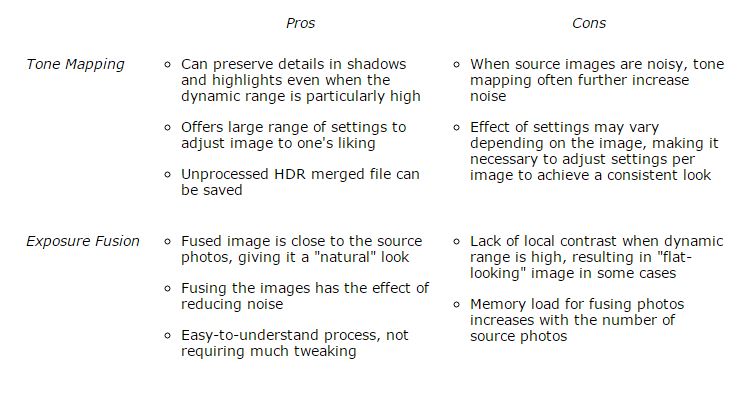
For some additional detail about the differences between Tone Mapping and Exposure Fusion, here is a pros and cons list for each – taken straight from Photomatix’s website:
When should you use each? In general, start with Tone Mapping and see how it looks. If you are getting overly HDR-looking effects, switch over to Exposure Fusion. In addition, as addressed later in this article, you should make one of each and later evaluate and/or combine them to get the best of both worlds.
Step 4: Set Your Sliders
At long last, it is time to set your sliders. It is difficult to tell you how to do this because every picture is different. At the same time, I know vague generalities are unhelpful, so I will try to be as specific as possible. Try out the settings I offer here, but then change them around to see what you like the best.
Start by looking at the thumbnail presets offered by Photomatix. If there is one that you like, use it as your starting point. You will generally only use the thumbnail presets under the Realistic drop-down option. The others look overly surreal and grungy. In any event, after you have selected a preset, you can change it by move the sliders around so you are not confined to those settings.
When you select a preset, the controls may change whether that preset was created using Tone Mapping or Exposure Fusion. Most of the presets use the Tone Mapping option, and that will be covered first. After that, we will walk through Exposure Fusion.
Option 1: Tone Mapping
You will note at the top left of the screen that you can use the Tone Mapping module by two different methods: Details Enhancer or Tone Compressor. You will usually use the Details Enhancer method. The Tone Compressor method does not take into consideration local context when it is setting the tones. Therefore, the pictures almost never look as good and you have less control. If you are Tone Mapping, stick with the Details Enhancer.
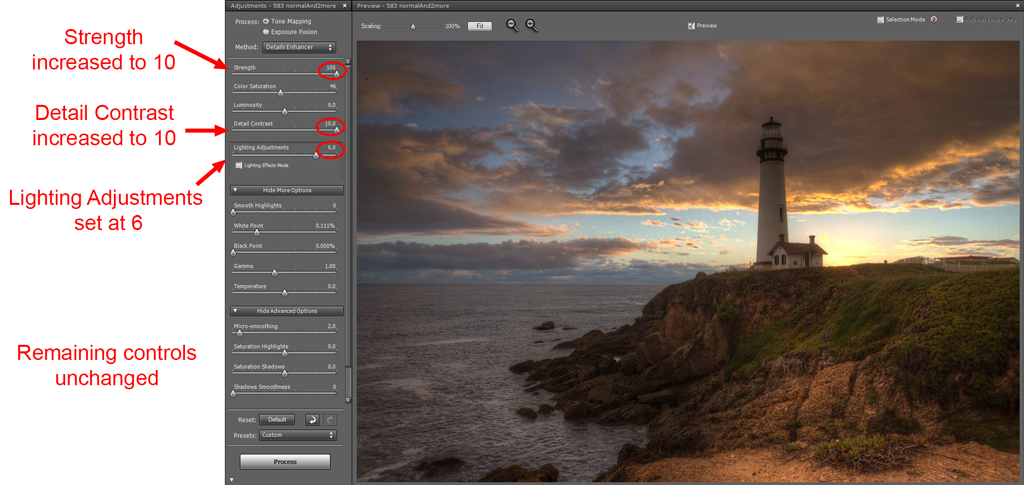
When Tone Mapping your picture, you only need to worry about 3 sliders: Strength, Detail Contrast, and Lighting Adjustments. Here is what they do and where you should start by setting them.
- Strength: This control allows you to increase the contrast and detail of the picture. Start by increasing this setting all the way to 100.
- Detail Contrast: You will generally want to increase this setting a least a little, often a lot. Move it all the way to 10 to make the picture as detailed as possible, and only back it off if necessary. Doing so will often make the picture darker, but do not worry about that now – you can fix that with other controls (either in this program or in Photoshop or Lightroom).
- Lighting Adjustments: This control affects the overall ‘look’ of the picture by changing the lighting of different pixels. Moving the slider to the right makes the image look more natural, while moving it to the left makes it more surreal. In general, move it to the right somewhere between 4 and 8.
Those are the 3 controls you should always change in Tone Mapping your picture. Conversely, there are several controls you should not change in Photomatix. Here they are:
- Saturation: Photomatix gives you the option of increasing or decreasing saturation. Often, you will find that your picture benefits from an increase in saturation. You should avoid making this change in Photomatix, however, because you can change saturation with much greater control in Photoshop (such as a Hue/Saturation adjustment layer or a Curves adjustment layer in LAB). Even if you do not have Photoshop, you can change the saturation using the Vibrance and Saturation sliders and the HSL/Color panel in Lightroom.
- Luminosity: The Luminosity control is sometimes tempting to use since it brightens your picture. This effect comes at a cost, however, in that it makes your photo look more “painterly” and unrealistic. Do not increase the Luminosity in Photomatix. If your picture needs to be brightened, do it later in Photoshop or Lightroom using the myriad of controls in those programs.
- Levels: There are several controls in Photomatix that let you control the White Point, Black Point, and Gamma of your picture. This is similar to a Levels adjustment layer in Photoshop. For that reason, you might as well use Photoshop for this. The Levels adjustment layer works better and gives you more control (as does a Curves adjustment layer), so do not make these changes in Photomatix – make them in Photoshop.
That said, if your picture is obviously in great need of help, go ahead and use the Photomatix controls to make the picture look as good as you can. In addition, you can and should play around with these controls to get an idea of how you want the final image to look. The point is for you not to worry about these controls right now. You will have the opportunity to make changes to saturation or brightness in Photoshop and Lightoom later.
Option 2: Exposure Fusion
As mentioned above, Exposure Fusion gives you less control over the final picture, but gives you a more realistic picture. In many cases, this is preferable. In addition, just because there are less controls in the Exposure Fusion module doesn’t mean you have less ultimate control over your picture, since you will want to make most of your adjustments to brightness, contrast, and color in Photoshop or Lightroom anyway.
Once you select Exposure Fusion, there will be a dropdown menu to allow you to choose the type of Exposure Fusion. You will almost always choose Natural. Once you do so, there is just the matter of moving the sliders. Again, you should take a minimalist approach in Photomatix. You can change things later in Photoshop if you want. Here are the controls you focus on:
- Strength: This is the strength of local contrast enhancements. This will usually (but not always) warrant moderate increases. Start with a setting between 2 and 5.
- Local Contrast: This increases the local contrast of the picture, which tends to show up as increased clarity. A moderate increase to between 2 and 3 usually works best.
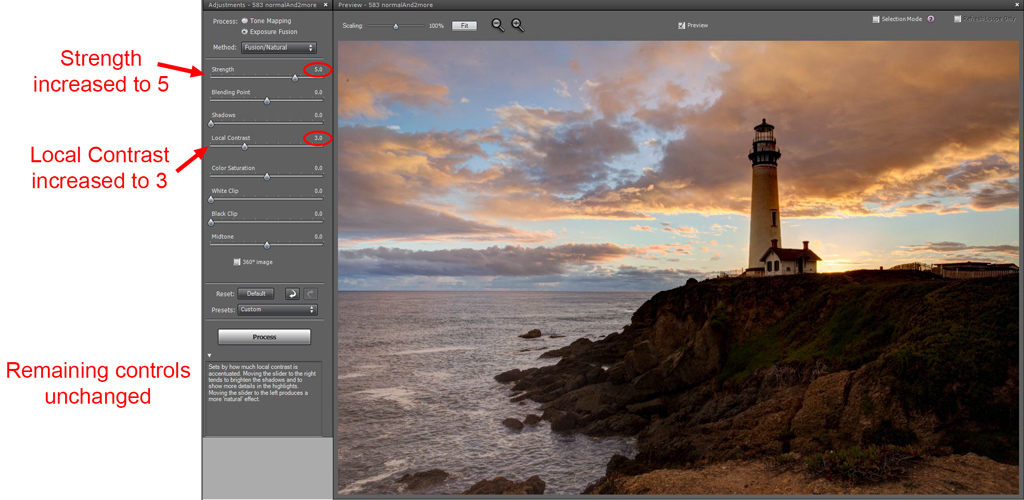
The remainder of the controls affect brightness and saturation, which, as addressed in the prior section on Tone Mapping, are better handled in Photoshop. Do not make any adjustments to these sliders unless, for some reason, you will not be using Lightroom or Photoshop.
Option 3: Make Both
We have now covered both Tone Mapping and Exposure Fusion, but so far they have been addressed as an either/or proposition. That is not necessarily the case though.
When it comes to HDR, there is no need to ever compromise. That is true within the realm of Photomatix as well. You can make a Tone Mapped version of your photo, and then go back and make an Exposure Fusion version. Later, you can pick which one you like best, or you can combine different elements of them in Photoshop. If you don’t know how to combine the photos in this manner, again this will be covered in an upcoming article.
Using Your Photomatix Result
Following these steps will get your photos into Photomatix and process them to get the effect you desire. Hopefully the process seems straightforward to you, since we have removed a lot of the variables and saved them for later work in Photoshop or Lightroom. Remember to let your tools do what they do best. Photomatix is great at Tone Mapping and Exposure Fusion, but Photoshop and Lightroom are better at changing brightness values, contrast, and color. That will also make your Photomatix experience much simpler. Once you have done it a few times, the process will seem simpler still.
Remember that using Photomatix is just one step in the process of creating a great HDR picture. You can just run your pictures through Photomatix and stop there – but that is generally not optimal. Instead, make a few versions of the same photo and then evaluate and/or combine them. In other parts of this series I’ll show you how to make HDR photos using HDR Efex Pro by Nik and using plain old Photoshop and Lightroom. I’ll also show you how to edit your photos in Lightroom so you don’t even need HDR processing. And after that, you may even want to combine these photos together, taking the best parts of each.
Related Articles
Now that you are finished with this article, here are some additional articles related to dynamic range and HDR: