

Other articles have addressed the common problem of the limited dynamic range of your camera and how to deal with it. This is a pervasive problem in outdoor photography because the sky is almost always brighter than the ground. The sun creates harsh shadows and contrasts. Your camera cannot handle the difference in tones.
Other articles have covered how to fix these problems in post-processing, and even spent a lot of time on HDR techniques for solving it. But is there was a way to deal with the problem in-camera?
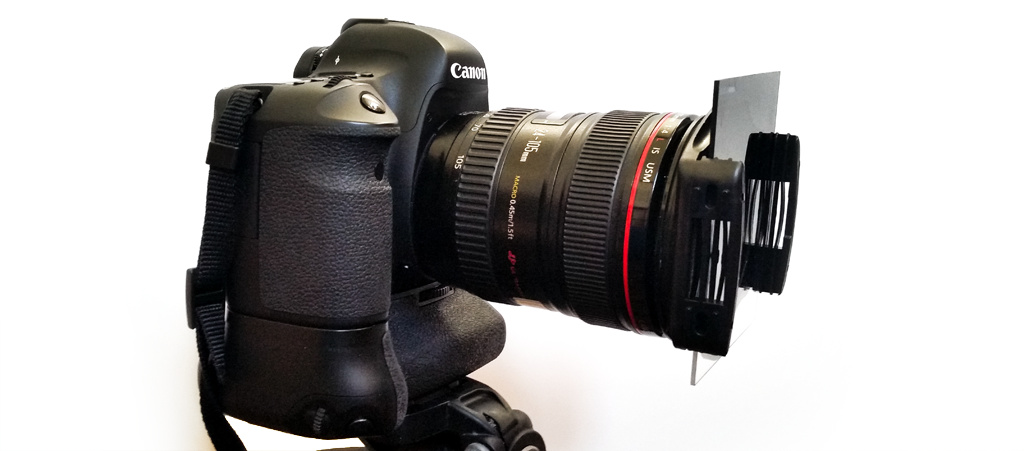
Yes. It is called the graduated neutral density filter (or a “Grad ND” for short). It is a rectangle piece of glass that fits over your lens where:
- the top portion of the filter has a dark coating over it so that it lets in less light, and
- the bottom portion of the filter is clear glass and does not affect the exposure.
If you haven’t bought one yet, check out a recent article that explains what you need. This article will show you how to use them.
Do you Need A Graduated Neutral Density Filter?
The first question you probably have is whether you need one of these filters at all. Not everybody will benefit from them. Whether you need one depends almost entirely on what sort of photography you do. Here’s a rundown of whether a Grad ND makes sense for you depending on your primary type(s) of photography.
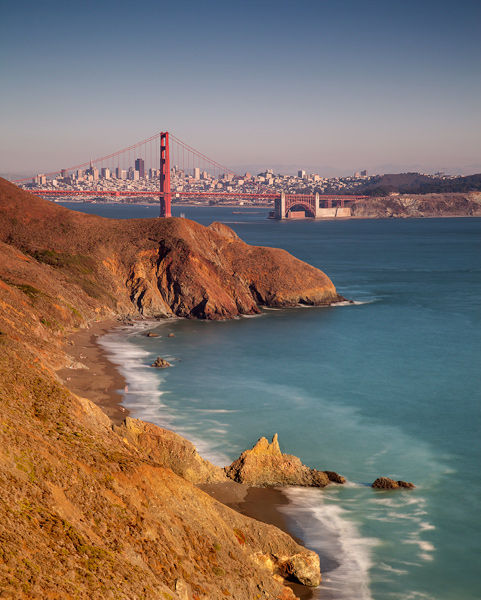
- Seascapes – Unquestionably, get a Grad ND! Since you are always dealing with a difference between a bright sky and less bright foreground, plus the horizon is nearly always level, the Grad ND is nearly always useful.
- Landscapes – You should probably get a Grad ND. You will frequently have dynamic range problems. The Grad ND won’t always work for you – particularly if you have trees or mountains sticking up over your horizon line – but it is still quite useful.
- Urban – You probably do not need a Grad ND. Although you will frequently encounter a dynamic range problem since your skies are likely to be much brighter than the buildings around you, you will not have much of an opportunity to use the filter. Buildings protruding into the sky will rarely create a level horizon the filter needs.
- Macro – You won’t need a Grad ND. You will rarely have the sky in your picture.
- Wildlife – No Grad ND needed. You will usually be zoomed in on an animal, with a blurred background. There is rarely a sky in your picture, and not usually much of a dynamic range problem.
- Sports – You will not need a Grad ND for sports photography either.

Using a Graduated Neutral Density Filter
How do you go about exposing your picture when using a graduated neutral density filter? First, meter the scene just like you normally would, without the filter on your lens. The key is to meter on the ground (or darker part of the scene) and not the sky (or lighter part of the scene). Set your camera to expose so that the ground is exposed properly.
After you have taken your meter reading, take a test shot if you want to make sure you have it right. When you do, just put the filter in the holder and take the shot without changing anything. Just make sure the filter’s transition area is lined up with the horizon line. That ought to do it.
Will a graduated neutral density filter always work for you? No. Many times you won’t have a straight horizon line and or there will be things like trees or buildings sticking up into the sky. The filter will darken those things too, even though that’s not what you want. Don’t avoid using the filter just because things aren’t perfect though. The final part of this article will help you deal with some of these issues.
Dealing with Problems
Sometimes you get lucky and you have a nice flat horizon line in your picture. In those cases, the Grad ND will take care of the bright sky cleanly.
Most other times, however, you will have some issue that seemingly precludes the use of the Grad ND. For example, in landscapes there will often be trees sticking up into the sky. In urban scenes it is quite common to have buildings sticking up into the sky. Even in a seascape like the picture just above, you may have a lighthouse or other structure protruding over the horizon. What should you do in those cases?
You should generally continue to use the Grad ND, but you will need to do a few things to compensate.
The first thing you will need to do is adjust the Grad ND. You can twist it, so that the transition between light and dark is at an angle. If you look at the lighthouse picture above, you will see that I twisted the filter to the left so that the filter darkened the entire sky and the brightest portion of the water.
Doing this can mean that the bracket shows up in your picture. In fact, in the picture above, you can see a black area in the top right corner, which is where the bracket was picked up by my camera. If that happens, you will have very little choice but to crop that portion of the picture out.
The next thing you should do is lighten the portions of the picture that the filter darkened, but which you did not want darkened. This will mean selecting the portion of the building that you want to lighten and then lightening it. The selection can be a little tricky since the filter is not darkening everything equally, meaning that you will have to lighten things unequally as well. Therefore, rather than making a hard selection, the best alternative is probably to use a brush with a low opacity and incrementally add the brightening where it is needed.
Conclusion and Next Steps
The Grad ND filter isn’t a cure all, and it isn’t for everybody. But on occasion, it is a lifesaver. If nothing else, it will save you a lot of post-processing time.
If you don’t already have one, check out my guide to buying a Grad ND. I’m more convince than ever that everybody should start out with the Cokin P-Series and get the 121S filter. Be sure to get the wide angle holder. If you do so, the filter, holder, and adapter will only set you back about $65. All the other options will cost you way more money.
Of course, a Grad ND is only one way of solving a dynamic range problem. If you would like to see other ways of doing so, here are a few articles on that: