
 So how do you take pictures that capture all the stars in the sky? Is there are particular spot you have to go? Or is there some magic exposure value you have to use? Or perhaps some post processing trick you need to master?
Actually, the answer to all those questions is “yes.” Or, at least you need to be particular about all three facets mentioned above. You have to be in the right spot. You have to use the right exposure settings. And you will need to add some processing to your picture when you are done.
But when you are done, if you’ve done everything properly, the results can be spectacular. This article will walk you through the steps needed to get you started photographing the night sky.
How to Find a Dark Sky
First, you will need a dark sky. That is a function of both time and place. For the time element, simply make sure you wait until at least an hour after sunset. At that point the sky will be dark enough to show the stars.
In terms of place, you will need to avoid light pollution. At a minimum, you will need to get out of whatever city or town you are in. But once you are in a rural spot, not all places are equal. To find out if the sky in your area is truly dark, check out any of the dark sky finders on the internet. I use this one. These tools are invaluable for making sure you have a dark sky that shows the stars to their full extent.
How to Find the Milky Way
Next, if possible, you want to include the Milky Way in your picture. There is a definite Milky Way season. It runs from April until September. During those times you will have the best opportunity to capture the Milky Way in the sky.
If you just go outside to a dark place thinking you will see the Milky Way, you are destined for disappointment. You probably won’t even see it. Your camera will though. To find the Milky Way, just get an app. The best one is Photo Pills (it only works for Apple devices, but there are other apps for use on Android devices). I recently met a photographer that was considering ditching his Samsung phone and getting an iPhone just so he could have the Photo Pills app!
Once you found your dark skies and set up your picture, you will need to expose it properly. The next three steps will help you do that.
Set Your Aperture First
The first move you should make when setting your exposure is setting the size of your camera’s aperture. Set the aperture to its wide open position (i.e., use the smallest f/number that your lens allows). You will need a lot of light to capture the stars so you need that wide aperture. Do not worry about the shallow depth of field that results from a wide aperture, as everything in your picture will be far away (at infinity on your focal length range).
Incidentally, this is one area where the kit lens will work fine for you. Most photographers with expensive lenses will be using aperture settings of f/4. Kit lenses commonly open up to about f/3.5 at their widest focal length. If you are unable to spend a lot of money on a lens, you will still have it at least as good as those who did in this regard.
Next, Set Your ISO
The next exposure control you should set on your camera is the ISO. You will want to set it quite high. Start by putting it at ISO 4000. As mentioned previously, it takes a lot of light to capture the stars in the sky. You will need a sensitive digital sensor to capture enough light.
You may be worried about digital noise with an ISO setting that high. Do not worry about it at this point. As we will see, when it comes to exposure, this is the lesser of evils. It is impossible to open up the aperture any more (since you have it opened up all the way) and, as we will see in a second, you really do not want to use a longer shutter speed. Later, you can deal with the inevitable noise that will show up in your picture. To a certain extent, the noise will blend in with the stars, so you can just use it. You can reduce the noise later very simply by using Lightroom, Photoshop, or other dedicated noise reduction software.
Last, Set Your Shutter Speed
Finally, go ahead and set your shutter speed. Start with a default setting of about 20 seconds.
Do not set a shutter speed any slower than 20 seconds. You might be tempted to do so in an effort to bring your ISO down. After all, your camera is on a tripod, right? What could it hurt?
The fact is that a slow shutter speed will ruin your picture. The reason for that is that the stars are moving across the sky. You don’t see it, but your camera picks it up. If you use a longer shutter speeds, there will be light star trails in your picture. They won’t be long enough star trails to actually be interesting – they will just show up as blur and ruin your picture.
Of course, you might actually want star trails in your picture. But this is another topic entirely. The shutter speed for that kind of star trails is measured in minutes if not hours.
Add Contrast
When your picture comes out of the camera, it will probably look pretty good, but not great. The next few steps will help your turn it into that great starscape you were after.
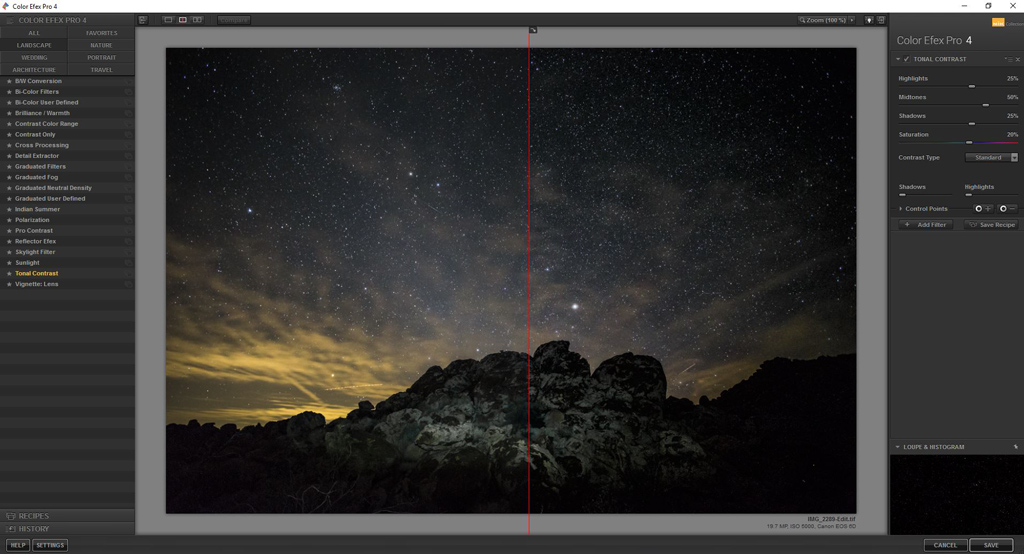
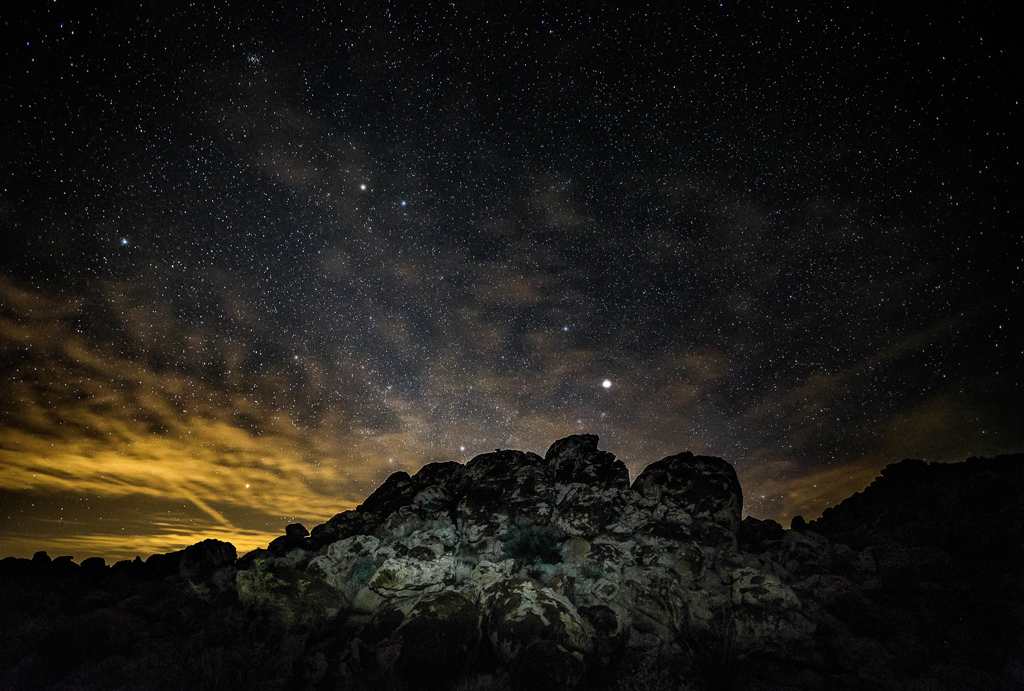
The first thing you will need to do it add some contrast to the sky. There are a lot of ways you can go about doing that. The simplest way is just to add contrast in Lightroom. In the Joshua Tree picture at the very top of this article, I just added +30 of contrast. Nothing fancy at all.
There are other ways to do it as well. An easy way that can yield fantastic results is a plugin. One great choice is Color Efex Pro from the Nik Collection (now free). Take a look at the before and after versions of the Joshua Tree photo:

You can also use curves adjustment layers with layer masks in Photoshop to add contrast. This affords you a great deal of control over the picture. If you are unfamiliar with how to use these, check out this article and to get started using them. There really is no more powerful tool for editing your photos.
The main thing to watch out for here is banding. Dark colors have less separation between them in digital capture. Oftentimes when you change them, banding occurs. There is no magic formula for avoiding banding – just watch for it and make sure your adjustments aren’t creating it.
Add Clarity
Pehaps the most important thing you will do to enhance the stars in your picture is adding clarity. There are a lot of ways to do this, but again the easiest is just a simple Lightroom adjustment. As an example, the Joshua Tree picture at the top of this article has a Clarity adjustment of +27.
While you are in Lightroom (or ACR), there are other tools you can use to sharpen things up. At the very bottom of the Develop module is the Dehaze slider. It will add clarity to most photos, but it tends to make night sky photos rather dark. I added a modest amount of dehazing (+9) to the Joshua Tree photo.
You can also use standard image sharpening. In Lightroom or ACR, push the Amount up to around 50 to start with. To avoid adding noise to the sky, add in some masking. In the Joshua Tree photo, I raised the amount to 59, added modest increases to both Radius and Detail, but then pushed the Masking up to 37 to avoid affecting other parts of the sky too much.
Finally, there are plugins for adding Clarity, such as Topaz’s excellent plug-in appropriately named Clarity. Give that a shot to add some additional pop to your sky.
Fix the Noise
For the last step, you should address the noise that inevitably results from the high ISO you used to capture your picture. There is a good, better, and best way to go about it.
The good way is to just increase the Noise Reduction in Lightroom. I will once again point to the Joshua Tree picture at the very top of this article, where I increased the amount of Noise Reduction in Lightroom to 24.
Another, better way to reduce noise, which gives you a little more control over it, is through dedicated noise reduction software. I use Noiseware. Just open up the program and add the amount of noise reduction, detail protection, etc. that you want. These programs are very easy to use.
Finally, the best way to reduce noise in your photo is to do in on a selective basis. Reducing noise in your photo also blurs details. If you apply global noise reduction, it will reduce sharpness. Therefore, you want to apply selective noise reduction just to the black sky without affecting the stars. You will do that by masking out the stars. Create a mask either by using a luminosity mask or by selecting the stars with the Color Range command, and then create a mask. Apply the noise reduction just to the dark sky. If you don’t know how to do this, I will be covering noise reduction in a coming article.
Now Go Photograph the Night Sky!
The next step is just to do it. And I have some good news for you here. You can take your time and try it over and over again. The great part about shooting at night is that you are set up on a tripod and the light isn’t changing. All you have to do is do it. Yes, you are in for a little sleep deprivation. But you’ll be glad you did it.