
 After using different kinds of HDR software over the years, I found that they all have certain strengths and weaknesses. Some of the software tends to produce a certain look in the picture, which I might not want. I have also found that how well the software performs varies from picture to picture. I might love the result from one set of bracketed photos and then hate the next. And, of course, each piece of software goes about creating HDR files in different ways. For example, in one picture the tone mapped version of Photomatix might look the best, while another picture might look best using Photoshop. Which one to use?
After using the different HDR software for a while, I started noticing that different parts of the same picture might look better using different software. For example, I might like how the sky looks in the HDR Efex Pro version of a picture, but I might like the foreground in the Photomatix version. This naturally made me start thinking about blending the pictures together to use the best parts of each.
But it goes even further. Sometimes I cannot decide how I want to process a photo using the same software. For example, in Photomatix a common question is whether to use the tone mapped version or the exposure fusion version. Often I like parts of each.
And, of course, I am often trying to avoid the surreal look that HDR software an create. Therefore, I like to incorporate elements from the original pictures.
You can probably already see where this is going. I started creating many versions of the same picture using Lightroom and the HDR software I have. I then compare them and decide which parts of each I wanted to use. Over time, I have developed a process for creating HDR images that allows you to incorporate the best parts of each HDR image. That’s what I want to introduce you to in this article.
I refer to the process with the rather grandiose name of Uncompromising HDR because you get the best of all worlds. You are no longer tied to one product. If different software has different strengths, use the strengths of each. You are no longer forced to choose between different methods of producing an image. If you flick through the presets and see two different versions you like, create them both. You can create all the versions you want. After that, you can compare them, use the ones you like, and discard the rest. Then, after you have narrowed the process down to the best versions, you can blend them together to get the absolute best image possible. This article will show you that process and how you can blend different versions to take complete control over the HDR process.
[box]This technique will require that you have a lot of different software. To do it fully, you will need Lightroom, Photoshop, Photomatix Pro, and the Nik Collection of filters.[/box]
Uncompromising HDR
Before I walk you though the process, let’s back up a moment. If you are not that familiar with the HDR process and what it does, you may be lost already, so let me show you how to catch up quickly. Elsewhere on this website, I have covered the inherent problem of a limited dynamic range in your camera and talked about some ways to deal with it, including a technique called high dynamic range photography (HDR for short). Using this technique, you bracket your photos and then use special software to blend the bracketed images together to create one image using different tones from each. Other articles walk you through the use of the HDR software that is currently available, showing you how each product works and what its strengths are. A quick summary, along with links to this additional information, is as follows:
- Photomatix Pro: Perhaps the best HDR software, Photomatix works as a stand-alone program or within Photoshop and Lightroom. It will create an HDR version of your picture by tone mapping the image or make a more realistic version by exposure fusion. For purposes of this process, I recommend that you make one of each. Either way, the process involves simple moving of sliders. The entire process is covered in this article.
- HDR Efex Pro: This HDR software is part of the Nik Collection. If you are familiar with the Nik process involving control points and sliders, you will like this software. I find it works well on those occasions where Photomatix has a hard time.
- Lightroom: Recently Adobe added HDR to Lightroom. It is, to be blunt, not very good. But it will create somewhat realistic HDR versions of your photos. I walk you through it in this article.
- Photoshop: The most realistic HDR processing is undoubtedly done by Photoshop. You have almost no control over the process, but on the other hand that makes it very simple to use. Photoshop will create a 32-bit image that gives you a lot of data to work with. After creating the image, you can edit further Lightroom or ACR. The process is covered in this article.
In addition, don’t overlook the option of simply processing your photo using Lightroom without using any HDR software. Simply bringing down the highlights and brightening up the shadows can make a world of difference in a photo. If you are not familiar with that process, it is very easy and here is a video showing you how to do it.
Step 1: Create Multiple Versions of your Photo
The first step is to simply create different versions of your photo using your HDR software. You don’t necessarily need to use all the software mentioned above, just use what you have. Don’t forget to make a version or two using Lightroom. Once you make your different versions, they will all automatically be added to your Lightroom catalog.
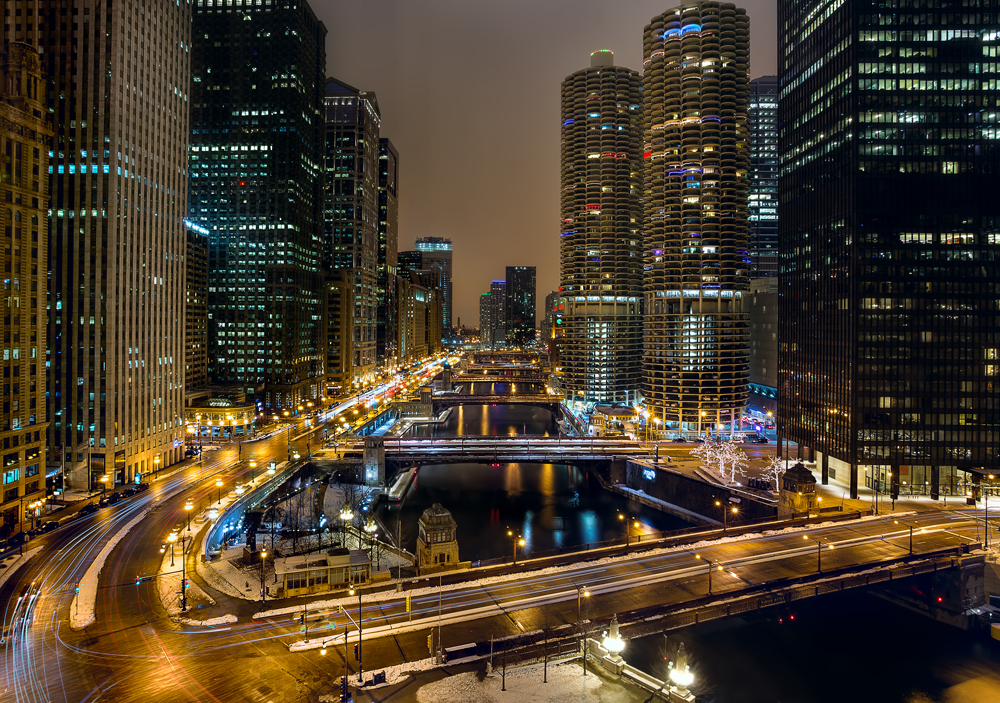
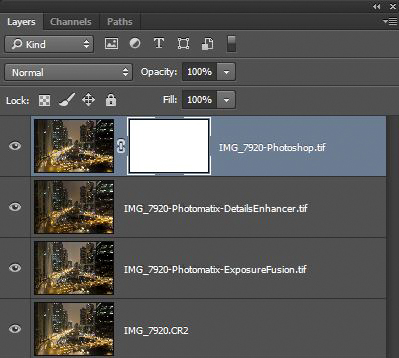
Here are the different versions that I created for purposes of creating the picture of the Chicago River above:
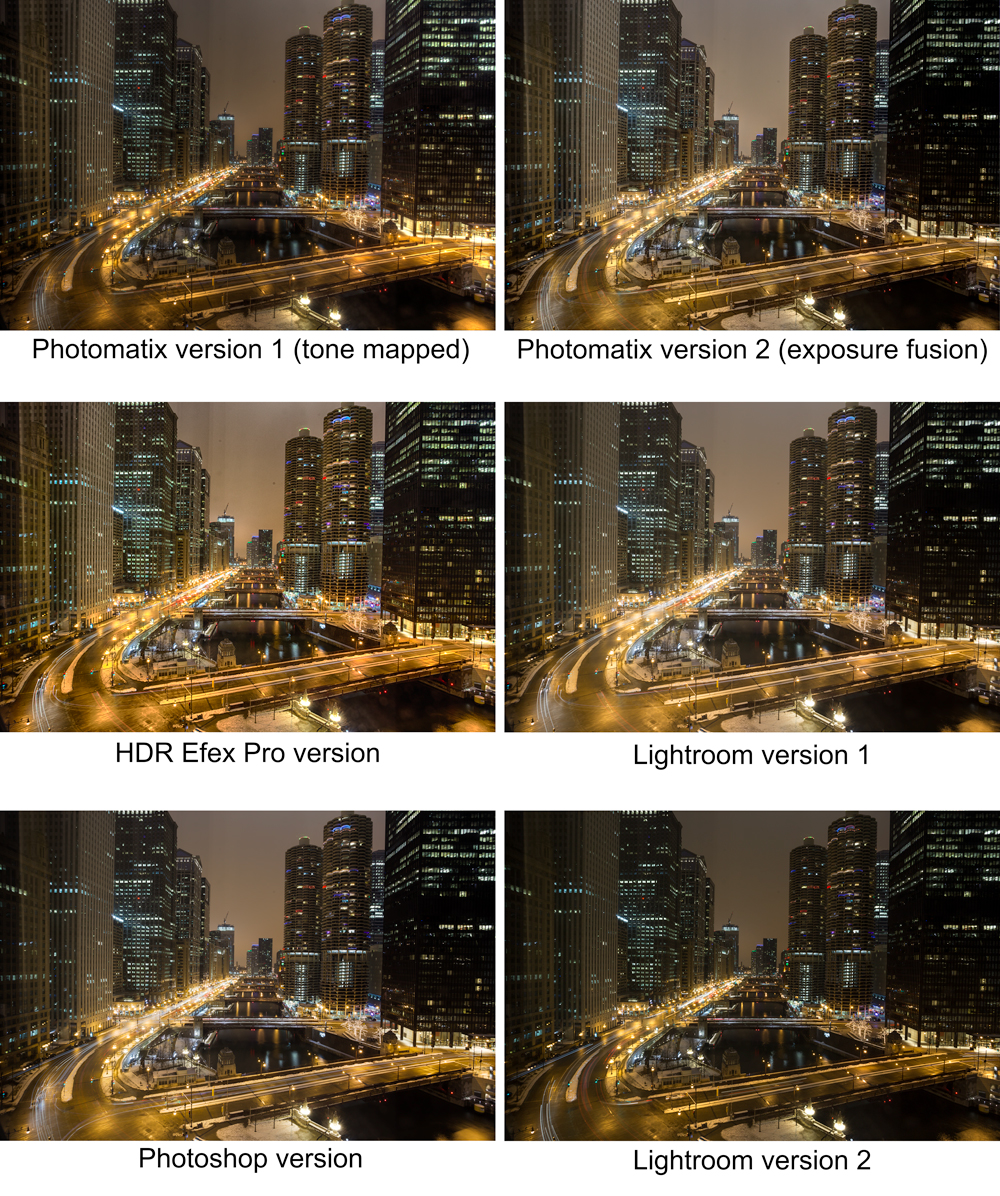
You can probably see that they are pretty similar, but all a little different. With these different versions made, the next thing to do is combine them.
Step 2: Bring All Your Versions Into One File
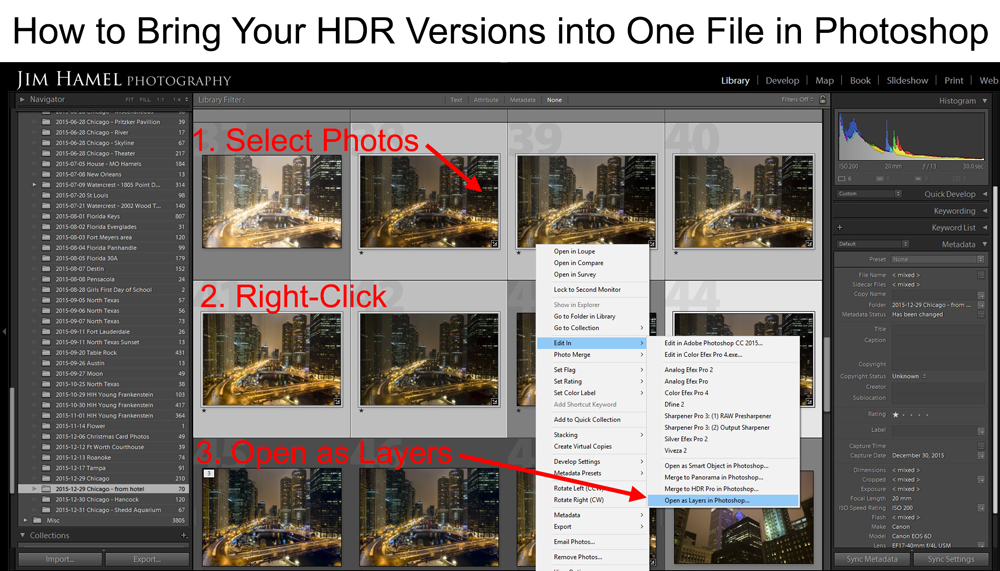
The next step in the process is to combine the photos you just created into layers of the same file in Photoshop. It is easy to do. In Lightroom, just select all the photos and right-click. Select Export to Photoshop, and then select Open as Layers in Photoshop. The graphic below shows you exactly how to do it:
Step 3: Blend
Now it is time to blend all those photos together using the best parts of each. To do that, you create a layer mask on the layer you are working on, which will allow you to use the brush tool to blend in parts of the layer just below. You’ll do that to each layer until you have used all the layers. When you are done, the result is that you will have use the best parts of each layers and combined them into one super-image. That’s the process in a nutshell, but don’t worry if that sounds confusing because we will walk through it now.
First things first. Check out all your different versions and make a plan for creating a final version. Decide which parts of each image you want to use. That will keep this process from appearing overwhelming. Further, you may discover as you look at the different versions that there are a few that you don’t really want to use. Click the little eyeballs beside each layer to see the different versions. Decide which you want and which you don’t. Deleting a few now will simplify the process.
Next, put the version you like the best – or will use the most elements of – at the top of the layers. Just grab that layer and drag it to the top of the stack. That will be your starting point. From there, you will be adding portions of the other layers below.

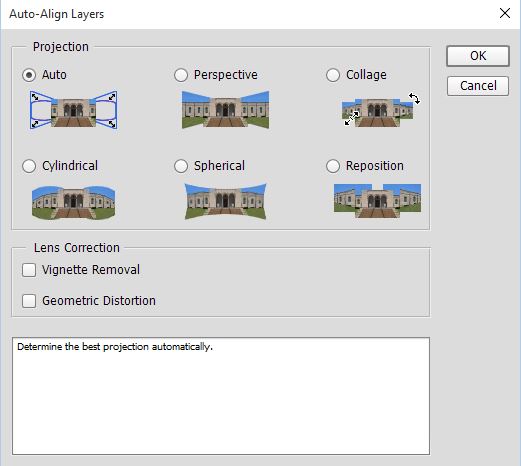
Another preliminary item is to make sure that your layers are aligned. This way, everything will match up exactly when you combine different layers. To align the layers, just select the top two layers then click Edit > Auto Align Layers. In the resulting dialog box, just select Auto to let Photoshop align the layers for you.
Now, create a Layer Mask for your top layer. This is what will give you the ability to bring in elements from other layers. You create layer masks by selecting Layer > Layer Mask > Reveal All. Notice that the layer mask you just created is white. That means that the entire top layer will show through. But if you paint on it with a black brush, then the layer underneath will show through (remember that white reveals and black hides). Therefore, select your brush tool (press B), then make sure it is set to default colors of black and white (press D), then finally toggle the color of the brush to black (press X). Anywhere you paint with black will now hide the top layer and, as a result, display the contents of the layer below it.
You can also reduce the opacity of the brush so that it will blend in the layer below. For example, if you set the opacity of the brush at 50% and then paint with black, it will show equal amounts of the top layer and the layer underneath it. When you painted will appear gray in the layer mask.
The best way to go about painting with a black brush is to set your brush to a low opacity (in the range of 5-15%) and use as large a brush as you can. Then paint in the effect as many times as you need to in order to bring in the layer beneath. Working this way will slowly build up the effect where you want it. It makes for smooth transitions.

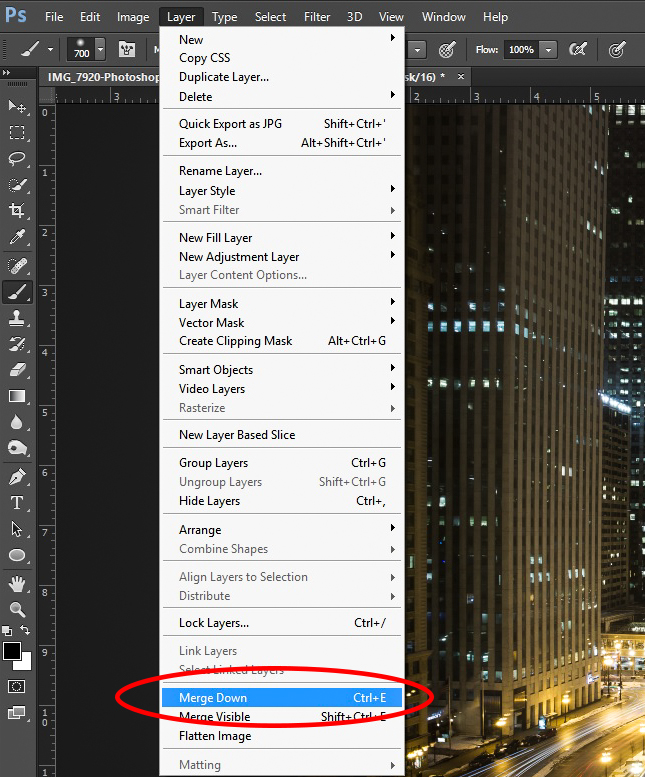
When you have brought in whatever elements of the layer below that you want, just collapse those two layers by selecting Layer > Merge Down. Make sure your top layer is selected when you do so.
Now you are ready to repeat the process for the next layer. Remember to select the top two layers and align them first. Then create a layer mask and use the brush tool to add whatever elements of the layer below you want in your picture.
Step 4: Further Edits
When you have reached the bottom, you are done. But you are likely not done editing your photo. At this point, save the photo and treat it like you would any photo you are about to edit. If you go back to Lightroom, the file you just created should be in the folder you were just working with.
Conclusion
You might hear some photographers debate whether Photomatix or HDR Efex Pro does a better job tone mapping pictures. You might hear other photographers debate the value of HDR software at all, and urge you to instead rely on Lightroom to deal with any dynamic range problems you may encounter. There is no need for any argument or debate. There is no need for any compromise. The point of the process demonstrated in this article is that, using the power of Photoshop’s layers, you can have your cake and eat it too.
You now have complete control over the picture. The HDR process puts you in control of the lighting of your pictures. The blending process lets you take exactly what you want from each in whatever proportions you want. There is nothing but a complete focus on achieving exactly what you want in your picture.
Is the process time consuming? Yes. Does it require a lot of software? Yes. But that’s also what makes it an uncompromising solution. You might not want to use this process every time, but when you want the absolute best you can get, this process will take you there.