
In most areas of photography, it seems that the advice is to go as manual as possible. Manual controls give you better control over your camera and afford you more options and flexibility. For example:
- It is best to shoot in a manual mode so that you can control the exposure settings. Otherwise the camera may give you a different depth of field than you want, or a slower shutter speed, or a noisier picture.
- It is best to shoot in Raw format, even though the file comes out of the camera looking worse than a JPEG, because of the additional control you get over your files.
- You should generally pick a focus point or points and use those to focus rather than allowing the camera to decide. That gives you the most control over what parts of the frame are in focus and which are not.
However, when it comes to white balance, an outdoor photographer should generally set the camera to “automatic” white balance and forget about it while shooting.
It is not that white balance is not important – it can be – but it is just that the subject need not concern you much. For the outdoor photographer, the while issue of white balance should occupy about 1% of your mental energy.
In this article, I will give you a simple formula for addressing white balance and tell you what you need to know. You can follow this simple methodology and your photos will end up with a good white balance. Meanwhile, you can devote your mental energy to other things that matter more to your photography.
What is White Balance?
Light has a color. The color of the light is referred to in photography as the “white balance.” It can be a cool, bluish color, as is often the case under interior lighting. It can also be a warmer, reddish color as in late afternoon sun.
You cannot always see the color of the light, but it is there. Your eyes are constantly adjusting to the lighting additions. It happens amazingly quick so you do not recognize it.
But the camera does not make the adjustments that the human eyeball make. It faithfully records the color of the light. Sometimes a scene will appear overly blue or overly yellow and that will not look right to us. That is a function of the white balance being “off.”
So what you need to do is tell your camera how to adjust the white balance. That will be the first thing we will do.
Set Your Camera to “Auto” White Balance
Your camera will have a menu setting allowing you to set a particular white balance. You will see options for “daylight,” “cloudy,” “tungstun,” etc. You could set the white balance according to the prevailing conditions of that moment. You could then adjust the white balance as those conditions change. You could even get out a grey card and set a custom white balance. But none of these things are necessary.
The only white balance setting you need – and frankly the only one you are likely to ever need – is “auto” white balance. Just set your camera to “auto” and leave it there.
My own camera has been set to auto white balance for the past several years and has not moved from that setting. Ever.
Tweak White Balance as Needed in Post-Processing
“But what about when the camera gets it wrong?” you may wonder. And the camera surely will get it wrong from time to time. But that will not happen as much as you might think. I was recently confronted with this when I scrolled through my photos in Lightroom to find one with a particularly “off” white balance setting that I could use as a “before” picture for this article. I really didn’t find many. Most were close. Your camera is smart that way.
And what about “getting it right in camera”? That is generally a good idea. But the fact is that it is much simpler to do any necessary white balance tweaking after the fact. In most contexts, the phrase “I’ll just fix it in post” is abhorrent to photographers. But this is one area where it works just fine.
It is really a simple matter to adjust white balance in post-processing. There are automatic tools and manual tools, which we will cover next.
Simple Steps to Tweaking in Post
Again, most of the time the camera will get the white balance right or at least very close. But for those times that it doesn’t, here are three easy ways to tweak it:
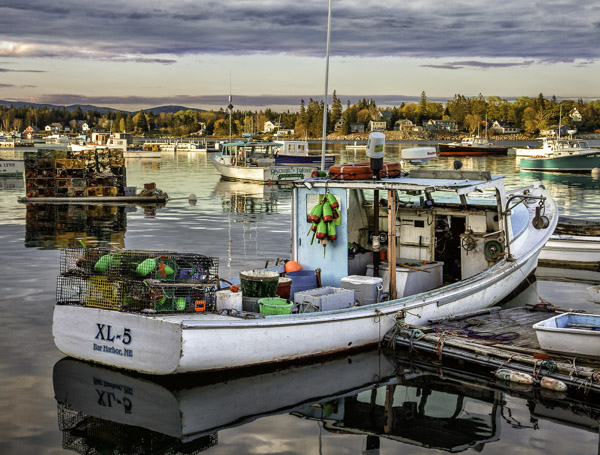
1. Use the Dropper Tool.
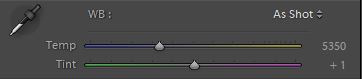
Whether you use Lightroom, Photoshop, or Photoshop Elements, there is a dropper tool that you can use. In Lightroom it is right above the white balance sliders, as shown in the photo above. In Photoshop and Elements it is on the ACR screen on the row above the image.
Select the tool and then click on something neutral in your image. I usually look for something white (but not blown out). Just click on it. Photoshop will set the white balance automatically.
If you like the way the white balance looks, you’re done. That’s it. But if you don’t like it, just repeat the process on a different part of the image (or use one of the other 2 methods below).
2. Use one of the Presets.
Photoshop and Lightroom also have white balance presets for certain conditions. These make good starting points. For example, if your picture was taken on a bright sunny day, you might select the “daylight” preset. Or if you are in a room with tungsten light try using the tungsten preset.
Just select the preset you want from the drop-down menu. In the photo above, that appears where you see the words “As Shot.” You can always return to the original way your camera captured the white balance by selecting the “As Shot” option.
If you are happy with the image after using the preset, then you are done. If not, you can tweak from there using the sliders in the next method below.
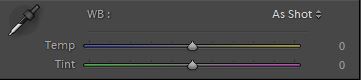
3. Move the Sliders on Your Own.
Lightroom and Photoshop both have sliders to adjust the white balance. There are two sliders. The top one is the one you will use the most. Slide it to the left cools the picture down, slide it to the right creates a yellower and warmer tone.
The slider below that controls the “tint” between green and magenta. Slide it to the left to add more green (or remove a reddish cast); and slide it to the right to add magenta (or warm up you photo).
The Proper White Balance Setting
What should your image look like? That’s entirely up to you. There is no right or wrong answer. That’s not just a cop-out answer: those that study this have come to the same conclusion.
The only rule is that a green tint pretty much uniformly looks bad. Err on the side of magenta. And, when in doubt, a warmer color looks better than a cooler one.
Why All the Fuss About White Balance Then?
There are photographers that should worry about white balance a little bit. For example:
- If you are a professional photographer doing a shoot under controlled conditions, setting the white balance at the outset might be a useful exercise. You should set it once and be done, rather than tweaking dozens or even hundreds of photos later.
- If you are taking multiple exposures – as in product photography – and it is important that they all look the same, you might want to take steps to ensure they are using the same white balance.
However, my guess is that these situations likely don’t apply to you. For an outdoor photographer, it is a simple matter to fix the white balance in post as described above. It does not matter if your pictures use the same white balance. And with conditions changing all the time, you would spend an inordinate amount of energy on setting the white balance.
The same is true for urban photography, seascapes, macro, wildlife, etc. In short, anybody likely to be reading a website entitled “Outdoor Photo Academy” should probably not spend a lot of time worrying about white balance while they are shooting.
A Function of Time
It might seem odd that so much emphasis is made to take complete control of your camera in other aspects of photography, yet here the advice is “forget about it – just set the camera to auto and don’t worry about it.”
And so much photography advice talks about “getting it right in-camera” rather than waiting to fix it later. Yet here the advice is just to fix white balance later.
What gives?
The reality is that if time, energy, and attention are unlimited, there is nothing wrong with paying attention to white balance before the shot. It is just that this never seems to be the case. The light is always changing. Your subject might be moving. You want to get this shot done so you can get on to the next one. Or you just don’t have all day to shoot.
Time is always limited and there are a lot of other things to think about as you are shooting. So, given how good the camera is, and given how easy this is to fix white balance in post, white balance should be low on your priority list.
Typically it will be low enough not to worry about at all.
Hi, Jim: Thanks for the article on white balance. I bracket almost all my landscape shots; and, typically merge them in LR CC to an HDR image. I manually set the white balance to either “cloudy” or “shade” (on my Canon 70D); and, leave it there for all exposures. Are there any issues with setting the camera to auto white balance when taking 3 or more images at different exposures? Thank you for your helpful articles! Cheers, Rick Hamill
Hi Rick – Good question. The short version is no I have never had any issues with that. I bracket my photos about half the time, so I think if that was a problem I would have seen it by now. However it does seem possible that the camera would change white balance between bracketed shots. I just went through some bracketed shots in my Lightroom catalog and the white balance settings were always exactly the same within brackets. That said I will test it and will reply further if I ever see any issues.
Hi, Jim: Thanks for the response. I look forward to hearing about the results of your test. I, too, shall try it and let you know what I find. Cheers,
Rick