

There are many times you want your image tack sharp from front to back. You need a wide depth of field to achieve this. How do you go about achieving the widest depth of field possible without some of the side effects that go along with that? That’s what you’ll learn in this article.
Option 1: Stop Down the Aperture
The first way to maximize your depth of field is also the most obvious. One of the exposure settings is the aperture of the lens, which is the hole in the back of the lens that allows light into the camera. Using a large aperture increases the amount of light that is let into your camera, which makes it easier to expose an image, but it has the downside of creating a very shallow depth of field in your image. Using a small aperture solves your depth of field problem, because the small aperture creates a very wide depth of field.
Therefore, problem solved, right? You just use the smallest aperture setting your lens allows. The smallest aperture setting varies from lens to lens, but it is usually between f/22 and f/32. Just make that setting and you are in business.
Well, not so fast. That small aperture can create other problems for you. The first one is that the small aperture greatly restricts the amount of light that is let into the camera. That might force you to use a slower shutter speed than you want to use. If you are hand-holding your camera, a very slow shutter speed can cause blur to appear in your pictures (called “camera shake”).
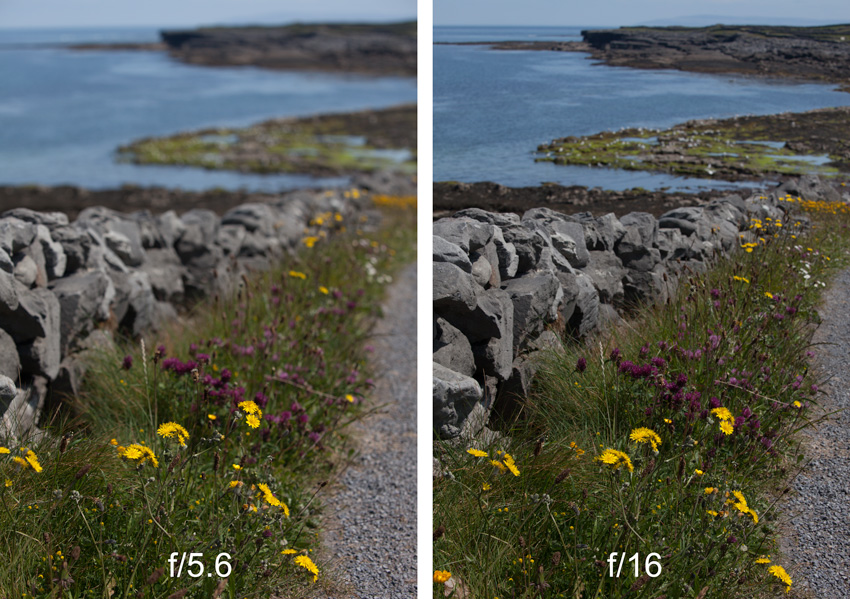
The other problem is something called diffraction. That is a softness (lack of sharpness) that is created when the light spreads from a very small aperture onto the digital sensor (sometimes crossing into other photosites). As discussed in this article, this is a real phenomena that does impact your pictures.
So should you avoid the smallest apertures? Not necessarily. If you are worried about using a slow shutter speed and the possible camera shake, just use a tripod (or other means of stabilization). In addition, sometimes the softness caused by diffraction will not be noticeable in your picture and may well be offset by the increase in depth of field. So don’t avoid using the smallest aperture. It is a valid way to achieve maximum sharpness from front to back in your image.
Option 2: Know Your Hyperfocal Distance
There is a really useful subject called hyperfocal distance, which tells you, for a given aperture setting, what the closest thing you can focus on and still have your background sharp.
What does that mean to you? Well, it tells you when you can use a larger aperture and still have everything in your image sharp from front to back.
An example will explain this concept. Let’s say you are lining up a landscape image and you want everything in the image – from front to back – tack sharp. The closest thing to you that will be in the image is a rock about 6 feet in front of you. You can use the subject of hyperfocal distance to tell you that you can get away with using an aperture of f/11 and still make everything in the image sharp.

Best of all, this concept doesn’t require calculations on your part. Check out this article I did for Digital Photography School on this subject. It includes hyperfocal distance charts you can fold up and put in your camera bag, as well as links to apps you can install on your phone to calculate the hyperfocal distance for you.
Option 3: Focus Stacking
This option is the most complicated, but is also the best way to guarantee tack sharp photos from front to back. When you either cannot or don’t want to use the lens’s smallest aperture to achieve a wide depth of field, you can take a series of pictures of the same thing and then combine them in Photoshop to create one image that is sharp from front to back.
You will need to have your camera on a tripod for this. Once your camera is set up on the tripod, and you have set up your composition, set up your exposure using your lens’s sharpest setting (if you don’t know it, it is usually f/5.6 – f/8.0). Then, take a series of photos, changing your focus between each picture. Start by focusing on the thing closest to you and work your way back to infinity. Then take these images back to your computer and combine them in Photoshop, using the “in focus” part of each picture.
How do you do that? I wrote about the process in this article on Digital Photography School.
Option 4: Use a Tilt Shift Lens
The final option is to get a specialty lens called a tilt-shift lens. The magic of this lens is that you can tilt the field of focus so that it matches the terrain in your image. That allows you to get away with a much wider aperture than you would otherwise have to use to keep everything sharp.
You can read my take on tilt-shift lenses in this article.
Fabulous article. You covered it all!