
Here is the next example for you to use in your own photography. This photo is obviously a night shot with some streaking lights. So you have that element.
But I want to show you this photo because it involves an additional problem that you will probably run into sooner or later. I had to take this photo through a glass window. It was shot from my hotel room and there was no balcony or sliding door to get me outside. The window wouldn’t even open. So I had no choice but to shoot it through the glass and deal with the reflections.
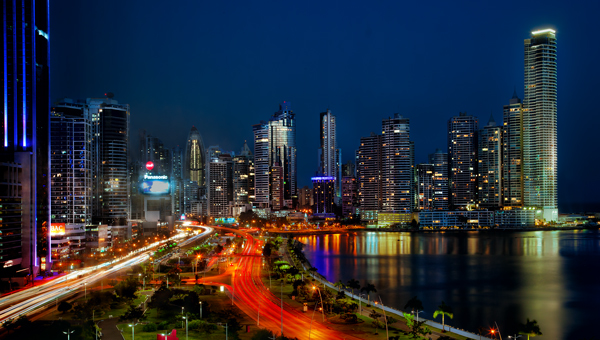
Here’s the photo and how you can do something similar:

Settings use in this example
Here are the settings used for this picture:
- Shutter speed: 30 seconds
- Aperture: f/16.0
- ISO: 200
- Focal Length: 40 mm
How to Do It
To take a nighttime shot with light trails, you are going to use a long exposure, which means your camera will be on a tripod. You will likely want to use a remote shutter release to ensure that you don’t vibrate the camera when taking the picture.
Once you do that, there are two things you need to worry about with this shot: your exposure and avoiding any reflections.
Setting the Exposure
As you can see, I used a 30 second exposure, and you will probably want to use a similar setting. The long exposure comes naturally since it is a nighttime shot.
In addition, using the long exposure makes your life simpler in some respects, because it takes the pressure off the other aspects of exposure. Specifically, the long shutter speed means that enough light is let in to allow you to keep the ISO low. That will keep digital noise under control.
The long exposure time also means that you don’t need a wider aperture. The small aperture to ensure there are no issues with depth of field.
Dealing with Reflections
You will also need to deal with the possibility of a reflection coming off the window and ruining your shot.
In my case, the reflection problem was something more than a theoretic possibility. I had actually taken shots from the exact same location the night before with a wonderful sky full of puffy clouds and a full moon. All of the shots were ruined by reflections.
So the good news is that I was cognizant of the problem and determined to avoid it. The bad news is that I did not have what I needed to make sure I didn’t have a reflection ruin my picture.
To make sure you avoid reflections, you should have a large black cloth with a hole in the middle for your lens. You hang up that cloth on the window. and shoot through the hole in it. I did not have such a cloth, and had to make do.
I did so in this case by doing three things, which might help you if you find yourself in a similar situation:
-
I closed the heavy hotel curtains behind my camera.
-
I made sure every light in the room was off.
-
I held towels up against the glass around my camera.
That worked well enough to get me the shot. The point for you is, in a pinch, use whatever you have available.
After the Shot
This shot required a significant amount of post-processing. You will want to enhance these type of pictures by making local contrast adjustments.
Don’t just try to make a contrast adjustment to the whole picture – you’ll actually probably make it worse that way. There are already very dark places and very bright places, so you run the danger of blowing out the highlights and pushing all the shadows to black.
In fact, don’t even try to make a contrast adjustment to a big part of the picture. You’ll run into the same problem.
Rather, select a small, discrete portion of the picture and make contrast adjustments within that selected area. For example, you might select a few similar looking buildings and adjust the contrast within them. You might also do the same thing for the streaking lights portion of the picture. You might do the same thing for the water in the harbor. And so on.
So be prepared to create several different curves adjustment layers in Photoshop when you edit this picture. (If you are not familiar with curves adjustment layers, stay tuned and I will have more on that topic soon).
Conclusion
Whenver possible, don’t shoot through glass. Go outside. Open the window. Go up on the roof. Anything. But sometimes it is unavailable. You only have two options in that situation:
-
take the shot and do the best you can.
-
don’t take the shot and go home with nothing.
So, you’re better off taking the shot. Hopefully this example will help you when the time comes.
Have a picture you think would make a good example? Don’t mind explaining how you did it? Send it to me!
You can email me at jim@outdoorphotoacademy.com.
I found these tips very useful, having ruined many shots in the past.
Awesome! I’m glad they are useful. I have ruined many myself.