


One of the questions I received recently asked me to explain exposure compensation. In this article, I will answer the 4 essential questions on that subject.
What is Exposure Compensation?
Exposure compensation is your ability to change the exposure values from something different than what the camera sets for you.
Let’s back up to explain this further. When you are using any camera mode other than Manual, your camera will automatically choose exposure settings for you based on the amount of available light. For example, if you are in Program mode, when you hold your camera up to take a picture, the camera will set a shutter speed and aperture size based on the amount of available light. It does that by using the internal meter to evaluate the amount of light available to determine the proper exposure level, and then choosing the settings that will allow the proper amount of light into the camera to make a correct exposure.
If you want to change that exposure value that the camera set for you, then you use exposure compensation. In other words, exposure compensation is just your ability to move away from the exposure level that the camera sets for you.
Why Would you Want to Use It?
If the camera is metering available light, determining the proper exposure level, and then making the exposure settings accordingly, why would you ever want to change those settings?
There are a few reasons.
The main reason is because the camera’s meter isn’t always right. The camera’s meter is just looking at the scene before you and setting the exposure value by averaging everything out to 18% grey (more about how that works in this article on camera metering). If you have a dark scene in front of you, the camera will try to make that 18% grey, which lightens it up and might lead to overexposure. Conversely, if you have a bright scene in front of you the camera will also try to make that 18% grey, which will probably make it darker than you want. Exposure compensation allows you to adjust for this.
The problem is compounded if you use spot metering. In spot metering, the camera is just metering off one small part of the scene. It is a powerful tool for controlling exposure (see this article on how to use spot metering to control exposure), but you have to understand what you are doing. If your meter is set on a particularly bright or dark spot, the camera will ignore the rest of the scene and set the exposure values based on that single spot. You need to be able to adjust the exposure levels to get a proper exposure, and exposure compensation allows you to do that.
Finally, you may just not like the “correct” exposure that the camera sets for you. You may want to darken the scene to add some mood or drama. You may want to brighten things up. Photography is ultimately an artistic endeavor, and highly subjective, so exposure compensation gives you a tool to put that to work.
How do You Do It?
Now that you know what exposure compensation is and when you might want to use it, let’s talk about how to set it.
In most cases, no matter what brand of camera you have, your camera will have a little button with a +/- on it. That is the button you press to change the exposure compensation. While pressing that button, turn the main dial of your camera right or left (by main dial, I am referring to the dial where your right index finger will naturally rest while you are holding the camera, usually next to the shutter release button). That will change the exposure compensation. Turning the dial one way will reduce the exposure, and the other way increases it.
Some higher-end cameras have a second dial or wheel on the back of the camera. Those cameras will usually not have the +/- button, but that second dial will be used for exposure compensation. The advantage is that you can just turn that dial with your right thumb without needing to press any buttons.
You change exposure compensation in increments referred to as stops. If you are not familiar with that concept, check out this article called F-Stops Made Simple. Each click of the dial will usually change exposure settings by 1/3 of a stop.
How Does It Work?
So what does exposure compensation actually do? You know that it changes the exposure, but how does it do so? By changing the aperture? Or the shutter speed?
The answer is that it depends on what mode you have your camera in. I will explain what is going on for each of the camera modes.
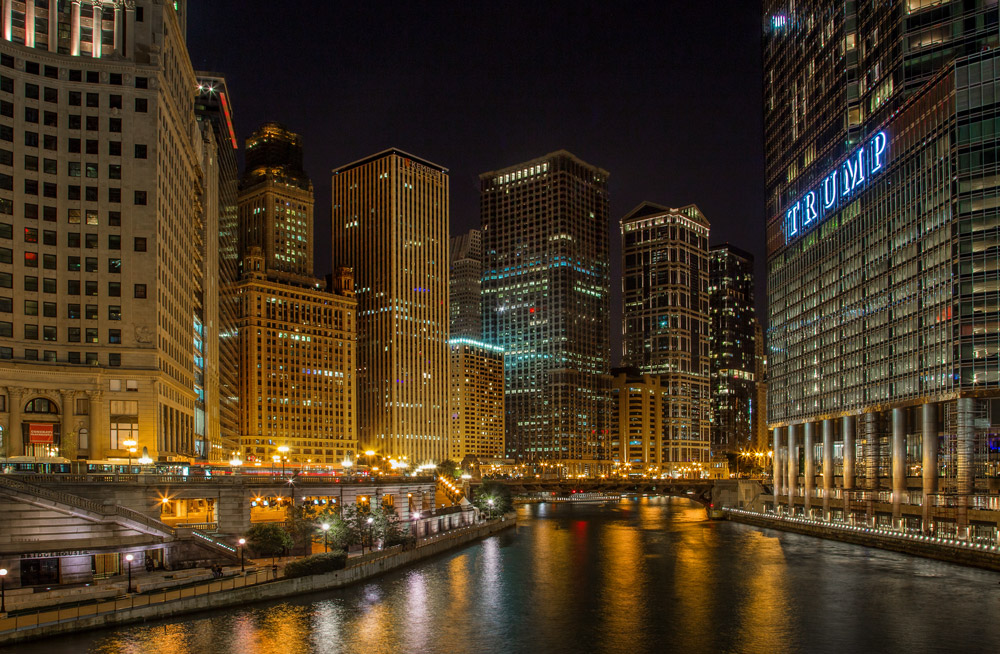
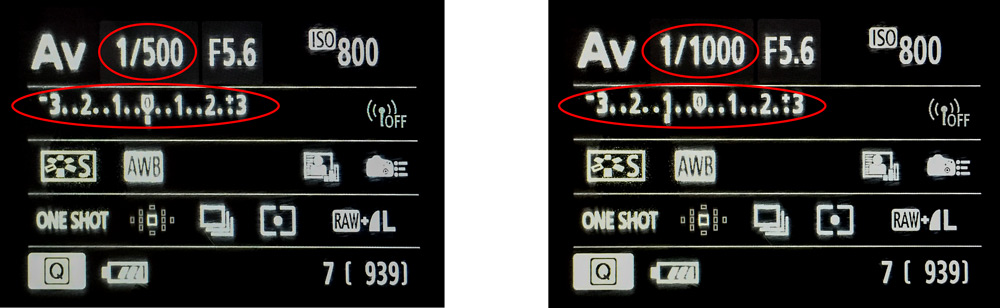
- Aperture Priority – If you are not shooting in Manual mode, I recommend you generally use Aperture Priority Mode (A or Av on your mode dial). In Aperture Priority mode exposure compensation changes the shutter speed. Remember that in Aperture Priority mode, you set the aperture, and the camera sets a corresponding shutter speed. If you were to change the Aperture, your camera would just set a different corresponding shutter speed and there would be no change in the exposure level. Exposure compensation gives you the ability to change the shutter speed (and the overall exposure value) while staying at the same aperture you originally set.
- Shutter Priority – If you are in Shutter Priority mode, exposure compensation changes the aperture. It is basically the reverse of Aperture Priority mode. You already set a shutter speed, and the camera set a corresponding aperture. Exposure compensation therefore changes the exposure by allowing you to change that aperture size.
- Program – In Program mode (P on your mode dial), exposure compensation changes the shutter speed. At least that’s what happened on the cameras I tested. It is possible that yours works differently, or that you can change it in the menu. As with so many things, this is a good excuse to pull out the camera’s manual and go through it.
Manual doesn’t really have “exposure compensation.” That is because the camera never sets an exposure value for you in the first place. You set everything yourself. Whenever you change the aperture or the shutter speed, you change the exposure value.
Finally, I should note that you cannot use exposure compensation in Auto mode. In Auto mode you have absolutely no control over exposure – the camera does everything for you. That is one of the reasons why you should never use this mode.
Conclusion
Exposure compensation is how you adjust the exposure set by the camera when you are not in Manual mode. It is a way to give you additional control over your camera when you are in a different mode, such as Aperture Priority mode. Either use the +/- button or the dial on the back of your camera to change it. It will give you full manual control over your camera without being in Manual mode.