

Once you are in command of the cameras shutter, new worlds are opened up to you as a photographer. Things that are simply not possible for the average snap shooter become possible for you. You control the action. You control what is blurred and what is sharp. You control the exposure.
Shooting with a fast shutter speed is easy (at least, it is easy if you have plenty of light). You just open up the aperture, increase the ISO, and fire away. But photographing with the shutter open a long time . . . that takes some skill. At least it does if you are doing it right.
The rewards more than outweigh the cost. Shooting with a low shutter speed will add interest and drama to your photos. It is often what will make your photo stand out from the crowd. In this article I will show you everything you need to know to do it. We’ll start with the basics and then move into using neutral density filters. Even if you’re familiar with the process, I think you’ll find some tips to help you improve your technique.
Why Use a Long Exposure?
Before we talk about how you take long exposures, we should talk about why you might want to do so. Why would you want to shoot with a long exposure? There are two possible reasons, but in this article we are going to focus on one.
The first reason (and the one we are not going to focus on here) is to let more light into the camera. Sometimes you have a low light situation that cannot be cured with a high ISO or large aperture. In that case, assuming you don’t have an artificial light source, the only way to increase your exposure is to increase the shutter speed. You run across this a lot when photographing stars (for a review of the techniques needed to do that, check out this article). Remember there are only three exposure controls and two of them (aperture and ISO) are prone to being maxed out. If that happens, you only have one option – increasing the shutter speed.
But, honestly, that’s not why most of us do long exposure photography. It is not just a matter of getting more light into the camera. It is more to achieve an effect. So why do we do it? Most of us use long exposures to create some sort of blur in our pictures.
Hang on, you might think, why in the world would I want blur in my pictures? Isn’t that the one thing were usually trying to eliminate?
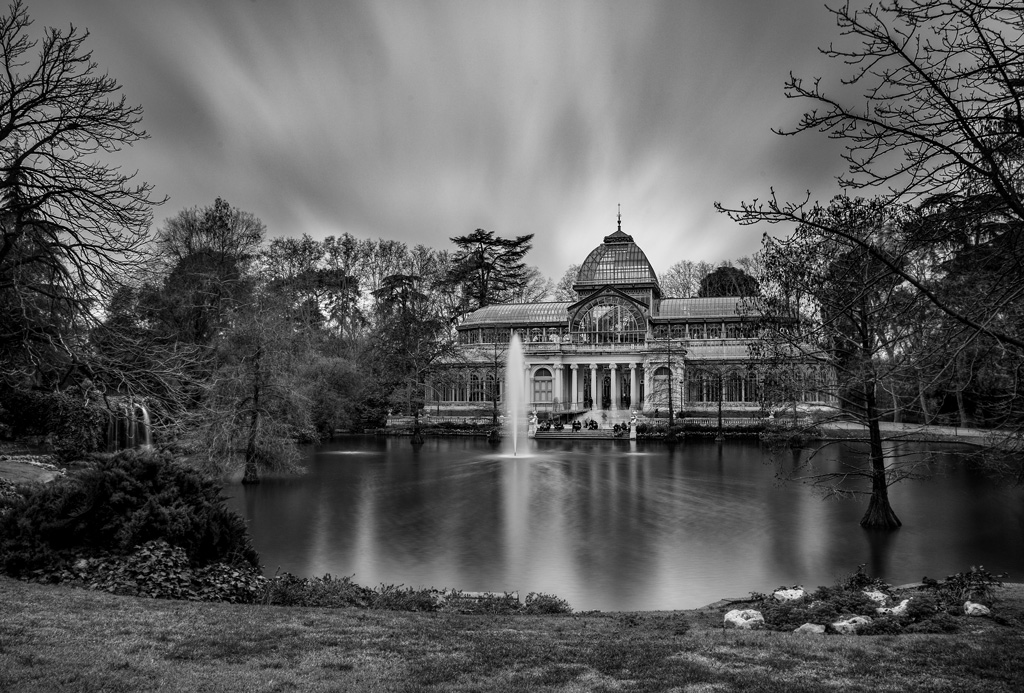
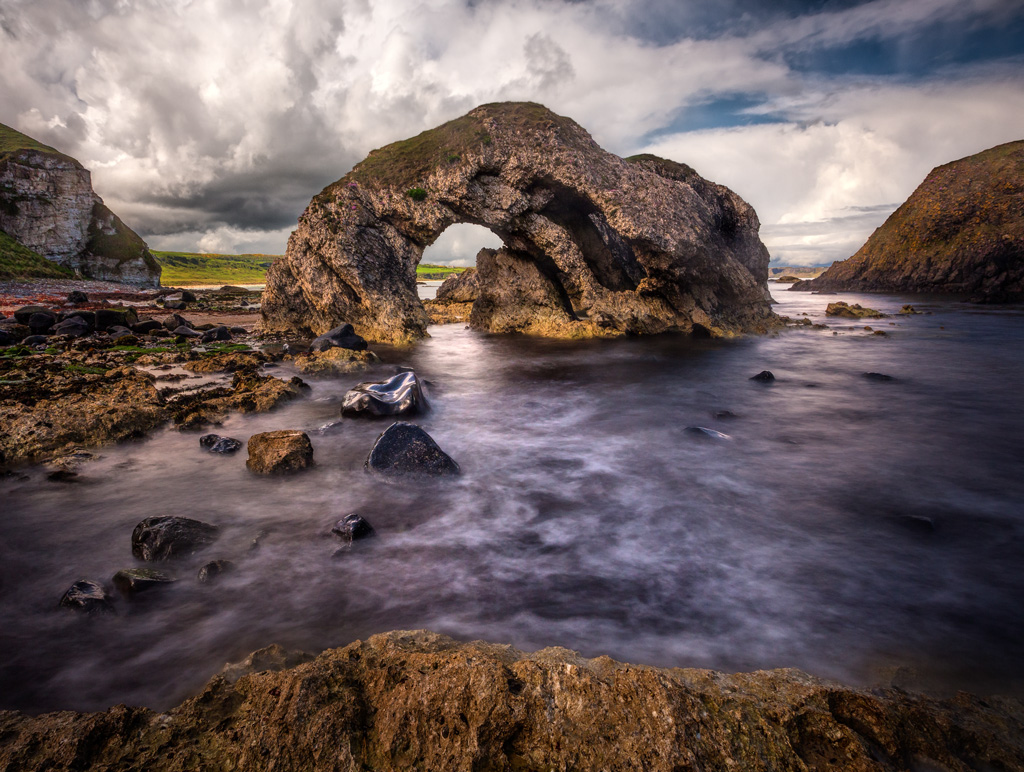
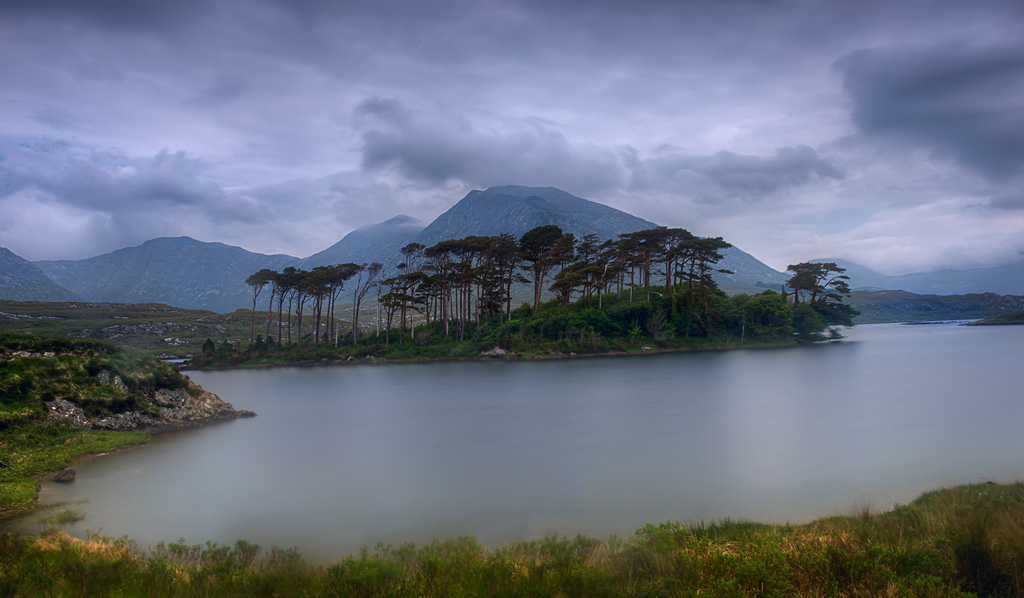
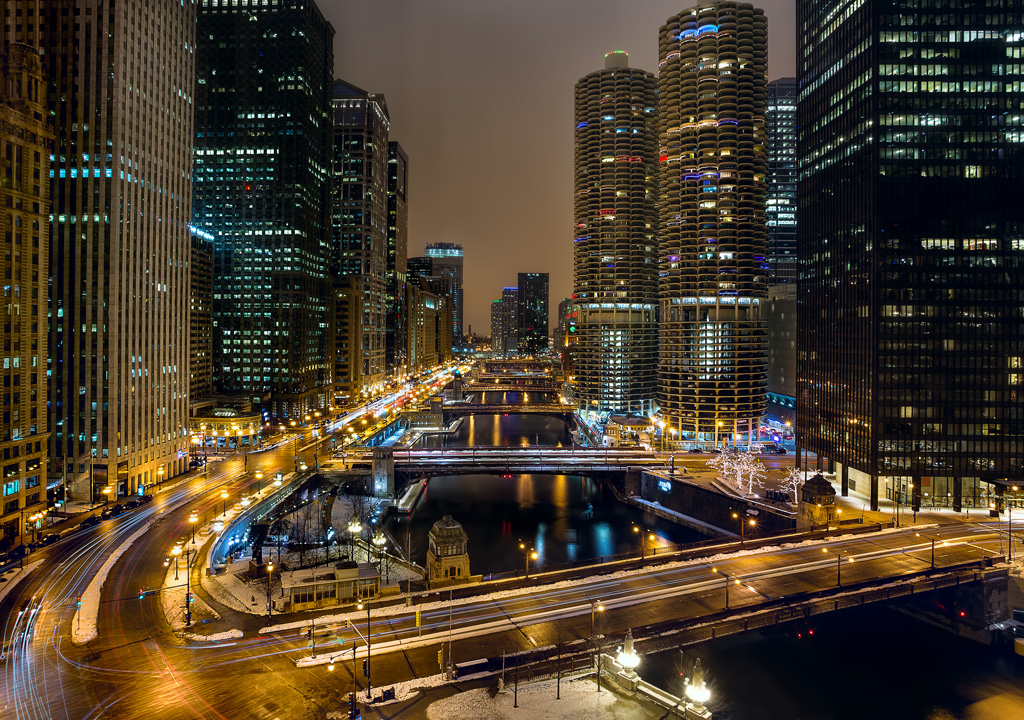
Yes, it is. But that sort of blur you are trying to avoid is blur to the entire picture. There are often elements of the scene that you want smoothed out. Typical examples are water and clouds. Think about a photograph of a fountain. Do you want the water looking jagged from a fast shutter speed or do you want to see a smooth flow of water from a slow shutter speed? The same slow shutter speed technique will also create other effects, such as streaking lights in traffic. That’s the sort of blur you will often want in your photo.
Now let’s get on to talking about how to create this effect.
How to Create a Long Exposure Photo
In a sense, long exposure photography is simple. You just hold the shutter open a long time. End of story.
Why am I devoting all this effort to an article on the subject then? Because doing it well and avoiding certain inherent problems takes some thought and skill. You can just slap your camera on a tripod and set the shutter speed on a really slow setting and it will probably work. You may even get good pictures sometimes. But to master it, there are a lot of aspects you need to master. There are pitfalls to avoid that could cause your photos to be unsharp, out of focus, have color casts, etc. What you need to master really boils down to controlling two things: (1) the stability of your camera to keep portions of the image tack sharp, and (2) controlling the shutter speed to create the effect you want. We’ll talk about both in the next section of this article.
Let’s talk about stability first.
Stability
There is no great secret how you keep you camera stable. It comes down to three points:
- You secure your camera on a tripod (and here are some additional tips for making sure you do so correctly);
- You use a remote shutter release or intervalometer to trigger the camera without moving the camera; and
- You use live view or mirror lockup to avoid any vibrations during the exposure.
These are listed in order of importance. The correct use of the tripod is paramount. You cannot do this type of photography without a tripod (unless you find something else to place your camera on). A remote shutter release is very important, but not absolutely necessary. Using mirror lockup or live view may not even be necessary – and is inapplicable with mirrorless cameras.
The more stable the camera, the sharper the picture is likely to be. In theory, if you have your camera securely placed on a tripod, you should be able to hold the shutter open all day with no loss of sharpness. There should be no difference between a 10 second exposure and a 10 minute exposure. The camera is unmoving so time should be irrelevant.
Except that it never seems to work out that way. It seems like longer exposures often tend to have a little more softness in them. Why is that? Honestly, I don’t know. I suspect that in using an extremely long shutter speed you are just giving more time for little things to happen. The wind may blow and cause some vibrations. The camera strap may flap around and cause tiny movements. The ground may shift a tiny bit. The tripod head may sag a little. All sorts of things might happen.
For this reason, whenever possible, I avoid shutter speeds that are extremely long. In certain cases, such as slowly moving clouds, you might want an extremely long shutter speed. But in most cases, you will have things completely blurred out in less than 30 seconds. The effect will be achieved. You just won’t need to hold your shutter open any longer than that. Therefore, while theoretically the time component and the stability component are completely separate, I find that they often aren’t, and it pays to keep the shutter speed from getting too long.
Shutter speed
Now it is time to control your shutter speed. Most of the time, you will be using a filter called a neutral density filter to restrict the amount of light coming into your camera. We will talk about that in a little bit, but first let’s talk about creating long exposures without adding a filter. This will be a little bit of a refresher for those already familiar with exposure.
To create a picture with a long exposure time, you need to restrict the amount of light coming into your camera. Remember that the exposure level is determined by three controls:
- The shutter speed, which determines the amount of time that the camera is allowing light onto the digital sensor.
- The aperture, which is the size of the hole in the lens that is allowing light into the camera.
- ISO, which the sensitivity of your digital sensor to light.
If you need a refresher on any of this, just check out my Exposure Page and all the articles on different aspects of that. (If you haven’t done so, you should, as I consider it a strong suit of this website).
If you have your camera set up to take a picture at the proper exposure level and then you just lengthen the shutter speed without doing anything else, your picture will be overexposed. You will have let too much light into the camera. Everything will be white and washed out. So you have to make an offsetting move.
What might the offsetting move be? It will either be to restrict the amount of light coming into the camera by making the aperture smaller or decreasing the sensitivity of the digital sensor to light. More commonly, it will actually mean doing both.
A Long Exposure Example – Without a Neutral Density Filter
Let’s take an example. Let’s say you are photographing a waterfall. You look through your camera and it tells you a proper exposure is achieved with the following settings:
- Shutter Speed: 1/20 second
- Aperture: f/8
- ISO: 200
Now you want to make the shutter speed as long as possible to make the water flow through the frame during the exposure. As set forth above, if you just lengthen the shutter speed without doing anything else, the picture will be overexposed. You have to make the aperture smaller or lower the ISO (or both). Here we will do both.
First, let’s decrease the ISO. Most cameras have a lowest native ISO of 100, so we will reduce it from 200 to 100. That buys us 1 stop (a “stop” is a doubling of light, and see this article for more information on that).
Next, let’s make the aperture as small as possible. The smaller aperture will let in the least amount of light possible. The smallest aperture on most lenses is f/22, so let’s reduce it to that level. That buys us 3 stops of light (in aperture settings, the full stop increments are f/8, then f/11, then f/16, then f/22).
We have now decreased the amount of light in the exposure by 4 stops. We decreased it by one stop by reducing the ISO and by three stops by making the aperture smaller. The beautiful thing about measuring everything in stops (or f-stops) is that it acts as a common currency for all exposure settings. We know we can lengthen the shutter speed now by 4 stops. Doing so takes us to a shutter speed of .8 seconds. Here’s how that goes:
- 1 Stop: 1/20 doubled is 1/10th of a second
- 2 Stops: 1/10 doubled is 1/5th of a second
- 3 Stops: 1/5 doubled is .4 seconds
- 4 Stops: .4 seconds doubled is .8 seconds
We have now created a long exposure while maintaining the proper exposure level. Our shutter speed of 1/20, which would have caused the water to appear jagged, will not be .8 seconds, which will cause the water to appear smooth and flowing.
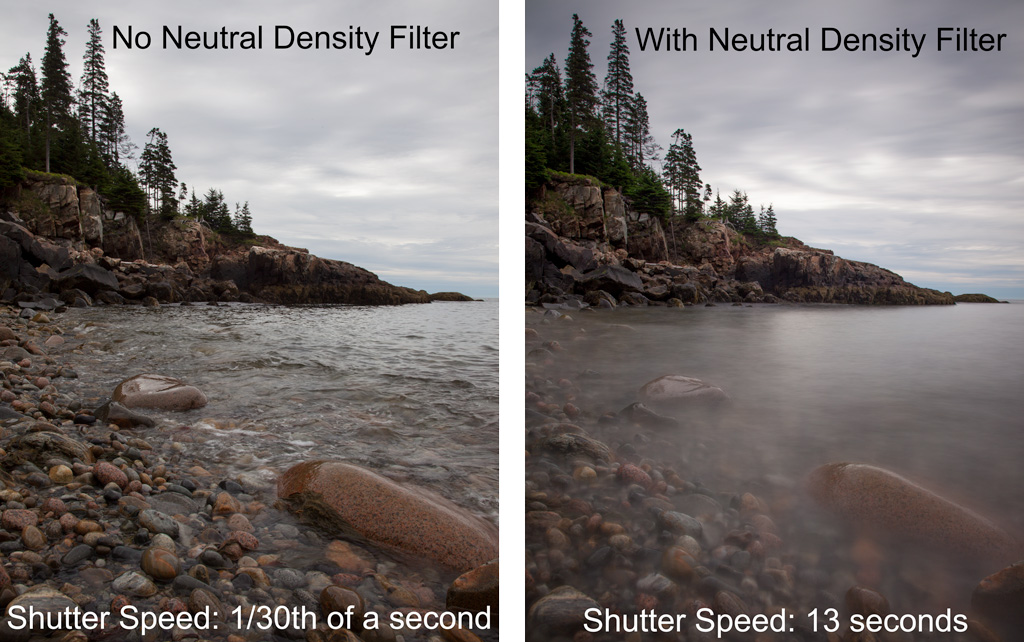
Neutral Density Filters
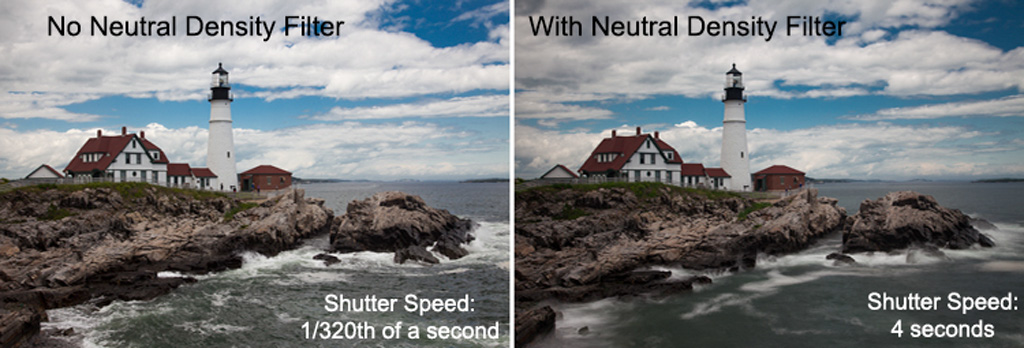
Oftentimes, however, you will need some help in creating a long exposure. There is frequently just too much light in the scene to allow us to use a long exposure without overexposing everything. Even the smallest aperture and the lowest ISO won’t get you where you need to be. In those cases, you will need something called a neutral density filter (often called an ND filter for short). These are filters that afix to the end of your lens and restrict the amount of light allowed into the lens. Think of them as sunglasses for your camera.
They come in a variety of strengths, measured in the aforementioned stops. Common strengths are 10-stop, 6-stop, and 3-stop filters. Which one should you choose? All of them, if you can afford it. That is what I have, although I confess it took me a while to get to that point.
If you are just starting out, get a 10-stop filter. That will get you all the effect you will ever need. If it is too much, just raise the ISO a bit. Modern cameras can go up a few stops on the ISO without any real impact. After that, add the 6-stop and 3-stop filters as finances permit.
Keep in mind that if you have a polarizer, it essentially acts as a 2-stop neutral density filter in that it “costs” you two stops of light. If you need only a slight decrease in light, use that as your ND filter. In addition, you can stack ND filters to adjust the effect. For example, you can stack a 3-stop ND filter and a polarizing filter to achieve five stops of neutral density effect. However, this won’t work as well at wide angles because the camera will pick up the filter edges in the exposure and they will be black.
Using Neutral density filters
Now that you have your neutral density filter(s), it is time to use it. If you are using lower strength filters such as 3-stop and 6-stop filters, you can just attach the filter to the lens and meter light as you always do. The camera will determine the proper exposure level after factoring in the impact of the filter. That part is pretty easy.
Troubles begin when using a 10-stop ND filter. 10-stop ND filters are really, really dark. Your camera will not see anything. The viewfinder and the LCD will be black. Therefore, the camera will not be able to auto-focus or set an exposure level. What to do? Just follow these 2 steps:
1. Focus before attaching the filter
Since your camera cannot focus on its own when the neutral density filter is attached, you will just need to do it ahead of time. Before you put the filter on your camera, just set the focus as you normally would. After you have set the focus, put the ND filter on the camera and take the shot without changing the focus.
Beware if your focus is set by half-pressing the shutter release button! That will be the case unless you have activated back-button focus. In that case, as you trigger the shutter you may cause the camera to attempt to refocus. This will mess everything up. The workaround is to set your lens to manual focus after you have set the focus. That way the camera will not attempt to change the focus when you take the picture. Just be sure to switch back to auto-focus when you are done.
2. Set the Exposure Value before attaching the filter
You will also need to set the exposure value before you attach the ND filter to your lens. Set your exposure level as you normally would, then attach the filter. You know that this is a 10-stop ND filter, so you just have to remove 10 stops of light from your current exposure settings. Assuming that your camera makes adjustments at 1/3 stop increments (most do) that means you have to dial back your exposure setting by 30 clicks.
How does that work? Here’s an example: If your shutter speed was 1/160 before you put the filter on your camera, then after moving 30 clicks, your shutter speed will be 6 seconds. If that is the shutter speed you want, you are all set. If not, just adjust the aperture and/or ISO so you can adjust the shutter speed further. In doing so, be sure to keep track of your clicks. As long as you decrease the overall exposure value by 30 clicks, your exposure should be spot on. But, if you take your picture and the exposure isn’t quite right, just make an adjustment, and try again.
Dealing with ND Filter Problems
The methods above will allow you to take photos with your ND filter. There are some other situations that will arise in using ND filters that may trip you up. To avoid that, let’s cover those issues now.
Capture moving objects in the photo that you do not want blurred
Sometimes you will want to use a neutral density filter but there will something in your image that is moving, that you do not want to appear blurry. This happens to me a lot because I like to take pictures in harbors, and while I want the water to be blurred and the sky to show movement, at the same time I want the boats to be completely sharp. There is always a slight rocking and movement to the boats, so if you use a long shutter speed this will show up as blur in your photos. Even if you do not see the blur in your LCD, you will see it when you get back to your computer.
The way to deal with this is to take two pictures. First take a picture with the neutral density filter on your lens, and do not worry about the blur in the boat (or other moving object). Next, remove the filter and take a picture of the exact same thing. Be careful as you unscrew the filter from the lens, making sure not to move the camera at all, then reset your exposure and take the shot again. Now you will have two pictures that you can blend in Photoshop later. The first will have the water blurred and/or moving clouds you want. The second will have a sharp boat or other objects.
In fact, I typically use this technique anytime I am using the neutral density filter. There will often be little things that look sharper at faster shutter speeds and I can blend them in later.
Fix any tint to your pictures created by the filter
Some neutral density filters add a slight color cast to your pictures. There is a pretty easy way to get rid of any color cast the filter may apply to your picture, it is available whether you use Lightroom, Photoshop, Photoshop Elements, or other software. Typically a simple White Balance adjustment will remove the color cast. The best way to do it is to use the White Balance targeted adjustment tool, which looks like an eyedropper. It is located next to the White Balance sliders in the Basic panel of the Lightroom Develop Module. In Photoshop and Photoshop Elements, it is on the Adobe Camera Raw screen, on the top row of tools. Just click on the eyedropper, then click on a neutral color value in your picture. The best way to do it is find something that is white and click on that.
Usually, this simple click will remove the color cast (and set your White Balance at the same time). If it didn’t work the way you wanted, just click on a different point until it looks the way you want. In the unusual event that you cannot remove the cast in this way, just use the White Balance sliders to adjust the color manually.
Using a Shutter Speed longer than 30 seconds
Most cameras only allow for shutter speeds as long as 30 seconds in Manual mode. If you add a 10-Stop ND filter to a relatively low light situation, you may need to use a shutter speed that is longer than that. There is a simple answer to this problem, which is to Bulb mode. In this mode the camera will expose pictures however long you want, infinite length.
You will often run into this problem if you are bracketing your photos. You can bracket your photos with a neutral density filter in the same way as without a neutral density filter. It just takes more time, due to the longer exposures. If you start with a shutter speed that is around 30 seconds, then the camera will not be able to create the overexposed image as part of that bracket. In other words, the camera cannot take an exposure any longer than 30 seconds, so the picture will not be overexposed the way you want. Again, the answer is just to take another picture using Bulb mode with the exposure longer than 30 seconds.
Getting Started with Long Exposures
Now you know everything you need to get started with long exposures. All you need to do now is get out there and do it. Don’t worry about messing it up. The great thing about long exposures is that you are invariably shooting something static. If your shot doesn’t turn out right, just do it again. And again.
And again.
Jim – concise and valuable as always.
Thanks!
would you recommend variable nd filters?
Honestly, I would not. As I understand it, they are essentially two polarizers stacked on each other. You dial in more or less effect by turning one of the filters. I have only tried one, but it was junk. There were huge streaks across the picture. You didn’t have to pixel-peep to see it, this was obvious as day. Anyway, I will say that I have heard from others who seem to like the variable NDs, but I don’t.
Thank you Jim.
Your articles are always very instructive and more importantly, personalized. They make me feel like I am chatting with you one on one. I’ve been at the photography hobby for forty years, but always learning something new. I only wish that could get my wife to jump on a plane with me and go to the locales you visit. A sincere snd heartfelt THANK YOU. Keep up the great work! Best wishes, Martin.