

If you are going to elevate your photography above the level of snapshots, one of the three things you need to master is shutter speed. This article will show you how to do that.
There are two parts to shutter speed; a boring part and a fun part. The boring part is that a lot of times, you just want to make sure the shutter speed is within an acceptable range (i.e., that it is “fast enough”). In other words, just make it fast enough that you don’t screw up your shot.
But then there is also a fun part of shutter speed, which is where you can use shutter speed creatively to turn your picture into something special. We’ll cover both here.
How the Shutter Works
Shutter speed is just how fast or slow the camera operates to take a picture. The noise you hear when your camera takes a picture is the shutter operating. You may think it operates instantaneously, but that is not necessarily true. The camera’s meter determines how much light is needed and, based on current conditions, how long it will take to let that much light into the camera.
If the case of a bright sunny day, the camera only needs to open the shutter for a tiny fraction of a second. There is plenty of light for an exposure. Often the time that is needed is only 1/500th of a second or even faster (most cameras will go as fast as 1/4000th of a second). That is why it appears to those unfamiliar with cameras that the camera takes a picture instantanously.
But sometimes, there is not as much light, so the camera needs to open the shutter longer to get the light that it needs for a proper exposure. In those cases – such as shooting indoors or when it is getting darker outside – the shutter opens up for a longer period of time. Usually it is still a fraction of a second – maybe something like 1/30th of a second – but it can actually take whole seconds or even minutes! Oftentimes novices try to take pictures in low light and are surprised to find the picture blurry. That is because the camera opened up the shutter for a longer period of time and the camera was moved slightly during the exposure (a phenomena referred to as “camera shake”).
The Range of Shutter Speeds
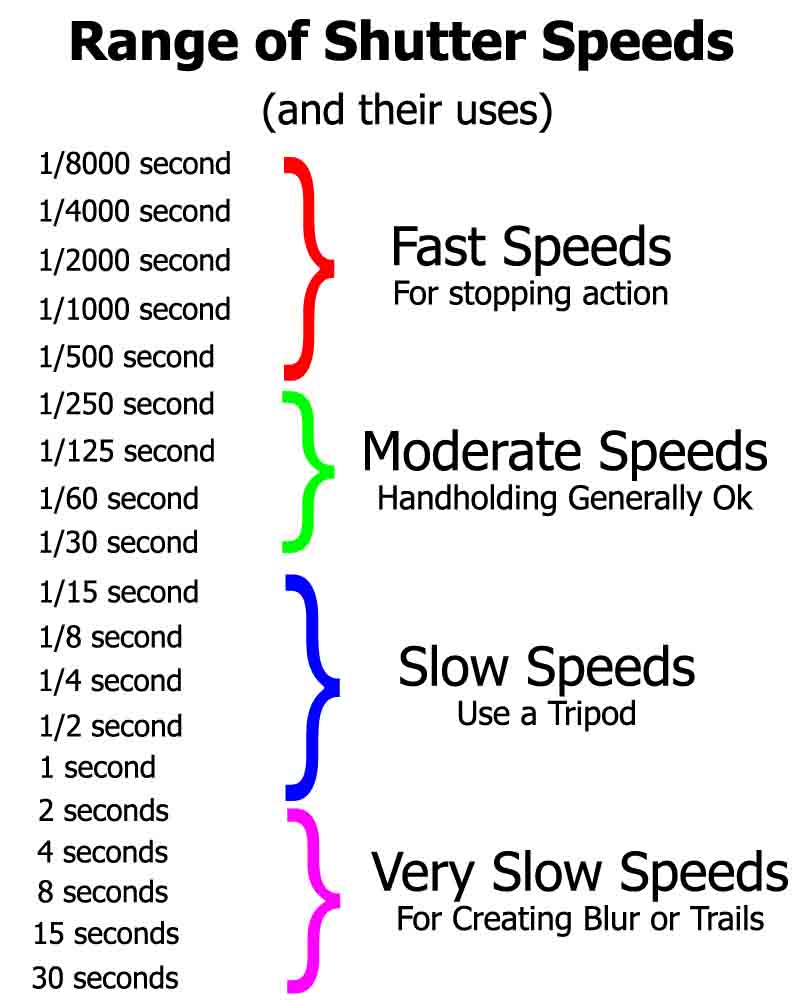
Lets talk now about shutter speeds you might use. To get this started, here is a chart that is a good summary of what we will be talking about in this post. It shows the entire range of shutter speeds available to your camera, and how they are typically used:
Making your shutter speed fast enough
A lot of times, when it comes to shutter speed, you aren’t really trying to do anything creative with your picture. Rather, you are just trying to make sure you don’t screw it up.
If you are using a tripod or some means of support, you really don’t need to worry about it. But if you are handholding your camera, this is definitely something to worry about. You need to make sure the shutter speed is fast enough that your natural “camera shake” is not a factor. Unfortunately, there is no set minimum shutter speed for all occasions because camera shake increases the more you magnify your picture (i.e. zoom in).
A “rule” of sorts has been developed to help you determine a minimum shutter speed. It is called the “Reciprocal Rule.” This rule says that your minimum shutter speed should be at least the reciprocal of your focal length. If you are like me, that sounds like an awful lot like math. Hopefully your eyes didn’t just glaze over because it is actually pretty simple. You just take your focal length, put a “1” above it, and there you go: that is your minimum focal length.
In other words if your shot is going to be at 40 mm, just put a 1 above the 40 and therefore your minimum shutter speed is 1/40th of the second. If your shot will be at 200 mm, your minimum shutter speed will be 1/200 of a second. Make sense? If not, you can resort to the simplification I set forth in a prior article.
Remember that the Reciprocal Rule is a minimum! I have said this before, but it bears repeating, if you are looking to take a really sharp, crisp picture, there is nothing you can do to help your cause more then have a fast shutter speed. In that case, make it as fast as possible.
Ok, that wasn’t so bad, was it? We’re done with the boring part. Now let’s look at some creative uses for shutter speed. First we’ll talk about creative uses for very fast shutter speeds, then we’ll cover slower shutter speeds.
Working with a fast shutter speed.
If you want to catch a sports scene at exactly the right time, or catch a hummingbird in flight, or just catch your kids that except for the right moment, it takes more than precise timing. It takes a precise shutter speed to ensure you catch that exact moment without any blur.
Camera blur is not just created by you moving the camera. It can also be created by your subject moving. And sometimes your subject is moving really, really fast. In those situations you need to make sure your shutter speed is very fast so that your subject is not moving while the shutter is open. If you are using a shutter speed of 1/4000 of a second, even a race car going at top speed will be “frozen.”

Try to keep your shutter speed at or above 1/500 of a second when you need to “stop the action.” There are a few ways to do this:
1. Open the Aperture: Make sure the aperture of your camera is opened up. If you do this in an automatic mode, the camera should automatically increase your shutter speed. If you do this in Manual mode, this will allow you to increase your shutter speed. Typically in a “frozen action” shot, you are trying to isolate one particular subject, so a shallow depth of field created by a wide aperture will not be a problem.
2. Increase the ISO: If you need more light, increase your ISO. Each stop of ISO that you add allows you to double your shutter speed. You may feel an inner resistance to pushing your ISO too high because you are worried about adding digital noise to your picture, but if you don’t put the ISO high enough to get the fast shutter speed to “freeze the action,” the shot is ruined. Don’t skimp here, even if everything looks ok on your LCD. I’ve done that many times, only to get the pictures up on the computer monitor and see that they are blurry.
Use this technique anytime you are shooting the following:
- sports
- moving wildlife
- motorsports
- fast action
- freezing water droplets in motion
Working with a slow shutter speed.
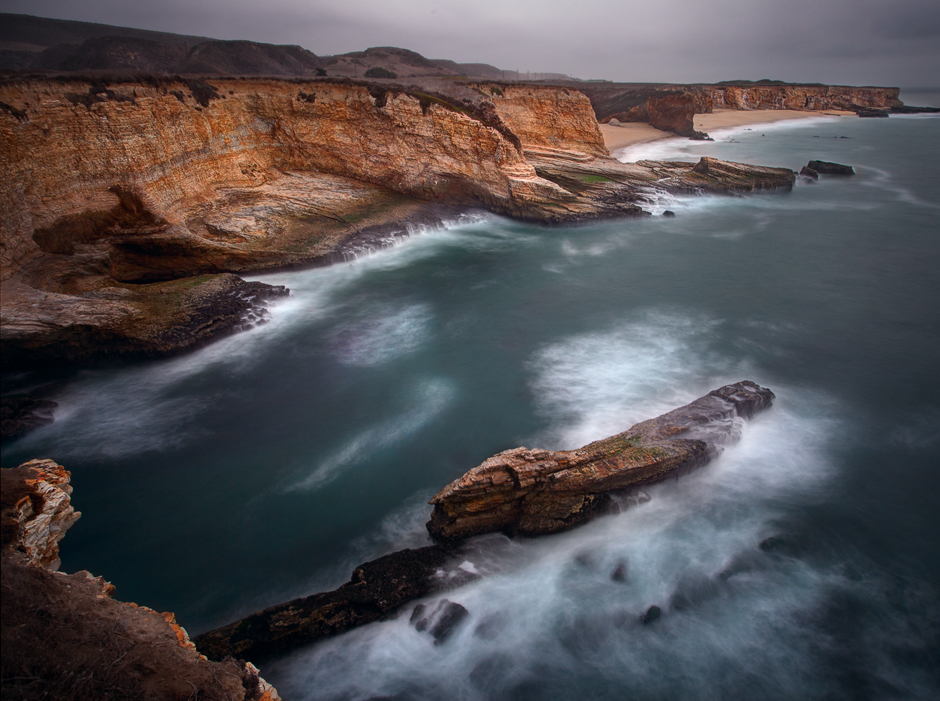
A super-slow shutter speed can really make your picture in the right circumstances. Some typical examples involve water or moving lights.
If you have seen a picture with an ocean or lake that looks dead flat, you can bet this was done through using a very long shutter speed that effectively blurred out the water.
Streaking taillights are another typical example of a slow shutter speed. Where you see streaking lights (like in the picture below), the photographer is holding the shutter open on the camera long enough for the car to move entirely through the picture. The camera picks up the bright lights the entire time they are moving to the picture and it appears as a long streak.

It should go without saying that the sorts of pictures are going to require a tripod. If you are shooting at night, the prevailing darkness may make it easier for you to get a long shutter speed. In other words, the camera’s meter will see that there is not very much light available and will call for a long shutter speed to let enough light into the camera to make a proper exposure.
During the day, however, you may need to take drastic action to get a slower shutter speed. The camera’s meter will sense that there is plenty of light available, so it will call for a fast shutter speed. To use a slower shutter speed during the day, you need to change other settings or otherwise restrict the amount of light that is allowed into the camera. Here are the steps to follow:
- Set up your camera on the tripod and check your exposure. If your shutter speed is long enough, which might be the case if you are shooting at night, you are all set.
- If you need to slow down your shutter speed, you need to make offsetting changes to your ISO and Aperture. First put the ISO as low as possible. On most cameras that is ISO 100. If that does not allow you to set your shutter speed slow enough, close your aperture to its smallest setting (the highest f-stop number, which is something like f/22 on many lenses).
- If the changes above do not allow for a slow enough shutter speed, and they might not if you are shooting on a bright sunny day, you will need to take even more drastic action. That is going to mean filters, most probably a neutral density filter. These come in a variety of strengths and restrict the amount of light coming into your camera. If you don’t have one, in a pinch you can use a polarizer if you have one, which typically restricts light by 2 stops.
Next Steps
Ok, now we’ve shown you how to keep your shutter speed in a proper range when shooting, and also explained how to get some cool effects from different lengths of shutter speed. So, now that you have an understanding, what should you do next?
First, practice with it a little bit. Nothing extraordinary, just enough to get comfortable with making the changes to shutter speed (and the offsetting changes to aperture and ISO if you are shooting in Manual mode).
Then, when you are ready, move on to mastering the Aperture and depth of field of your photos.