
The sharpening process is divided into three parts. First, you will do something called input sharpening, which is where you add a little sharpening to compensate for the inherent fuzziness of RAW digital capture. Next, you will apply sharpening to key areas of your photo to make them stand out. Finally, the third step is to apply sharpening for your output device. We will cover that third step, called output sharpening, in this article.

If you decide to display a photo, you are going to do one of two things with it. You will either (a) create a digital version for the web or a pdf, or (b) you will print it. Either way, you will need to apply a certain amount of sharpening to tailor your digital photo to that output.
Why? Because either way, you are changing your picture. If you create a digital file, you are often re-sizing the picture. In doing so, the sharpness changes and you will need to account for that. If you create a print, it is an entirely different medium and you will need to account for the lack of sharpness that develops in that process. As I understand it, the inks bleed over each other slightly, so you counteract that by increasing the sharpening.
So let’s go through the process in this article. The good news is that this is simple. If you have Lightroom, it is really easy. I’ll walk you through the process using Lightroom, but then I will offer a few tips for those using Photoshop or Photoshop Elements.
Output Sharpening for the Web
First, let’s sharpen for the screen. You should create a JPEG if you are using your picture for display online or in a PDF. Create the JPEG by using the Export command (File > Export) in Lightroom. When you do so, an Export dialog box will appear, and within that box you will have an option for Output Sharpening. If you check the box, Lightroom will add sharpening based upon your final output. Here is how it will look on your screen:
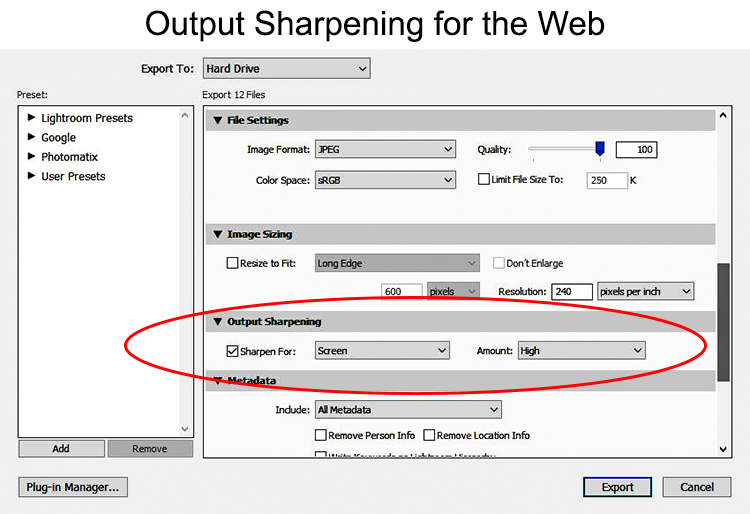
You have only two settings you need to make, both of which appear in the area circled in red above:
- You choose between Screen, Matte Paper, and Glossy Paper. Choose Screen.
- After that, you choose Low, Standard, or High. Choose High.
Now Lightroom adds a predetermined amount of sharpening to the image for final output. That’s it for Lightroom.
For Photoshop users, this process is considerably more difficult. When you create a digital file, there is no way to add sharpening as part of that process. You may just be using the Save As command, and there are no sharpening options there. I generally use the Save for Web command (even though it appears Adobe is phasing it out), and there are no sharpening options there either. To add output sharpening, you need to resize your image using the Image Size dialog box and then use Photoshop’s sharpening tools to sharpen the photo. There is no automated way to do it, and you will have to use some trial and error.
Output Sharpening for Prints
Next, let’s sharpen for a print. If you are printing within Lightroom, go to the Print module. In the print controls on the right hand side, scroll down to the Print Job category. Within that category, you will see a box for Print Sharpening. Check the box and it will give you options for output.
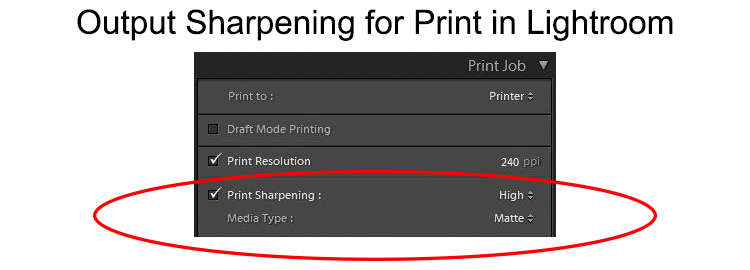
There are only two settings you need to make, both of which appear in the area circled in red above:
- Choose Matte or Glossy depending on what type of paper you are using. For any coated paper, choose Glossy.
- After that, choose Low, Standard, or High to determine the amount of sharpening to apply. Choose High.
That’s all you need to do in Lightroom. But once again the process is more difficult for Photoshop users. There is no process for adding sharpening as part of the print process. You should apply sharpening after resizing the image to the final print size. Once again, this will require a little trial and error.
Conclusion
Whenever one writes about a subject, there is always a tendency to wrap up the topic by saying something to the effect that “you really need to pay attention to this topic, because doing so can make your pictures significantly better, and you might fall into a trap if you don’t.” Perhaps just because I’m a contrarian, I try to avoid that. Here it is easy to avoid that though, since output sharpening will not significantly enhance your photos and they won’t be ruined if you don’t apply output sharpening. Rather, output sharpening is a subtle effect that will help your photos a tiny bit. But every little bit counts, right?
The process is simple if you use Lightroom. It is just a matter of making a few settings when you export to a digital file or create a print. While I love Photoshop and Elements, the process is hardly with going through in either of those programs. It is almost worth springing the $100 or so for Lightroom just to simplify this process.