
This is the first in a series of articles about specific location to photograph throughout the world. It is also a chapter from my forthcoming book on Photographing London. It is my hope that these articles become a resource of very specific information and inspiration for your travels. I hope you find it useful, and let me know what you think (either through the comments below or email).
About St. Paul’s
First, I thought it might be helpful to know a little bit about the place you are about to shoot.
The current St. Paul’s Cathedral was built following the destruction of a prior cathedral on the same spot (also called St. Paul’s Cathedral) in the great fire of 1666. Sir Christopher Wren was given the task of replacing the churches in the City of London, and this was to be his masterpiece. The result, which took until 1711 and the modern equivalent of over $250 million to complete, is the current St. Paul’s Cathedral. It has dominated the London skyline ever since, and was the tallest building in London until 1962.
St. Paul’s Cathedral has hosted countless official British functions, including the funerals of such notables as Nelson, Wellington, and Winston Churchill. The building survived the Blitz when much of the City was in ruins. In our own time, it was the spot of what was that the most widely watched wedding in the history of the world, that of Prince Charles and Lady Diana Spencer.
Through it all, it has remained a functioning church, and in fact that limits when you can visit the Cathedral.
Photographing St. Paul’s
In a sense, photographing St. Paul’s Cathedral is the worst. To begin with, you are forbidden from taking pictures in the interior of the cathedral at all. In addition, even on the outside, once you get close to St. Paul, the size of it is so massive that it is difficult to photograph.
Nevertheless, it’s still qualifies as one of my top choices for photography in London. The reasons for that are:
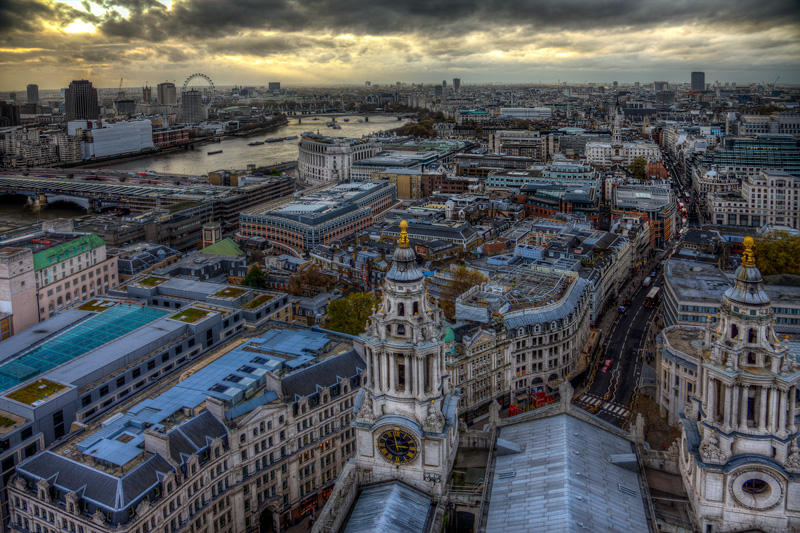
- You can get great views of London from the dome.
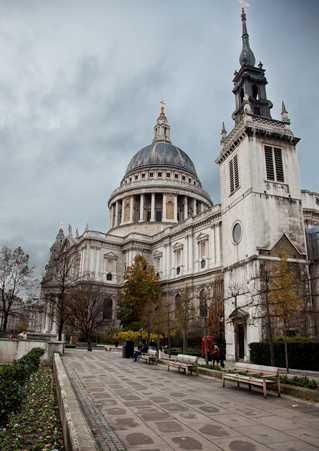
- You can get great shots of the exterior from certain spots that are not too close.
- You can’t even sneak a few shots of the interior if you are so inclined (although this is not necessarily recommended).
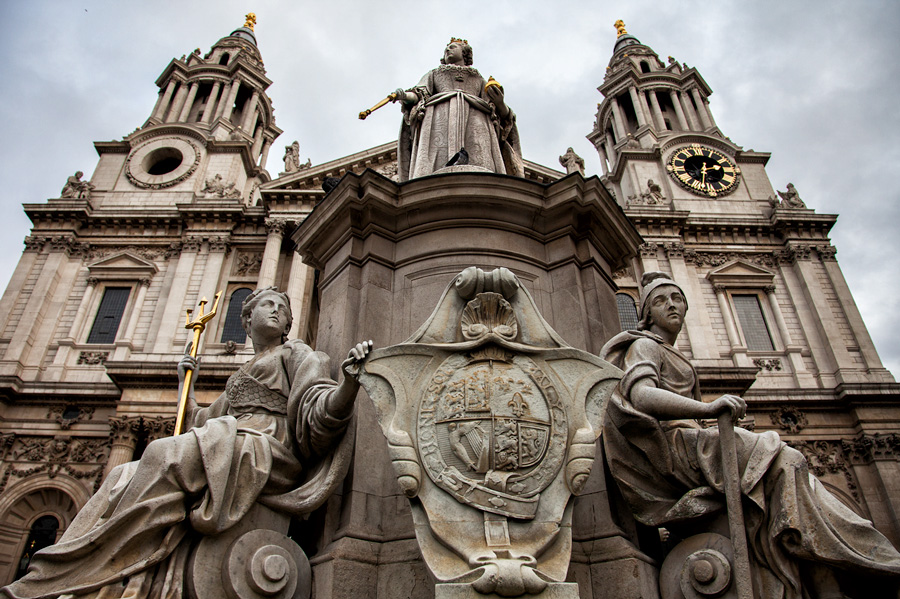
Walking straight up to the front steps of St. Paul and attempting to take a picture of the front façade is likely an exercise in futility. It is so massive it will be difficult to capture in one frame. Even if you put on a extreme wide-angle lens, portions of the façade will block out other portions, likely making your picture unsuccessful. The key to photographing the exterior is to not get too close. I have picked out a few choice spots for you and designated them on the following map:
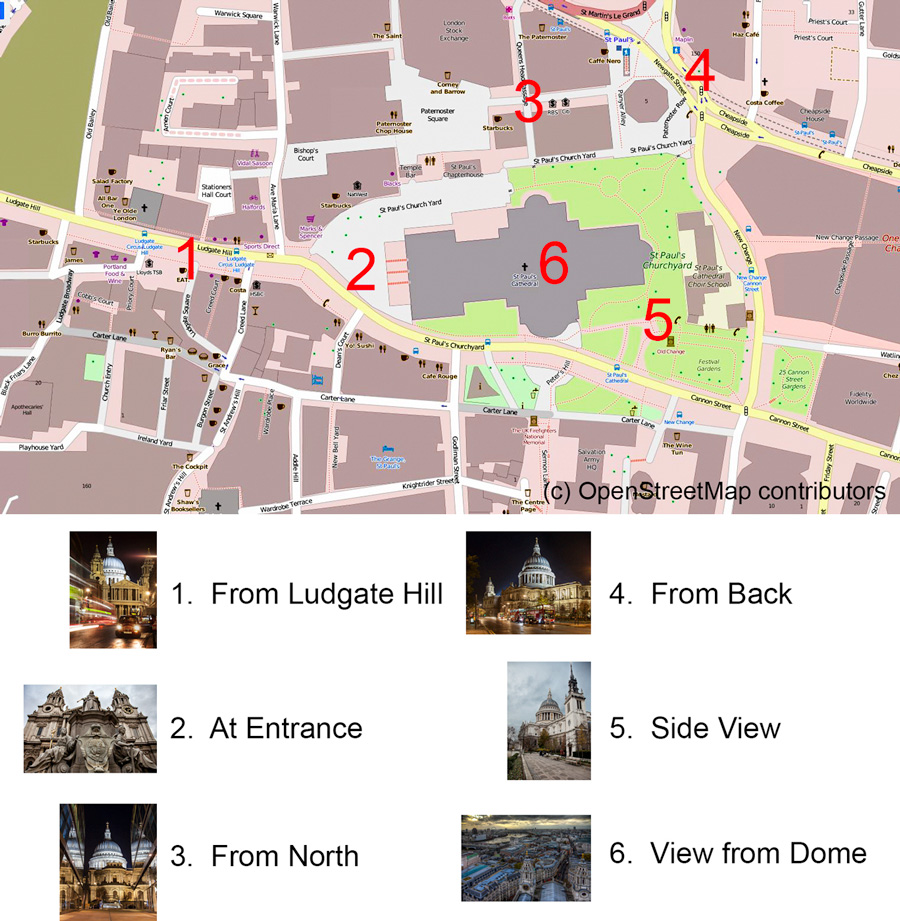
These are not the only angles to shoot from. The best way to photograph St. Paul’s Cathedral is to simply allow time to walk a complete lap around it from a healthy distance.
Visiting St. Paul’s
Because St. Paul’s Cathedral is a working church, it is closed to visitors on Sunday, when services take place. Other days it is open from 8:30 AM until 4:30 PM. It is a rather expensive ticket as well, costing £16.50 for adults to enter.
To get there, just take the Tube to the St. Paul’s stop (Central Line).
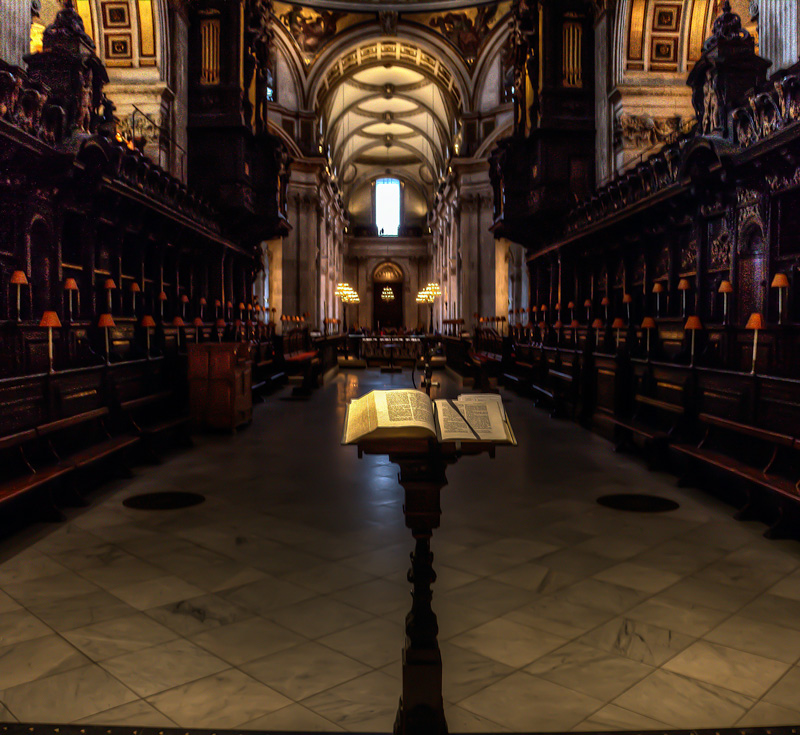
Photographing the Interior
Photographing the interior of St. Paul’s Cathedral is strictly forbidden. Nevertheless, it is common to see people snapping pictures with their phones and compact cameras. If you decide to sneak a picture or two, it will still be difficult to get a good one. To begin with, it is a very low light environment. Your ISO will need to be at least 1600, likely higher. In addition, there will be people everywhere. You will need to wait for the right moment to capture the picture without a bunch of people in it (or else put your clone stamp tool to work later in Photoshop).
Photographing from the Dome
The view from the dome of St. Paul’s Cathedral is spectacular and worth the price of admission.

First go up 249 steps to the Whispering Gallery, which runs around the interior of the dome at a height of around 100 feet. It is called the Whispering Gallery because a person all the way across the dome can hear you speaking even if you are whispering.
From there, take the staircase up another 117 steps to the first exterior viewing area, called the Stone Gallery. You can also go up another 166 steps to the Golden Gallery near the top of the dome. I recommend visiting both galleries.
Tripods are not allowed in the galleries. You will likely not need one anyway. Visiting hours are all during daylight, so you should have plenty of light. In any event, if you need additional stability, there are places to rest your camera.
Photography In Daytime Visits
Normally when you visit St. Paul’s Cathedral, you will do so during the day where you can visit the interior, climb into the dome, and take some pictures of the exterior in one fell swoop. So I will talk about what to do in this context first.
What to Bring
The good news is that you need only bring your camera and a wide angle lens to shoot St. Paul’s Cathedral. In looking at my own pictures, they are all shot at less than 50 mm. The challenge you will face, given the massive scale of St. Paul’s Cathedral, is getting everything you want within the frame. This is true whether you are outside photographing the exterior, or if you are trying to sneak a picture inside.
You will not need a tripod or any other equipment. The tripod is not allowed when you are shooting from the dome (and it is clearly not allowed inside where photography is not allowed at all). You won’t need it anyway since it will be daylight outside. If it is cloudy, just move your ISO up to about 400. The only time you might need a tripod is if you are going to try some of the techniques referenced in other articles for eliminating people from your picture.
Challenges to your photography
When shooting St. Paul’s Cathedral, you are likely to struggle with three things: (1) foreground elements, (2) dynamic range, and (3) other people. Here are some ideas for dealing with those elements.
Composition
As usual, the most important thing to consider when shooting is the composition of your picture. When you are photographing St. Paul’s Cathedral, you obviously have a predefined subject of St. Paul’s Cathedral or some part of St. Paul’s Cathedral.
Once you have ensured that you have your subject entirely within the frame, that takes care of a lot of your composition. The next item to consider is that your have an adequate center of interest. After that, make sure your photo is balanced. A good way to add balance at St. Paul’s Cathedral is through the use of symmetry, since the Cathedral largely lends itself to being shot in this manner.
The only additional element to worry about is the foreground. As with many other pictures, the foreground is what will differentiate a nice picture from a snapshot. As you are lining up the shot, look for anything that might constitute a good foreground. I typically looks for patterns on the ground, or else for some way to incorporate traffic or a statue. The important thing is not to use any particular item in your foreground – only that you think about it as an important element of your picture.
Dynamic range
Another constant struggle when photographing outdoors is having a sky that is overwhelmingly bright. This results in a “blown out” sky that is pure white in your picture. Fortunately for us, this might not be as much of a problem here because London is frequently cloudy. But it is still almost always the case that the sky is brighter than the buildings it surrounds.
To address this, you will likely need to set your exposure by aiming at the sky and then brighten up the Cathedral later. You can also try to opposite and set your exposure by aiming at the Cathedral and then hoping you can tone down the sky later.
A final technique is to bracket your exposures, where you take 3 pictures (one at normal exposure, one underexposed, and one overexposed) and then blend them later. Most cameras have a setting in the menu that will allow you to set up the bracket so you can snap off 3 photos without changing anything.
For additional information on dealing with high-contrast scenes, check out this article I did for Digital Photography School on that subject.
Removing People
St. Paul’s Cathedral is obviously a very popular tourist attraction. It is also in the heart of the City of London. Therefore, having other people in your picture is almost inevitable. But, of course, your picture is of St. Paul’s Cathedral and not random tourists, so you may want to try to eliminate them.
You can always be patient and wait for a time when there are not many people in your picture before taking it. And you can always work in Photoshop later to try to eliminate people. A couple of other techniques you might try both involve a tripod:
- You can place a neutral density filter on your camera to restrict the amount of light coming in. Then you can set an extremely long shutter speed so that hopefully the people are moving enough that they exit your frame.
- You can put your camera on the tripod and take a series of photos from the exact same spot. Later in Photoshop you can run a script called “Statistics,” which is an automated process whereby Photoshop will attempt to determine which elements of the picture are unwanted people and remove them.
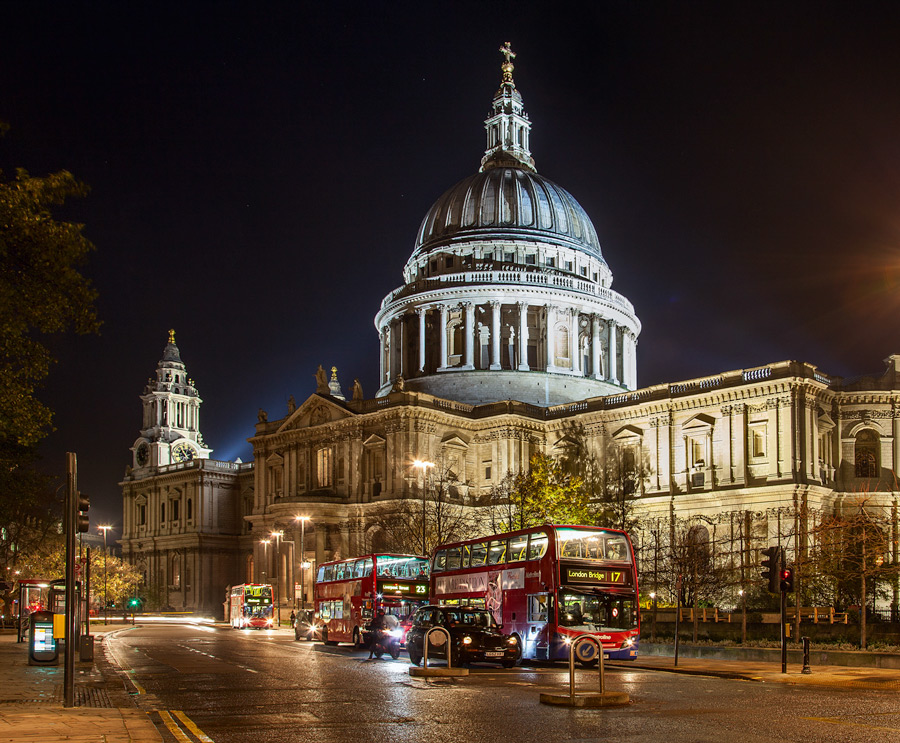
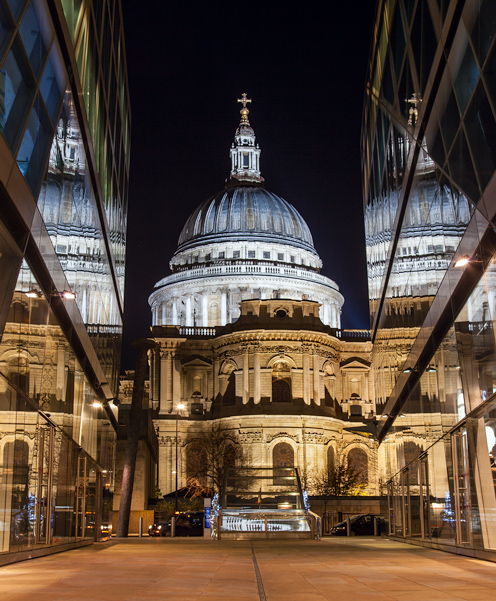
Photographing St. Paul’s Cathedral at Night
St. Paul’s Cathedral is always lit at night and is visible from quite a distance away. Along with its iconic status, this makes it one of my favorite places for night photography in London. If you are new to night photography, check out this article to get up to speed.
As with all night photography, a good tripod is essential for shooting St. Paul’s Cathedral at night. You might also use a remote shutter release to ensure you are not creating movement in the camera by pressing the shutter button.
There are several good locations on all sides of St. Paul for photographing it at night. The map set forth previously shows location of four of my favorite shots taken at night. You can use those, but I think the best way to approach it is to simply arrive at St. Paul’s Cathedral and walk entirely around it.
As you are composing your shots, consider incorporating traffic and other lighting into the picture. This can add great foreground and other elements to add interest to the picture.
This is a new concept for Outdoor Photo Academy, so please let me know what you think about it. If there are additional items your would like to see included in future location-specific articles, let me know that as well. And I hope you’ll check out my book Photographing London when it comes out (ETA Spring 2015).
Jim, love the image of St Pauls, you have captured the feeling of Cheapside very well, I was down there last week and boy you hit the nail bang on the head. Well done mate. We have a lot of exhibitions concerning the plague of 1665-6 this year being 350 years since we got hit with the plague and then the great fire. It makes grim reading and must have been a nightmare to live within the city walls at that time. Steve
I’m not sure why I am just seeing this now, but thanks for the kind words, and you got a really nice picture. I will bet it was grim back then. As I understand it, the Great Fire is what actually ended the plague outbreak, which, if true, is at least one good think that came out of it. Plus some nice Wren architecture.