
Everyone struggles with taking sharp pictures. It is universal in photography. Many beginners are trying to just avoid blurry pictures. But as people progress with photography, while blurry pictures are typically no longer a problem, the quest for sharper pictures continues.
Most people blame unsharp pictures on their equipment. But that fact is that most problems with sharpness do not come from a problem with your camera or lenses, and is not because you need to learn a new Photoshop technique. Rather, it is simple improper technique practiced while taking the picture. But if you incorporate the steps below into your photography and you will see noticeable improvement in your pictures immediately.
Why Your Photos Might Be Soft
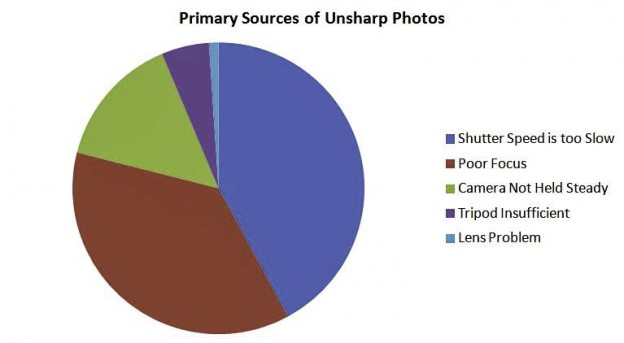
The number one cause of unsharp pictures in this world is not being able to hold the camera steady enough while you’re taking the picture.
Notice there are two elements in that statement: (1) steadiness of the camera, and (2) time to take the picture. That means you can attack this problem in one of two ways. You can shorten the amount of time the camera is taking to expose the photograph (in other words, increase the shutter speed) or you can hold the camera steadier during that time.
In the first few steps, I am going to tell you how to do both. After that, we’ll look at some other possible causes of unsharp pictures that might be the culprit.
1. Use Fast shutter speeds
First, make sure you are using a fast enough shutter speed. Shutter speed settings on most cameras go from about 30 seconds to about 1/8000th of a second. You want to be more toward the 1/8000 end of things. Honestly, having your shutter speed too slow is the most common reason I have seen for unsharp pictures. If you aren’t familiar with shutter speed yet, check out the posts on exposure and shutter speed.
If your shutter is opening and closing fast enough, you almost don’t have to worry about keeping the camera steady. With a fast enough shutter speed, you can actually be waving the camera around as you take the picture and it will still be sharp. (You shouldn’t do this; I’m just making a point). I’m talking something like 1/500 of a second on the low side. The point is that if your camera is only taking 1/2000th of a second to take the picture, then your movement becomes almost irrelevant.
But a slower shutter speed means care has to be taken to ensure that the camera is held steady during the time the shutter is open. The reason for that is that, assuming you are handholding the camera, your hands will be a little bit unsteady. This is true for all people, no matter who you are. There are always slight movements. This is referred to by photographers as “camera shake.”
You cannot eliminate camera shake, but you can ensure you have a fast enough shutter speed so that it won’t matter. It gets worse the more you are zoomed in, so that has to be taken into account. Here are some simple guidelines for making sure you are using a fast enough shutter speed to avoid the dreaded camera shake:
- for Wide-Angle shots, make sure your shutter speed is at least 1/60th a second;
- for Medium-Range shots make sure your shutter speed is at least 1/100 of a second;
- for Telephoto shots make sure your shutter speed at least 1/200th of a second.
This is a simplification of a rule known as the “reciprocal rule” in photography, which I’ll address in the future. But for now, just use these settings as a minimum and you can be reasonably sure your shutter speed is fast enough.
I should note that a fast shutter speed also avoids blur in a different way. Having your subject move during the time the camera is exposing the picture will also create some blur. Assuming you do not want that, making sure you are using a fast shutter speed will keep them from being blurred.
2. Steady yourself
Rather than focusing on decreasing shutter speed, you can also focus on keeping the camera steadier during the time the shutter is open.

If you are hand-holding the camera, the trick is to keep yourself as steady as possible. Start by holding the camera correctly. It actually does matter. The first thing to do is keep your elbows tucked in to your chest as you are taking pictures. That way, your body is supporting your arms, which are supporting the camera. It makes things more stable. Also, hold the camera with your right hand on the side of the camera operating the controls, and keep your left hand underneath the camera and lens providing support.
In addition, try to stabilize yourself or the camera in some fashion. If there is a fence or some sort of a ledge that you can rest your camera on while you take the picture, do it. If there is a nearby wall or something sturdy that you can lean against, use it to keep yourself from swaying. These will add additional stability and take some of the “shake” out of your pictures.
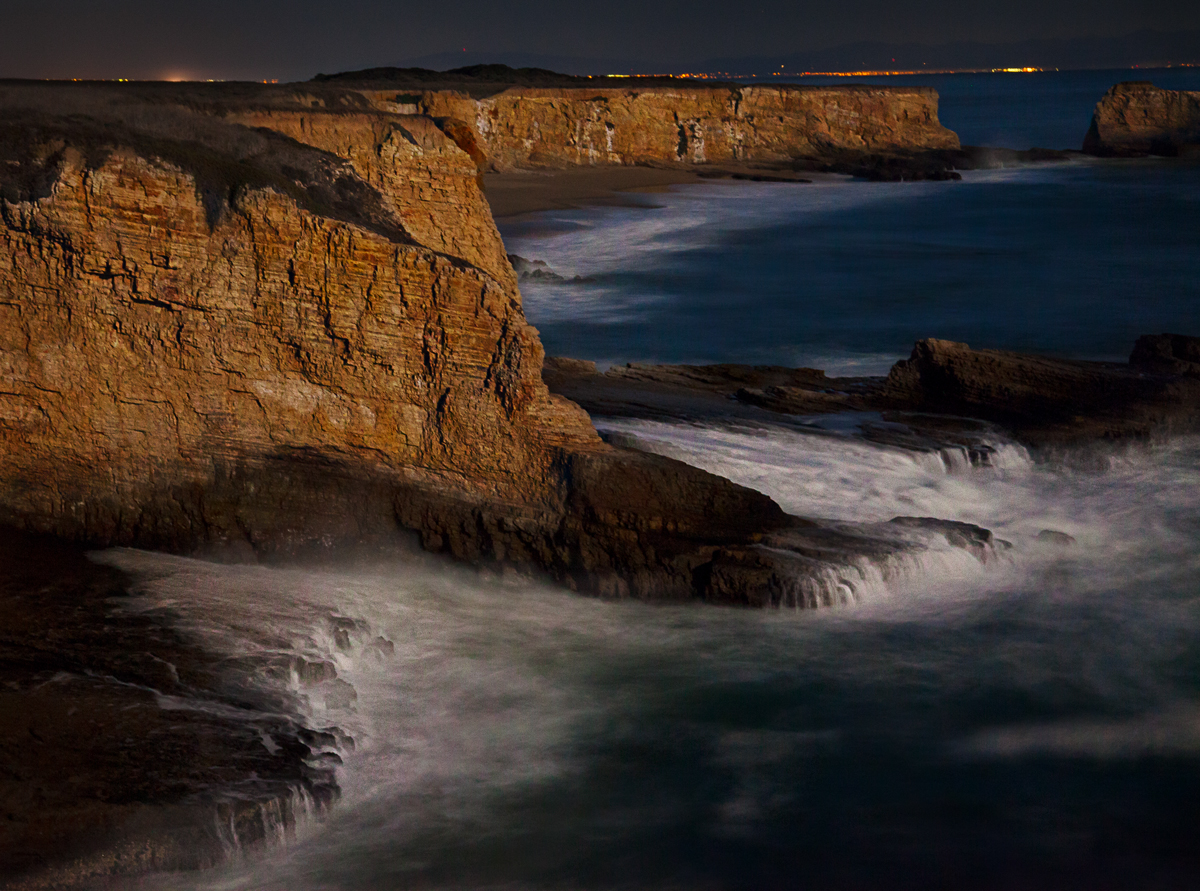
The other way to deal with this issue is to take the camera out of your hands entirely and put it on something stable. Like a tripod. If your tripod is stable enough, you can have a shutter speed as slow as you want. You can actually have the shutter open for several minutes and the picture will still be sharp.
If your problem is not shutter speed or steadiness of the camera, then the next most likely culprit is improper focus. So let’s talk about that next.
3. Nail the Focus
Focusing a modern camera is pretty easy so we won’t dwell on it too much. You are probably using Auto Focus, and that is a good thing. Auto Focus has made focusing cameras simple enough that anybody can do it. Just keep your Auto Focus on and let the camera do that work for you.
But the camera is not a mind-reader. You need to tell the camera exactly what to focus on. Sometimes the camera will easily pick out your subject. But sometimes it won’t.
For those times that the camera is not focusing on the right thing, try this:
-
Center: Regardless of how your want your ultimate picture composed, first center the camera exactly on what you want the camera to focus on. Having your subject in the center of the frame will make it more likely that your camera chooses to focus on that thing.
-
Focus: Once your subject is centered in the frame, press the shutter button half-way down. When you do so, the camera should focus on your subject, and often will light up momentarily on your screen where it is focusing and give a little beep to let you know it has focused on something and is ready to take the picture. If you are happy with where the camera focused, just move on to the next step. If not, keep moving the camera around a bit and pressing the button half-way. It will get there.
-
Readjust: Once the camera does focus on the right subject, keep the button pressed half-way down while adjusting the camera to your exact composition. Keeping the button pressed half-way will keep your camera from re-focusing on something else.
-
Shoot: When your picture is framed exactly the way you want it, press the shutter button all the way down to take your picture.
That’s it. That should result in you nailing the focus every time. Well, we all make mistakes, so most of the time.
One more important tip when it comes to focus: If you are photographing a person, always, always, always focus on the eyes.
4. Use the “Sweet Spot” of Your Lens
If shutter speed or focus is not your problem, it might be your lens. But before you rush out and buy a new lens, make sure you are using the one you have at its sharpest settings.
 Many advanced photographers will actually test their lens by taking a photo of the exact same subject matter over and over at different aperture settings. (If you are not yet familiar with the aperture, read this article on exposure that addresses it, and this article on aperture and depth of field). These photographers will then compare the results by zooming way in on the photo and see which one is the sharpest. After that, they will try to keep their pictures at the sharpest aperture settings for that lens.
Don’t worry, we are not going to do any tests. Actually, you can test your own lenses if you are so inclined, but if you don’t want to mess around with that, you can rely on the work of those that have come before you.
Since many, many lenses have been tested in the fashion mentioned above, it has become clear that the “sweet spot” for most lenses is in the middle of the aperture range, usually a little toward the open side. For most lenses that is an aperture setting of around f/5.6 – f/8. So, all other things being equal, trying to keep your aperture setting at around f/8.
That setting of f/8 as your default aperture has another benefit as well. It will also keep you from having too shallow of a depth of field.
These techniques will keep unwanted blur out of your pictures. But the process of digital photography adds a little blur to the picture that we will want to address as well. We will do that through very, very simple editing of the picture in your photo editing software.
5. Add Some Minor Post-Processing
After you have taken your picture, you can use software to sharpen your photos a bit. If you are shooting in Raw, this is pretty well mandatory. All photo software will have this functionality, and I will explain it for Lightroom and Photoshop users here. Keep in mind that post-processing won’t fix a bad picture. It will just give a tiny boost to an otherwise good picture you got using the techniques above.

My assumption in this post though is that you are completely unfamiliar with post-processing software, but don’t worry because this is super-simple. There are just 2 very short and easy steps. The method is the same whether you are in Lightroom or Photoshop, so just open up whichever one you use and load your picture. Make whatever changes you were going to make, and then when it come to sharpness, here’s what you do:
Move the Sharpness “Amount” slider to the right: There is a “sharpness” slider in the “develop” module of Lightroom and in the Adobe Camera Raw screen in Photoshop. All we are going to do is adjust that slider to the right. How much to the right? Try moving it up to about 60. Leave the other settings alone. You can use 60 as something of a default setting, but obviously adjust up or down as best fits your picture.
Move the Clarity slider to the right: Another move that will probably yield better results than the Sharpness control is the “Clarity” slider. Try moving it up (that is, to the right) to about 20. You should notice a nice improvement. You can adjust it up or down as best suits your picture.
Conclusion
Use the moves addressed here as a sort of checklist when you are shooting. With a fast shutter speed, using good shooting techniques to stabilize the camera, shooting at a good aperture for your lens, while focusing on exactly what you want, you can be assured you are doing everything possible to get sharp pictures. You can add the post-processing to give a little extra sharpness. The result should be solid pictures.
I am currently playing with the free software that came with my Canon, Digital Photography Professional v4. It has a Sharpness and an Unsharp Mask selection with sliders for Strength and Fineness. I assume these are the same as Sharpness and Clarity in LR or PS. My question is, what is the difference between Sharpness and Unsharp Mask? I also have PS Elements, and it has an Unsharp Mask function. I can’t seem to wrap my brain around it.
Great question. Don’t worry about the confusing name “unsharp mask” (it is a holdover from the film days). Just think of it as straight-up sharpening.
I’m not sure where you are seeing those sliders. The current Lightroom sharpness sliders are Amount, Radius, Detail, and Masking. The current Photoshop and Elements sliders for Unsharp Mask are Amount, Radius, and Threshold.
For any of them, the main one to start with is the Amount slider, which is sort of like strength. You should probably just change that one to start with. After a while, you can adjust which pixels are affected by the sharpening with the other two sliders. When you do, the increasing the radius slider will strength the effect even more by increasing the width of the effect; while increasing the threshold slider will reduce the effect by controlling which pixels are sharpened. Again, just worry about the Amount slider for now. I will write an article about this very shortly to answer this question further and explain everything.