


What is Bracketing?
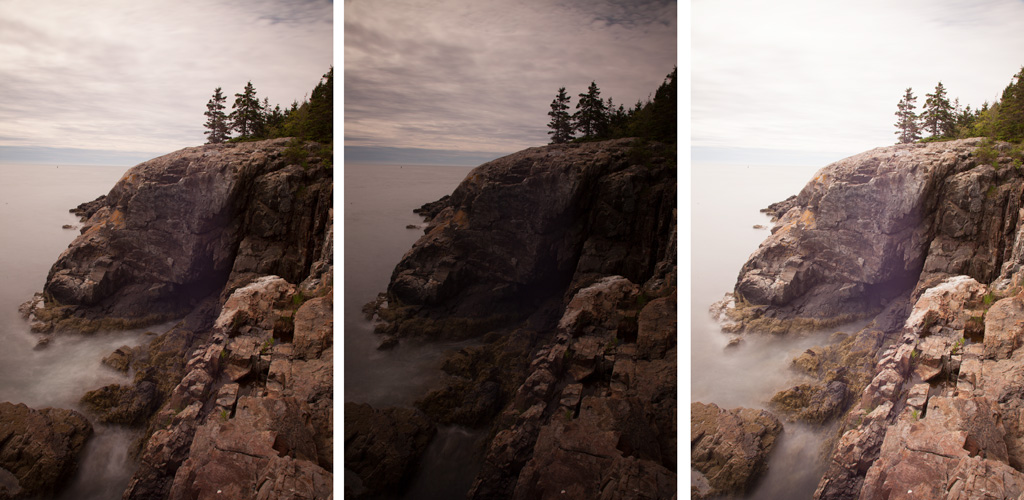
One of the ways to protect against a potential exposure problem or a dynamic range problem is by bracketing your photos. This is a photography technique where, instead of taking 1 picture, you take 3 or even 5 pictures of the exact same thing at different exposure levels.
You start by taking one picture at normal exposure. You then take the second photo and purposefully underexpose it. You then take a third photo and purposefully overexpose it. If your camera allows you to bracket with 5 photos, then you can add photos that are even more underexposed and overexposed. The technique is called bracketing because your underexposed and overexposed photos act as a bracket on your normally exposed photo.
Why Would You Bracket?
There are two primary reasons for bracketing your photos:
First, bracketing can serve as a safety net against any exposure problem. If you (or your camera, in auto mode) get the exposure wrong, one of your bracketed photos can save you. In addition, sometimes you will find you actually like the version that is underexposed or overexposed better.
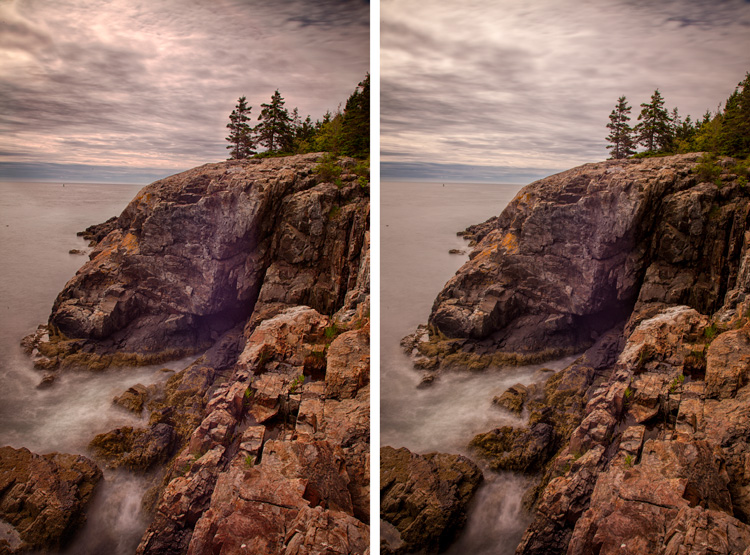
The second reason to bracket your photos – and really the reason most people do it – is to blend the photos in some manner later. For example, you might load the files as layers in Photoshop and blend them together, taking the best parts of each. You might start with the normal exposure as your base layer, then blend in portions of the foreground from the overexposed shot (since the foreground is usually the darkest portion of the picture). After that, you might blend in portions of the sky from the underexposed shot (since the sky is usually the brightest portion of your photo) to keep from having a blown out sky.
In addition, you might use HDR software to blend the exposures. In fact, you will need to bracket your photos if you plan on using HDR software. This software – such as Nik’s HDR Efex Pro or HDR Soft’s Photomatix Pro – will blend the exposure to keep everything within the dynamic range of the picture.
How Do You Do It?
Bracketing your photos could not be simpler. There is a manual way to do it, and an automatic way. Most cameras have the automatic way and it should be used whenever possible.
Automatic Bracketing (AEB)
To set your camera to automatically bracket your photos, go into the menu and find the bracketing function. In some cameras this is called AEB, which stands for Auto Exposure Bracketing. Enable this function. You should then see an exposure scale on your camera’s LCD. Turn the camera dials to separate the exposures. Some cameras will allow you to bracket 5 different exposures. I recommend that you use the number of bracketed photos your camera allows.
Most cameras will allow you to set the exposures up to two stops apart. Set them at least one stop apart. In scenes of high contrast I typically set them closer to two stops apart.
You do not technically need a tripod to bracket your photos, but it helps. The tripod will keep the pictures lined up exactly the same way (as long as you do not jostle it too much). If you do not have a tripod handy, you can still take the exposures by holding the camera as steady as possible. If you are blending the photos later in Photoshop, align the photos (select the top two layers and go to Edit : Auto-Align Layers). If you are using HDR software, the software should align the photos automatically.
Manual Bracketing
If your camera does not have automatic exposure bracketing, you will need to bracket the photos manually. This will require a tripod to keep the different pictures you take matched up. Set up your photo and then take your normally-exposed picture. After having done so, increase your shutter speed by at least one stop to underexpose the second picture. The faster shutter speed means that less light is let into the camera, so the picture will be underexposed. Take the second photo. After you have taken that photo, increase your shutter shutter speed by at least 2 stops overall (increase it back to your original exposure, and then add at least one stop from there).
The one benefit of manually bracketing your photos is that you have complete control over the process. You can take as many exposures as you like, and you can make them as overexposed or as underexposed as you like.
Bracketing in Modern Photography
Bracketing has been one of the blessings of digital photography. Bracketing really wasn’t available in the film days. You could brackets your photos with film cameras, but it was expensive and not nearly as useful (there was no Photoshop and consequently no blending). Digital exposures are free, so you might as well take advantage of it. Even if you do not think you will ever blend your photos, you never know – you might decide to start doing that in 5 years.
Interestingly enough, bracketing is starting to become less necessary. The dynamic range of digital cameras seems to be increasing. In addition, the tools we have now to bring back blown highlights and black shadows (within reason) are getting better and better. If this trend continues, then bracketing might become less common.
But for now, bracketing is a great tool for the photographer. It gives you insurance that your exposure will be ok, and it allows later blending to deal with any dynamic range issues. It is free, so you might was well use it.