


Do you find yourself thinking something like this:
“I’m doing everything right in the field, but my pictures just aren’t as sharp as I want. When I look around at others’ pictures, they are way sharper than mine. What am I doing wrong?”
If so, you are not alone. I have thought that plenty of times. I hear from a lot of others who have as well. In fact, it is a pretty common complaint. Today I’m going to try to help you understand what is going on and how to fix it.
But First, Let’s Make Sure You Are Doing Everything Right . . .
Before I get into how we’re going to fix it, we need to check something. We need to make sure you are really doing everything right in the field. By far, the most common problems with image sharpness have to do with shutter speed, focus, and depth of field. Check out this article on sharpness if you are not 100% sure. In addition, for more on the impact of shutter speed on sharpness, check out this article and this example.
What You Get From Your Camera
Ok, if you are sure you have done these things and we are starting with a good image, let’s get into the difference between your image and what you see others doing. Here is the short answer: most of the time, the difference is post processing.
We often have unrealistic expectations as to what our cameras can produce. No matter what camera and lens combination you use, pictures just don’t come out of the camera super sharp. They need help. If you think others are getting super sharp shots straight out of the camera, well . . . they just aren’t. Many times those creating super sharp images are a little coy about the amount of processing that goes into creating these images. It fools people into thinking that others are somehow consistently getting super sharp files straight out of the camera.
You are most likely already aware that the best image files that your camera can produce are RAW files. Does that mean RAW files are the sharpest? Hardly. In fact, there is inherent softness in RAW files as compared to JPEGs. At least that is the case when they come out of your camera. Don’t get me wrong: RAW files are still the best. But the idea of taking RAW files is that you will be editing these files later, and you will be adding your own sharpness.
Adding Sharpness
How do you go about adding sharpness to your images? Most people break it down into three steps. The first is called input sharpening. That is where you apply a base level of sharpness to the entire image. This is where you counteract the softness of the RAW file, and it is usually a pretty mild change. The second step is called creative sharpening. This is where you sharpen discrete portions of the image to draw the viewer’s eye where you want it. You’ll see the most dramatic changes in this step since it is actually designed to change the image. The third and final step is output sharpening. This is where you tailor the sharpening to the final display of the image. For example, you will sharpen differently for a digital image than a print.
This is all very important – and as you can see from the links I have devoted some time to writing about all this previously – but it doesn’t get to the crux of the issue for us. The question is “how do we make our images super sharp?” Again, the answer is post processing. But how? Do you just crank up the sharpening slider? No. There is more to it, and we’ll get into that now.
A Step-By-Step Example of What Can Be Done
To make this clear, I’m going to walk you though some basic “sharpening” steps and show you the effect on the images. The first thing you will notice is that a lot of this isn’t “sharpening” at all. At least it isn’t called sharpening by Lightroom or Photoshop. In that regard, it is important to understand what sharpening is. It is just a contrast adjustment. It is where the software finds edges and increases contrast along those edges. With that in mind, let’s walk through an image.
We’ll start with this image I recently took of downtown Dallas, Texas. I’m using it because it looks pretty good right out of the camera. Here it is with no contrast, sharpening, or other such changes made to it:
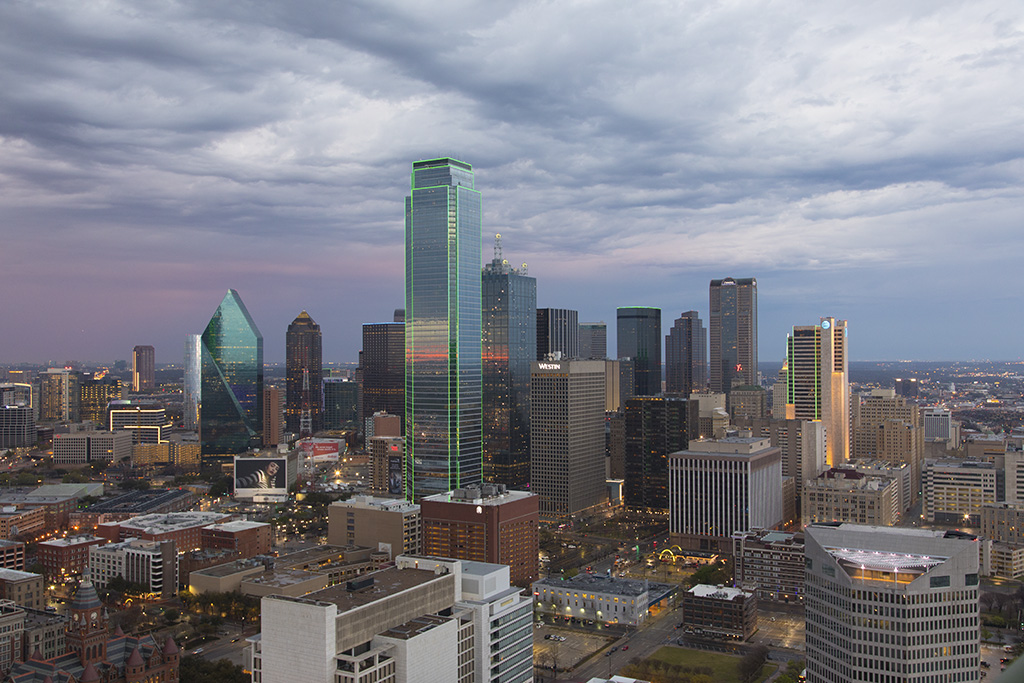
In fact, all I have done to this image is adjust the white balance and increase the vibrance a bit. The image looks ok in terms of sharpness, but we’ll take a closer look in a second.
Now we are going to walk through some common changes and watch the impact. First, let’s make very basic changes in Lightroom. On almost every image I touch, I increase the Clarity, Sharpness, and Dehaze. I will do that here and here is the result:
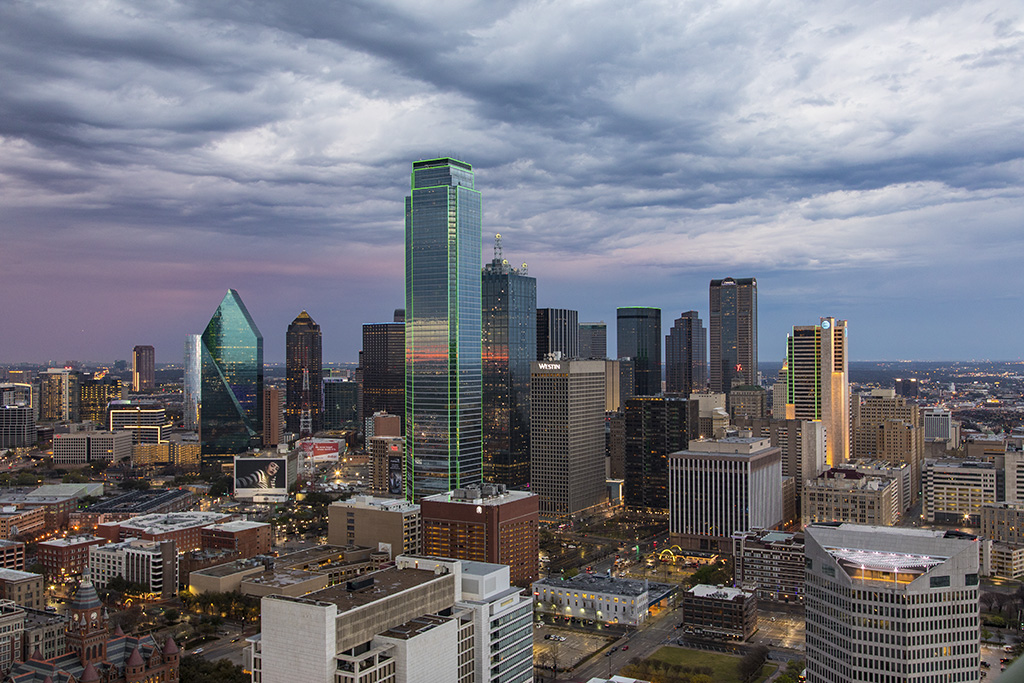
The specific amounts of each are Clarity +35, Sharpness amount +58, and Dehaze amount +20. I also decided to add +10 to Contrast (remember sharpness is all about contrast). In that regard, I also pulled the Blacks down a touch (-10) and increased the Shadows (+35). No magic to that, I just think it looks better.
You can probably already see a difference, but let’s take a closer look. Here are 100% zooms of each of the two versions:
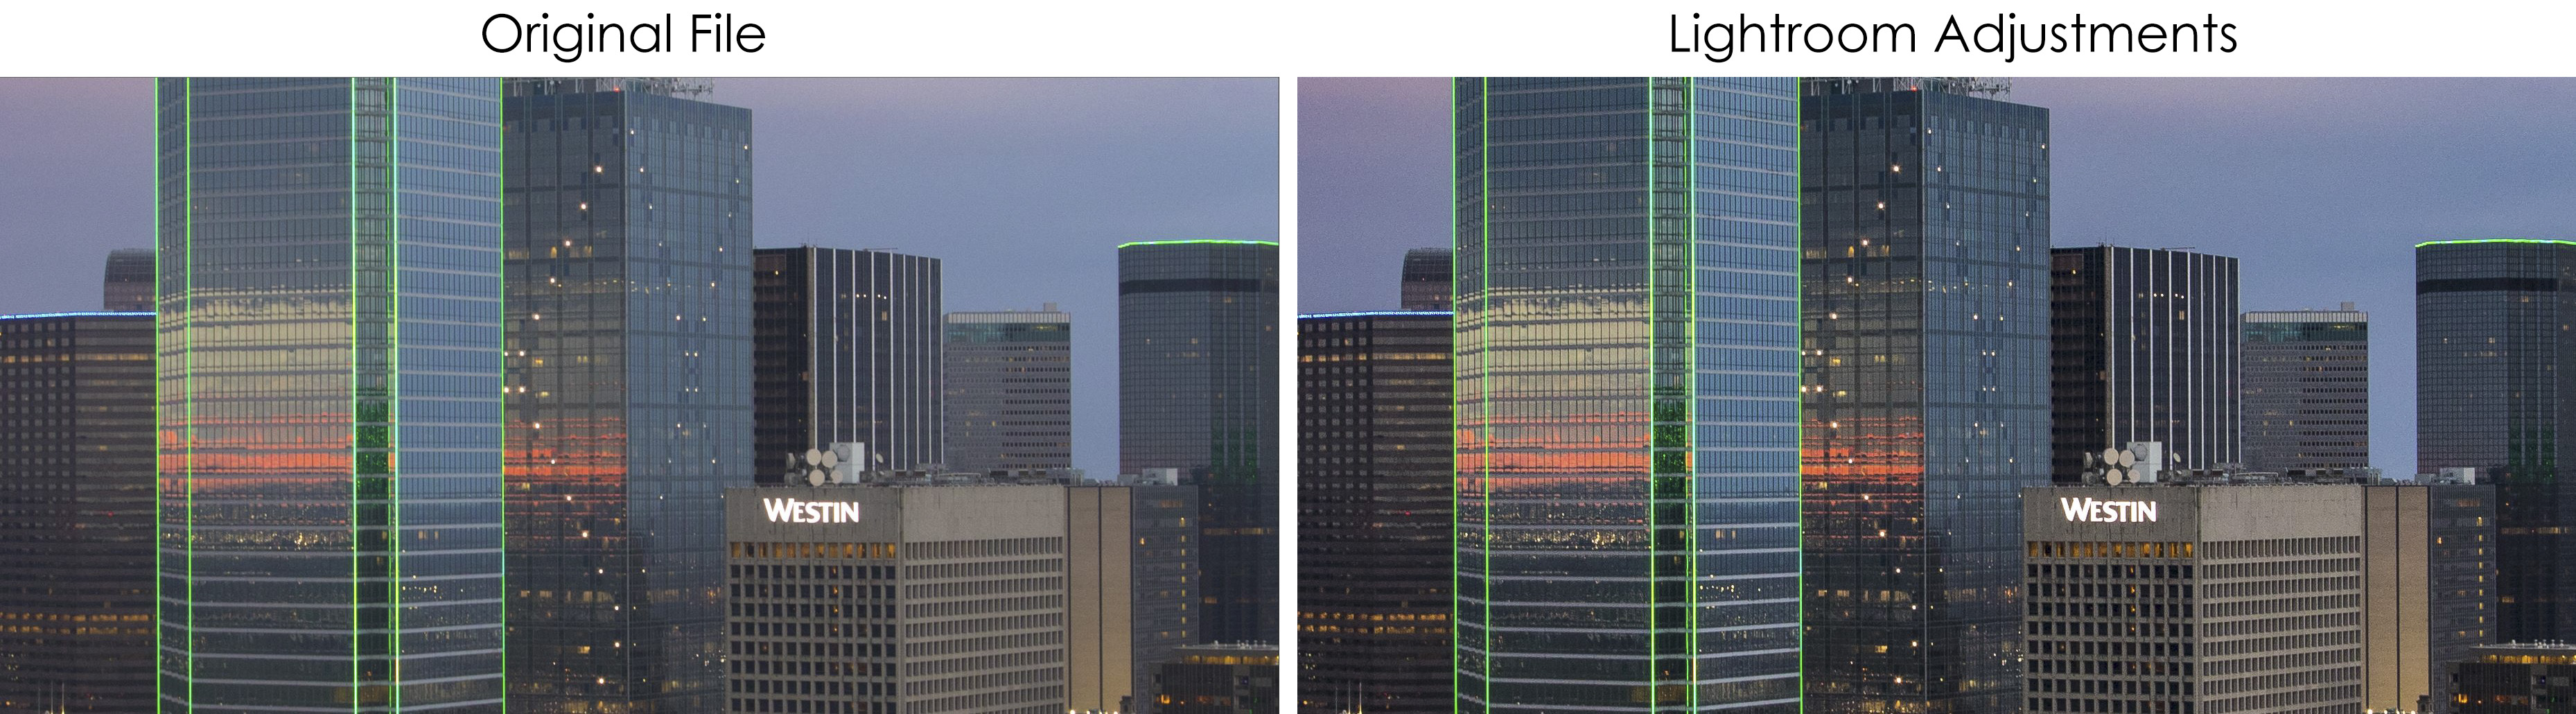
That’s a pretty clear difference, and it look maybe 10 seconds. But we are just getting started here. Now let’s take our picture into Photoshop and do a few things.
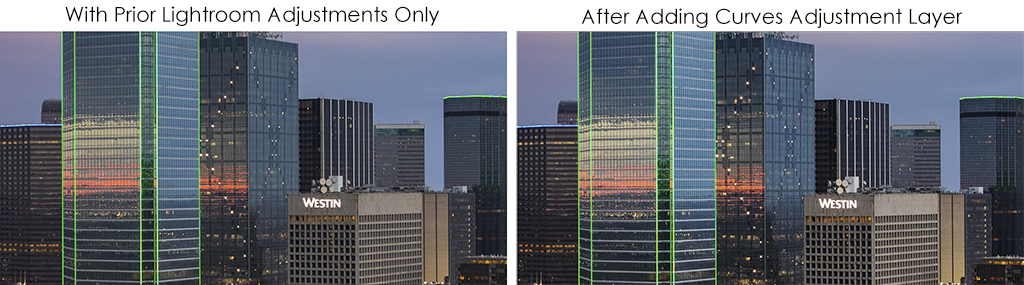
Remembering that sharpness is all about increasing contrast (you will get sick of hearing me say that, if you aren’t already), let’s increase contrast in our buildings. There is no better tool for doing that than Curves Adjustment Layers. If I was serious about doing something with this picture, I would probably do separate Curves Adjustment Layers for different buildings. For this example, however, I’m just going to create one layer for the core buildings in the center of the frame. In other words, I’m just selecting the central buildings so that my changes apply only to this portion of the picture. The curve I am going to add looks like this:
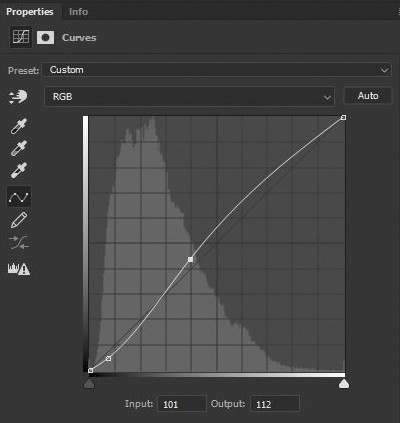
If you aren’t familiar with curves, just understand that the important thing when it comes to contrast is to steepen the slope of the curve where there are the most pixels. Therefore, you can see that what I did was pull the curve down just to the left of the big cluster of pixels. Then I pulled curve up just to the right of those pixels. That’s what those two dots on the screen represent – they show you where I pulled the line up or down. My changes steepen the slope of the curve where there are the most pixels in the image. This is often called an “S-Curve” because of the shape it creates. (If you are unfamiliar with curves, I have articles about using them here and here as well as this video). In any case, our picture now looks like this:

But let’s take a look at it close up. Let’s compare is to the version with our Lightroom adjustments, again with a 100% zoom, and when we do so, we get this:
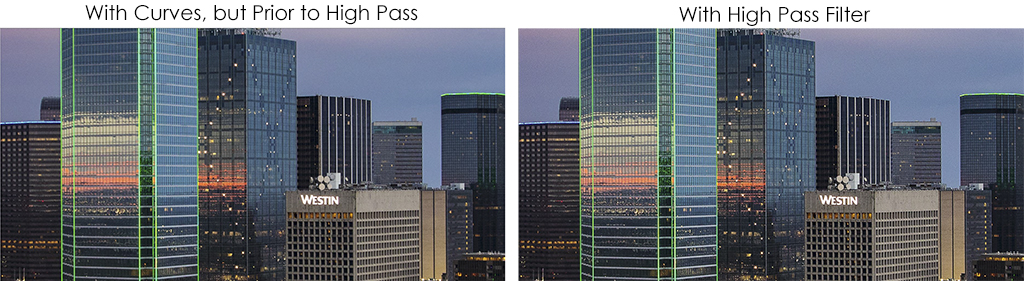
Now the picture is even clearer and sharper. Let’s move on and do one more thing in Photoshop. I’m going to add a High Pass Filter. If you aren’t familiar with that, think of it as Photoshop’s version of clarity. To use it, you first create a new layer (Ctrl+J) and then change the blend mode of that layer to Overlay. After that, select the High Pass Filter (Filter > Other > High Pass) and just set an amount. In this case, I kept the amount very low. Here it is set at only 1.9:

It is a fairly subtle change, but our picture is looking pretty sharp now. The High Pass filter adds a little more detail. Let’s take a look at the zoomed in versions. Here is the new version compared to the last edit we did:
That’s all I’m going to do here. Keep in mind I really haven’t even broken out the heavy artillery. When I want to create maximum sharpness, I use Topaz Clarity. Sometimes I also like the tonal contrast filter on Nik’s Color Efex Pro. And we haven’t even used the Unsharp Mask filter in Photoshop. In short, there is a lot more that could be done here. But I think we’ve made enough of a point here, and this article is getting long enough.
As our final step, I’m going to reduce the noise. That will actually decrease sharpness a tiny bit, but it will improve overall picture quality. And with that, let’s compare the original and the final version. First, here they are at full size:
And here are the 100% detail versions:
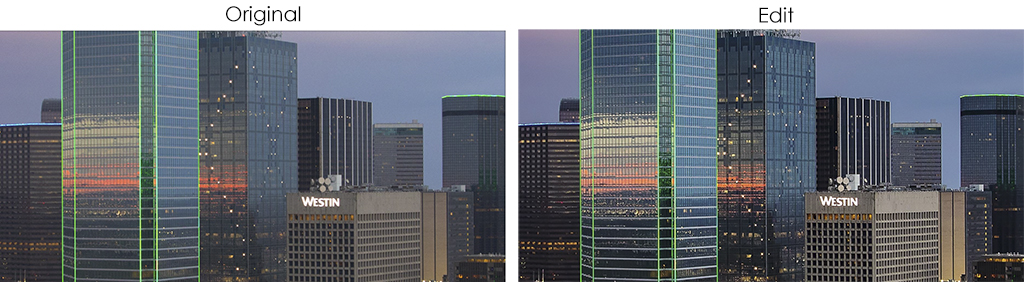
Big difference? I think so. In fact, I’d say it is more of an increase in sharpness than any equipment upgrade could get you. Is this all we could do to increase sharpness? Not by a long shot. I’m trying to keep it simple here, as well as keep it from getting overdone. Remember again that this is not all that could be done. There are other tools I haven’t even touched.
If you think it is overdone, that is fine too. You can simply use these tools to a lesser extent in your own pictures.
The idea here isn’t so much to show you how to sharpen your images. Rather, I just want to show you that your images need a little help when they come out of the camera. If you are looking at your pictures and are unhappy with how they look, it might just be that you need to add a little processing to them. It isn’t artificial or cheating or anything like that. It is just how things are done.